
If you’ve found yourself here, you’re probably thinking about learning Grasshopper or have already started your journey. But with tons of work, hobbies, and family duties, your time is limited ⏳, so it’s essential to get the most educational value out of the time you have. Learning from others’ mistakes is one of the most efficient ways to learn. Below is a list of 7 mistakes I made while learning Grasshopper. Avoid them to save hours of frustration!
Table of Contents
1. I Didn't Know What the Computational Thinking Process Was 🤔
Six years ago, when I started learning Parametric Design, I jumped straight into creating algorithms for my design problems in Grasshopper. After a while, I realized I was doing things backwards.
Don’t do it in this order! ❌
Do the opposite:
First, understand how computers solve problems, and then start creating algorithms in Grasshopper.
Start with Computational Thinking 🧠
Computers are designed to help us solve problems, but first, we need to understand the problem itself. Computational thinking is the step that comes before programming, helping us break down a complex problem, figure out how it can be solved, and develop possible solutions.
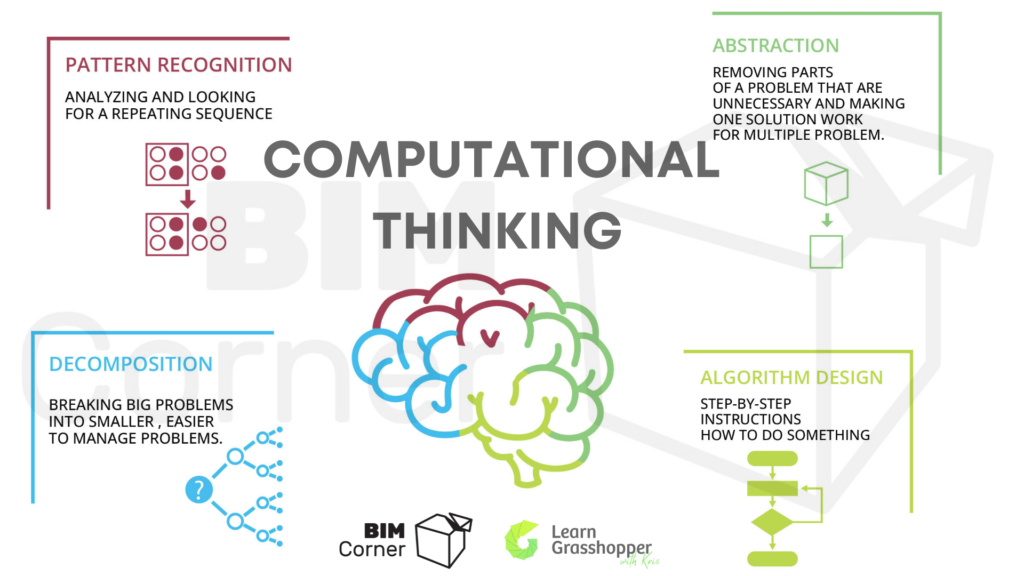
The essence of computational thinking is to simplify and structure the problem in a way that both humans and computers can understand. Once you master this, you’ll be much better equipped to use Grasshopper effectively!
2. Learning Grasshopper Without Knowing the New Terminology 📖
Stepping into the world of parametric design means diving into a whole new set of terminology. When I was a beginner, I ignored this step and just watched tutorials without bothering to understand the jargon 😞.
After countless tutorials and repeating terms hundreds of times, I finally got it. But if you’re trying to learn a new concept of modeling and scripting, and don’t understand what your instructor is saying, it’s going to take much longer to learn.
Especially when learning parametric design from scratch!
Along with terms specific to Grasshopper like canvas, primitives, and relay, you’ll also need to learn Rhino and programming terms such as Brep, NURBS, polysurfaces, boolean, cull, and indices.
I know, that’s a lot of new names—but don’t worry! I’ve got you covered.
Learn Faster 🚀
After several years, I realized that learning the terminology is one of the most important first steps in your Grasshopper journey. You don’t need to memorize all these terms by heart, but familiarizing yourself with them will make learning so much easier.
Once you get comfortable with the terms, you can focus on the key information instead of getting lost in jargon like I did. This will help you move through tutorials and lessons much faster and more efficiently.
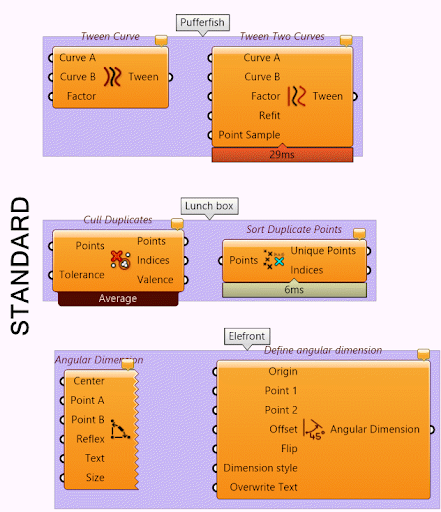
3. Downloading Too Many Plugins 🛠️
When I started learning Grasshopper, someone told me:
“Kris, you have to install these plugins: Pufferfish, Lunchbox, TT Toolbox, Metahopper, Human.”
I took their advice and installed them all without hesitation.
It didn’t take long for me to realize that this was a huge mistake. 😅
When you install Rhino 7 with Grasshopper, you already get 624 components. After adding all the suggested plugins, I ended up with over 1000 components! Wrapping my head around that many options was overwhelming.
Less 📉 is More 📈
At the time, I thought more components = more capabilities.
Turns out, that wasn’t true at all.
- First, I didn’t understand the basic components of all these plugins, which made it extremely difficult to create even the simplest algorithms.
- Second, many of the components had similar names but different functions. I often had no idea which one to choose, leading to endless frustration while searching for the right component.
Lesson learned: Focus on mastering the core components before diving into plugins. Only install plugins when you truly need them.
4. Lack of Practical Examples 🏗️
Crazy geometry, organic shapes, futuristic designs—these are all cool concepts, but they’re not practical for a structural engineer like me.
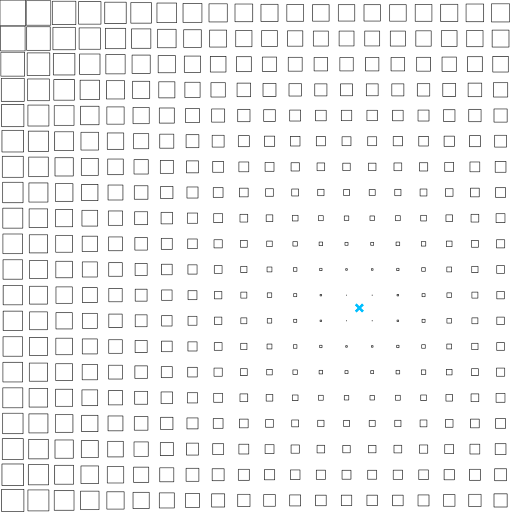
I remember one of my first exercises: making an attraction point. This exercise is in almost every Grasshopper tutorial. The concept is to modify your design by moving one point, scaling objects based on their proximity to the point.
I watched the tutorial, followed the steps, and felt proud of my first working algorithm. Then, I showed it to a colleague.
“Cool and fancy stuff! But it’s impractical as hell.”
That comment deflated me. I was so excited to have created something, only to realize it was useless for my real-world projects 😤.
He Was Right
I have never used that script—or even part of it—in any of my future projects.
From that moment on, I became much more selective about the examples I worked on. Before jumping into any new tutorial, I made sure to check if I could actually use it in my work. This wasn’t easy, especially since most tutorials on YouTube focus on fancy design concepts rather than practical, real-world applications.
5. Flattening Everything 📉
One of the most challenging aspects of Grasshopper is understanding data tree structures, and it can be daunting even for experienced users. However, with practice and proper guidance, mastering data trees will unlock new levels of design possibilities.
Why Do We Need Data Trees in Grasshopper?
Data trees are particularly useful when working with complex models that require data to be arranged in a specific way. Think of them as tools to organize and store large amounts of information. They allow us to store data hierarchically, with multiple lists within one list.
For example, if you’re designing a building facade and need to organize the placement of various panels, data trees can help. You can create lists of panels for each section or floor of the facade, then group these lists using a data tree structure. This allows you to manipulate panels within each section or across the entire facade more easily. Instead of making changes floor by floor, you can update all floors at once.
Important Things to Remember About Data Trees 🌳
- Order of branches and items is always from left to right.
- The first branch is on the left, and the last branch is on the right. Items within each branch are also ordered from left to right.
- Grasshopper stores data hierarchically.
- This allows for the organization of large amounts of information in a structured manner.
- Trees grow incrementally and linearly.
- As new branches are added, they are placed in a linear sequence, creating a logical structure.
- The structure can be changed at any time.
- This allows for the optimization and customization of data organization to fit specific needs and analysis goals.
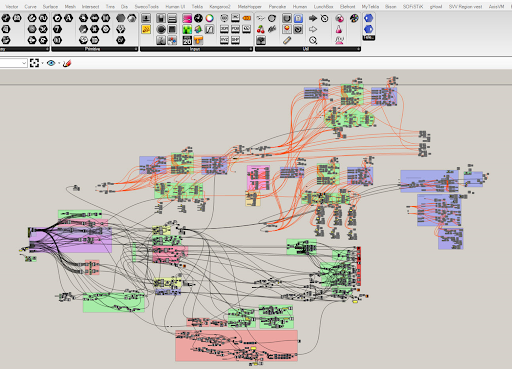
6. Creating Messy Scripts 🌀
In my early years using Grasshopper, I created way too many terrible scripts. Trust me—I thought I had everything under control, but in reality, I had no idea where things were 😅. Now, I know better, and I call these scripts Spaghetti Monsters.
4 Quick Tips to Clean Up Your Scripts 🧹
- Telepathy
- Telepathy is a wireless sender/receiver that allows you to send Grasshopper data anywhere on the canvas using a simple key-naming interface. You can download it for free from Food4Rhino. The toolbox includes two components: Remote Receiver and Remote Sender.
- Use Templates
- When organizing your spaghetti, definitely use color labels for grouping components. Grouping is one thing, but applying the correct colors is another. I recommend creating a company template so the same colors are always used for predefined groups. Start with this template every time you create a new script or cluster.
- Use Sketches
- Adding sketches to your script is a useful visual solution, especially in large scripts. Create a sketch object and import it as a .dwg file to Rhino. You can reference the whole bridge or just a small cross-section and connect it to your Grasshopper script. Add arrows to show which part of the structure corresponds to which part of the script, making it easier for colleagues to navigate your work.
- Give Names to Variables
- When creating input data using commonly used components like slider or panel, always give them clear names. Trust me—when your script grows huge, many components will look the same. Naming them uniquely will help you (and others) tell them apart.
7. Lack of Guidance while Learning Grasshopper 🛠️
When I started learning Grasshopper, I was the only one in my office using it. I spent hundreds of hours trying to figure things out on my own, often turning to Google, but it didn’t always help. It was frustrating 😠. I knew what I wanted to achieve but had no idea how to get there.
Advice Would Have Been Golden 🏅
The issues were often simple—like choosing the wrong component or input connection. A quick tip from an experienced user could have saved me hours of struggle.
Was It My Mistake?
At first, I thought learning alone was my biggest mistake, but the real oversight was not seeking out a community. I never used the Rhino/Grasshopper forums, which could have been a great resource.
Why Didn’t I Ask for Help? ❓
I thought my questions were too basic or silly. I was afraid of being judged, so I hesitated to ask for help.
Lesson learned: Don’t hesitate—ask for help! The community is there to support you, no matter how simple your question may be.
Join the waiting list for my upcoming training program and be part of a global community of over 700 students who have successfully transitioned into engineering, all without any prior experience.