
The start of the project is a very special time for the project team. One of the major BIM Coordinator’s tasks early in the start phase is to set standards and processes in such a way that the work on the project runs efficiently. This refers not only to the correct implementation of BIM processes but also to the proper setup of the programs used on the project.
We are talking about modeling tools, CDE’s, coordination programs, or even applications that use models on the construction site. It all depends on what the team is using on the project.
In a few tools, we can adjust features to facilitate and standardize the work of other participants in the project. We call this set of rules and guidelines a template.
In this article, I will describe what elements should be included by BIM Coordinator in the Revit template.
DO YOU WANT TO BECOME A BIM COORDINATOR ? I AM BUILDING AN ONLINE PROGRAM TO BOOST YOUR CARRER IN BIM
What is template and why is it important ?
In Revit, we use templates to begin new projects or files to ensure that these files are similar to and consistent with, other projects and files produced by our company. Template files provide a reliable way to begin each new project file and ensure that it starts with the right collection of settings, features, and office standards.
It is our goal as BIM Coordinators to begin a new project with a well-thought template. It ensures that each new project starts off on the right foot.
With a good template, you can save a lot of your and your project team time. On the other hand, it might take a lot of time to create a good one.
It’s a bit counterintuitive. In order to save time, you need to spend time.
So let’s check where we can use templates in Revit and what kinds of overall features we can expect a template to have.
What kind of things we can set up in the templates?
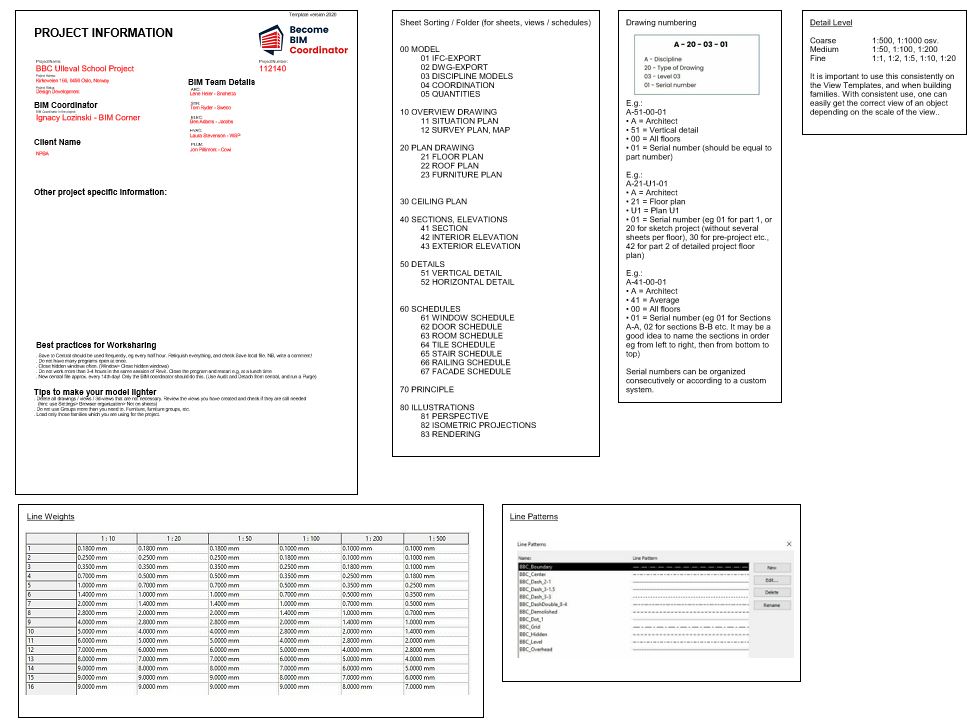
I will not lie that Revit templates can include anything we would like to have in our project. The template can have things like standard annotation, what kind of fill patterns, text, tags, and symbols we want to use. We can define different project settings, units, and project information.
Templates are a great place to established what sheets your team needs for this particular project. So if you want to have a set of predefined A0, or A1 sheets drawings with project or office title blocks, those can already be included in a template. Of course, those sheets need to contain various views.
You can have standard floor plans, sections, details, and schedules already pre-defined in a template, ready to receive building data.
In addition, we can include content within our template files. What content we will include in our template is strictly associated with a type of template we are about to create.
If we create a template for architects, it will most likely contain elements such as doors, windows, or furniture. However, if you create a template for MEP trade, it will probably contain ducts, pipes, water supply, or fire protection families.
Revit Template Checklist
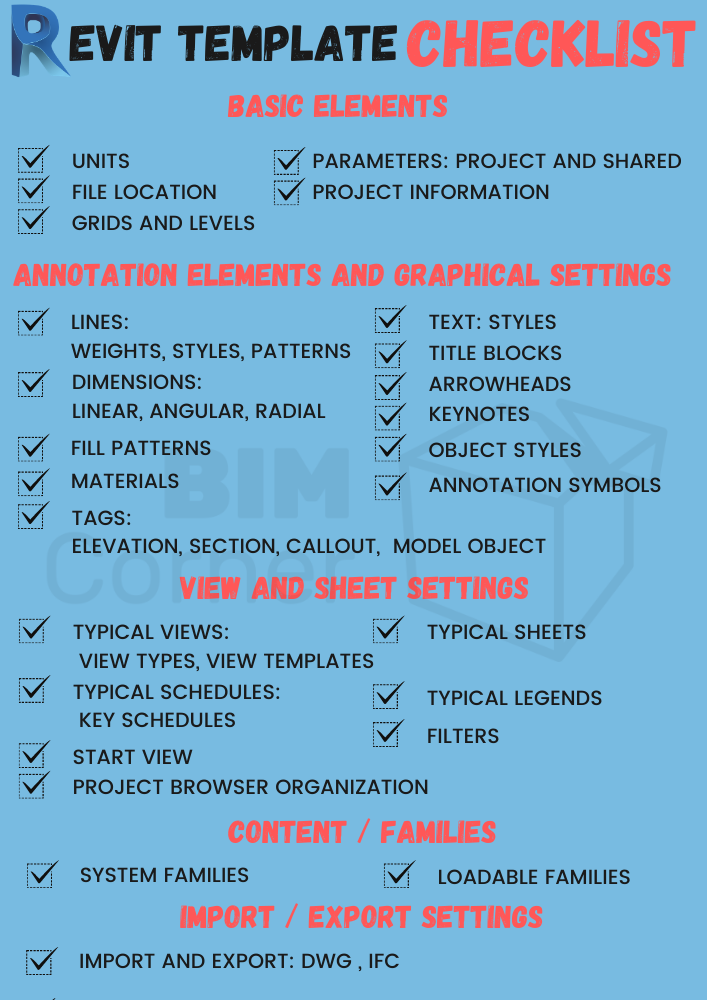
When I create a template, I like to work with a checklist. I have all the elements I need to remember in it. I think through every point of this checklist and I decide if I want to set a given element in this particular template or not.
I created Revit Template Checklist which you can find at the end of this article. I added all of the main categories that you need to review when double-checking your template.
REMEMBER – Templates are different. We can create a personalized template for the project, which will contain all the necessary standards and information used in this particular assignment. But most probably this template will be different from the standard one that your company is using for general purposes.
Therefore, remember that the checklist is not a rigid list of points that you have to include, but a list of things that you should consider when creating a template. You, as a BIM Coordinator, should choose only those elements that will best fit the purpose of a given Revit template.
Below is a list of things you should keep in mind when creating a Revit template:
Basic elements
1. Units – we define what units our project/office standard template will use. If your company work with both imperial and metric system, think about making 2 templates for both measurement systems.
2. Parameters – In most cases the right set of required parameters is implemented in a project template, not in an office standard template. But if your office uses a set of predefined parameters which are used in almost every project, so it might be a good idea to add them to a template. An alternative way is to create a shared parameters file for those parameters.
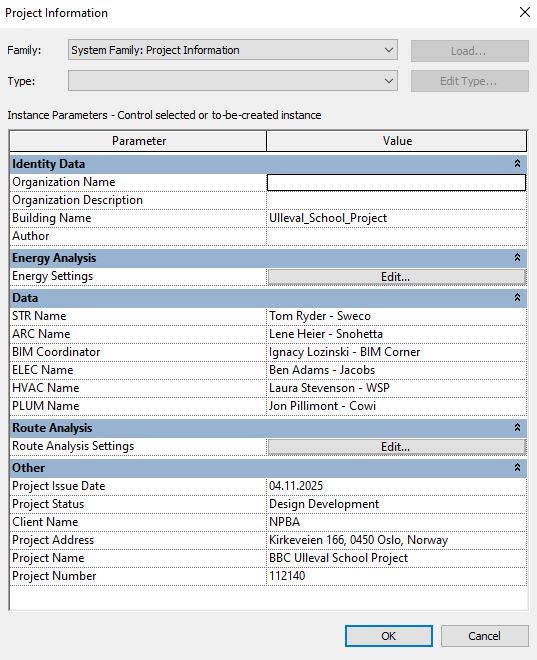
3. Project information – this element relates to a project template. Add all needed information that is associated with this particular assignment.
4. File Location, Grids, Levels – those elements change mostly project by project and they’re also more related to project template than office standard one.
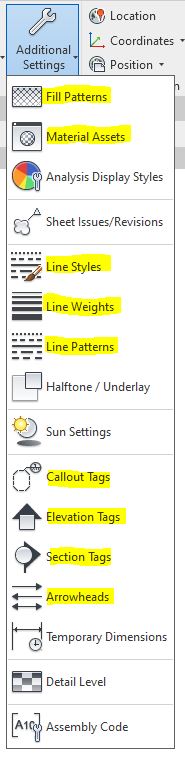
Annotation elements and graphical settings
1. Lines – Lines are one of the basic graphic elements in engineering documentation. A template is a great place to define what line patterns, weights, styles we will use in your project
2. Text and dimensions – text and dimensions are the next basic elements of each documentation. Many projects have predetermined guidelines for the appearance of the text contained in the drawings.
3. Title blocks – Each company and each project has its own dedicated title block that it uses. This element should be established here. It is the basis of a good template.
4. Arrowheads – another graphic element that appears in almost every documentation. It is good to have a specific list of standard arrowheads in your company/project template.
5. Keynotes – if your company or project uses keynote data to annotate model elements it is a good idea to predefine them in a template.
6. Tags – if your company or project uses a specific graphical variant of tags then you should add it to your template. Remember, there are elevation, section, callout, and model object tags which you might consider adjusting.
7. Object styles – defining global settings, how model objects will look like on views is a critical aspect of effective work with Revit. These options are strictly connected with your lines and materials and should be planned with the rest of the project/office team.
8. Fill patterns and materials – Which fill patterns and materials you will add to your template will strongly depend on its type. If your office works only in a narrow niche and uses a specific set of fill patterns and materials, it is worth adding them all to your template. However, if your office works on different types of projects and in different specializations, try to reduce the number of patterns and materials to a minimum.
9. Annotation symbols – if you want to use a standardized set of symbols that will land on your project documentation add them to your template.
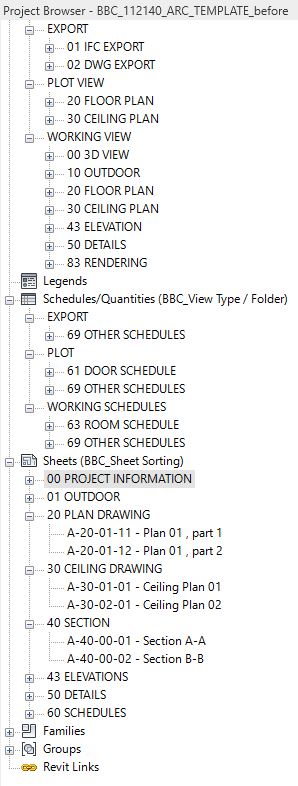
View and sheet settings
1. Project browser organization – your project team will work will the project browser all the time using Revit. It’s a good idea to standardize the way views, sheets schedule, and legends are organized. This creates order in the model and helps work more efficiently.
2. Typical Views – Every good template should have a set of predefined typical views which most likely will be used during the project development. Adjusting view types and view templates can not only save time for each template user but can help standardize the way the whole project team will work.
3. Typical Sheets – The same as with views. Our template should have a well-structured set of predefined sheets which will include a proper scale, paper size, title block. Sheets should also correspond with a list of views that are meant to be printed.
4. Typical Schedules and Legends (and key schedules)- Schedule and legends are a great way to create and visualize a table of data within the project model. If your office specializes in a certain job, maybe it is a good idea to add specific pre-defined quantity schedules which are mostly used by the users.
5. Start View – This will be the first view a user using our template will see. In this view, I like to add important information regarding the use of a given template. If it is a template for a project, I often include basic project information and tips on how to optimally work with a given template.
6. Filters – if you have specific graphical rules that your project/office uses to work effectively on views, you should consider adding those rules to a template. Customizing pre-defined filters will help you with that task.
Content / Families
1. System families – System families e.g: walls, floors, ducts, roofs are built in families within Revit. If you are working on a specific project template and you know that users of this template will use a certain list of types of those families, then you have a green light to add those types to your template.
2. Loadable families – all families that we load from our office or project content library (e.g. doors, windows). You have to be careful with adding loadable families to your template. Those families might drastically increase the size of your template. I suggest adding the most used families for a specific category in the template file. Rest should be stored in a family library folder on your project or company server.
Import and export settings
1. Import / Export DWG, IFC – most Revit projects need to import information and export information for use by other members of the project team. So you want to plan for these inevitabilities in your project template. In our project template, we should pre-configure those setting so that importing and exporting of various file formats goes smoothly.
REMEMBER TO REGISTER FOR WEBINAR
24th NOVEMBER at 20:00 CET
10 TIPS TO IMPROVE YOUR BIM COORDINATION PROCESS
All registred will receive  GIFTS
GIFTS

MIND MAPS AND WORK FILES
DOWNLOAD BIM COORDINATION GUIDE
Subscribe to our list and download Practical Guide to start with BIM Coordination.
Interactive BIM Coordination guide full of tips, graphs, mind maps, and practical exercises.
It will teach you the basics of BIM Coordination. All for free.
To sum up
As you see there is a lot of things that you might want to consider when creating a project/office template. A well-conceived Revit template can save you a lot of time. Though they take some time to create, templates let you leverage this investment again and again.
Above mentioned points are not the only options that you can configure in your template file. My goal with this article was to point out the most common elements that land on the template files regardless of project type or discipline.
Feel free to add additional points to this list if you need them.
I am curious what stuff do you adjust in your template. Let me know by adding a comment below.


Great Post. Thank You.
Your welcome Dave. I am glad that you like it.
Nice reference. Thanks Ignacy
Sure, thanks for kind words.