In this article I would like to present a simple 6 step process how you can check and maintain your Revit model standard using Free add-ins – Model Checker and Model Configurator
BIM Coordinator and manages often struggle with messy Revit models. If you’re responsible for maintaining Revit model quality, you’ve probably run into some of these issues:
Models are inconsistent – naming, categories, and parameters that shouldn’t be there!!
Checking models manually takes forever – and mistakes constantly slip through
Enforcing company standards is a pain – everyone has their own way of doing things
So that’s why I created this article.
To introduce you to the tool that can help you take control of Revit standards.
So let’s dive in👇
Table of Contents
Preparations
Before we run into check itself we need to prepare our Revit. First we need to install a few aplications – Model Checker, Model Configurator and Revit Lookup.
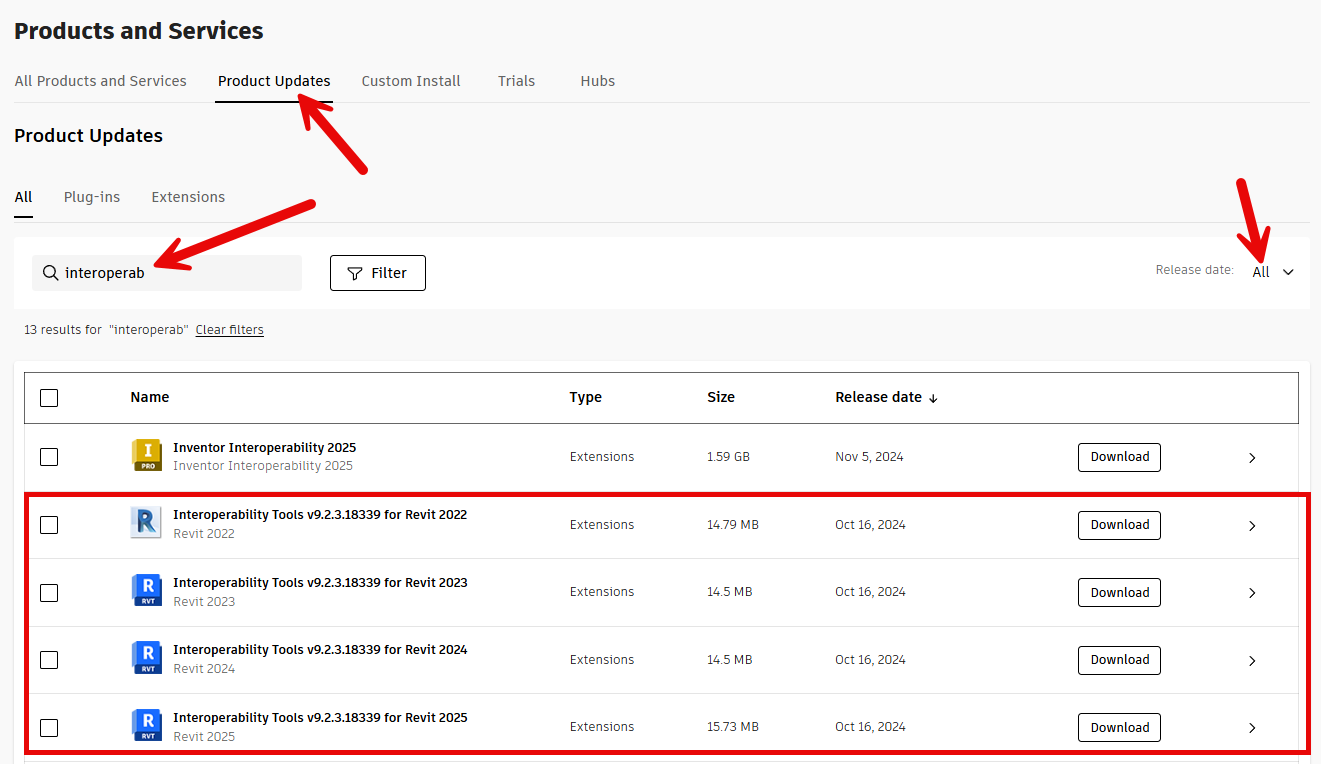
1. Model Checker For Revit - What is it? And how to install
So what is Model Checker for Revit.
Model Checker for Revit is free an add-in that allows users to automatically validate Revit models against predefined standards and project requirements.
It helps ensure:
data consistency,
model integrity,
and compliance with your project standards
The tool performs various types of checks, including parameter validation, data completeness, model structure verification, and rule-based compliance testing.
It is particularly useful for BIM coordinators and managers to streamline quality control and improve interoperability in BIM workflows.
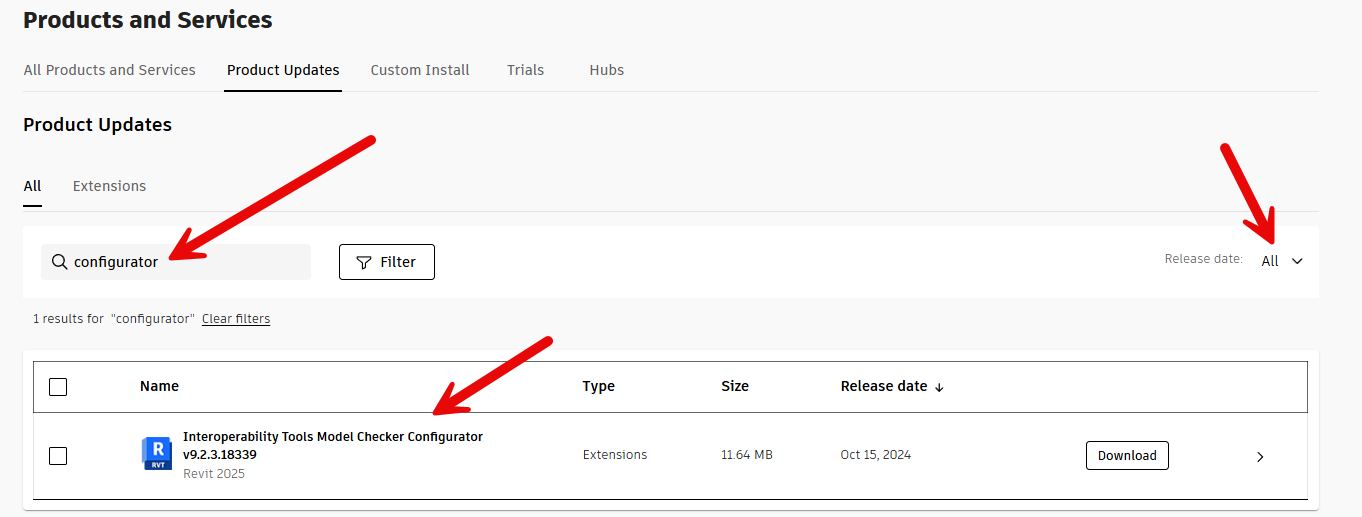
2. Model Configurator For Revit - What is it? And how to install
Model Configurator for Revit is a tool that helps set up a Revit model quickly and correctly. It adds the right parameters, views, and settings so that the model follows project rules.
Model Configurator and Model Checker work together.
Configurator sets up the model with the correct settings.
Then, the Checker checks if everything is correct and follows the rules. If something is wrong, the user can fix it before using the model. This helps keep models clean and correct from the start.
How to install
Do the same as for Model Checker but this time write “configurator” in the Search box
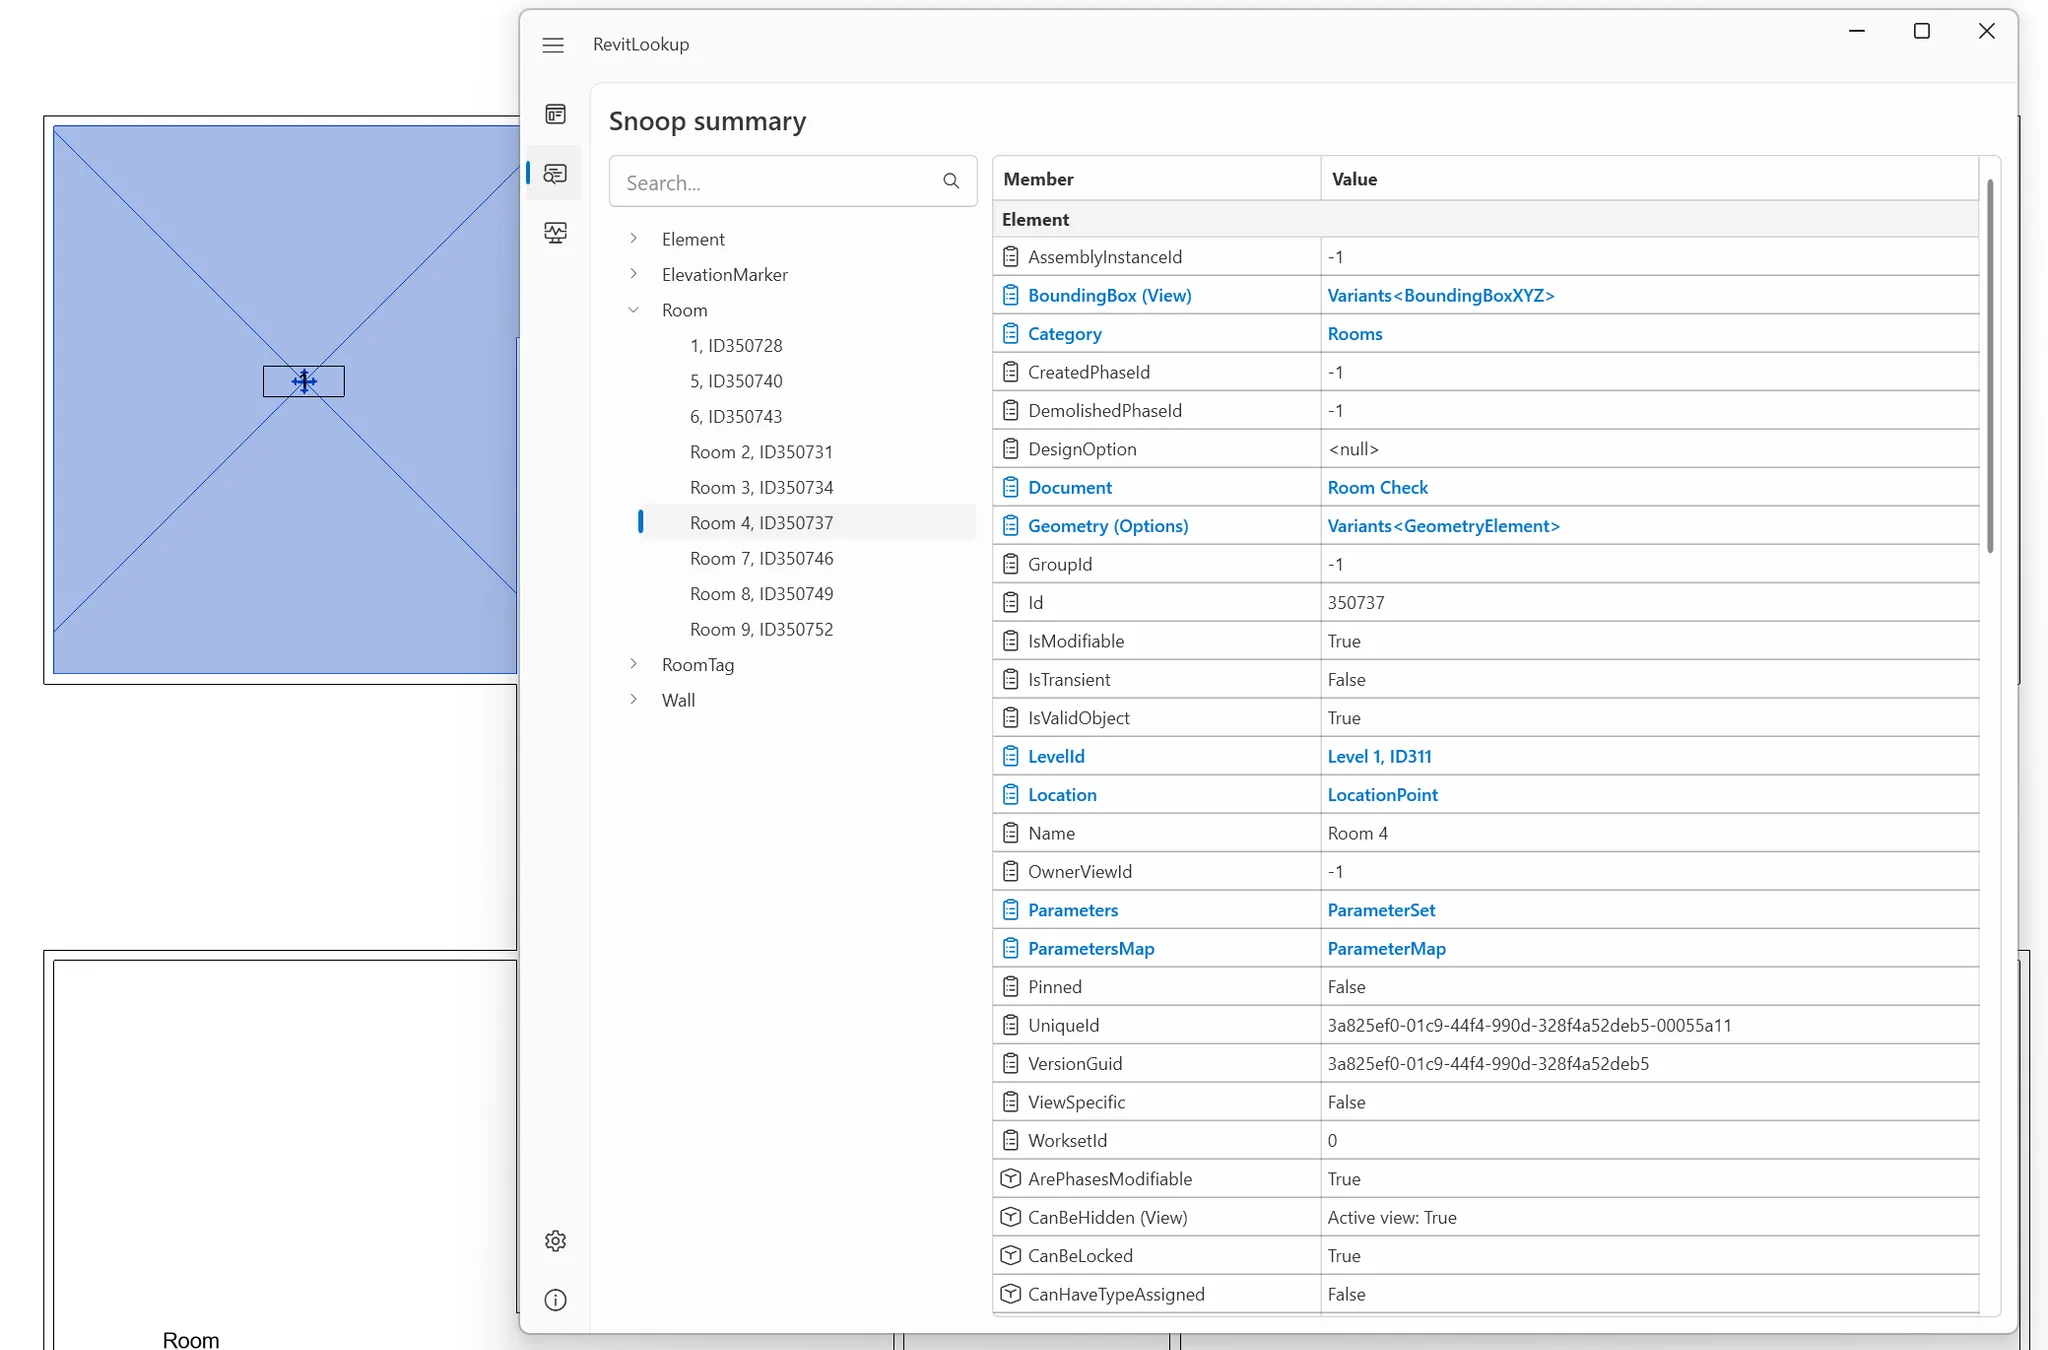
Revit Lookup for Revit - What is it? And how to install
Revit Lookup is a tool that helps you see all the “hidden data” inside a Revit model. It shows every This is useful when you need to check how things are named, what values they have, and how they are connected.
You can use Revit Lookup with Model Configurator and Model Checker to make sure everything is set up correctly. I will explain it a bit later.
As mentioned earlier, Model Checker offers extensive capabilities and checking options. For this demonstration, we’ll focus on a simple example:
Checking if room names in our model are defined.
This basic check will introduce you to how the rules work, allowing you to explore and build upon it.
From this foundation, you can create more advanced checks to verify various aspects of your model against your standards.
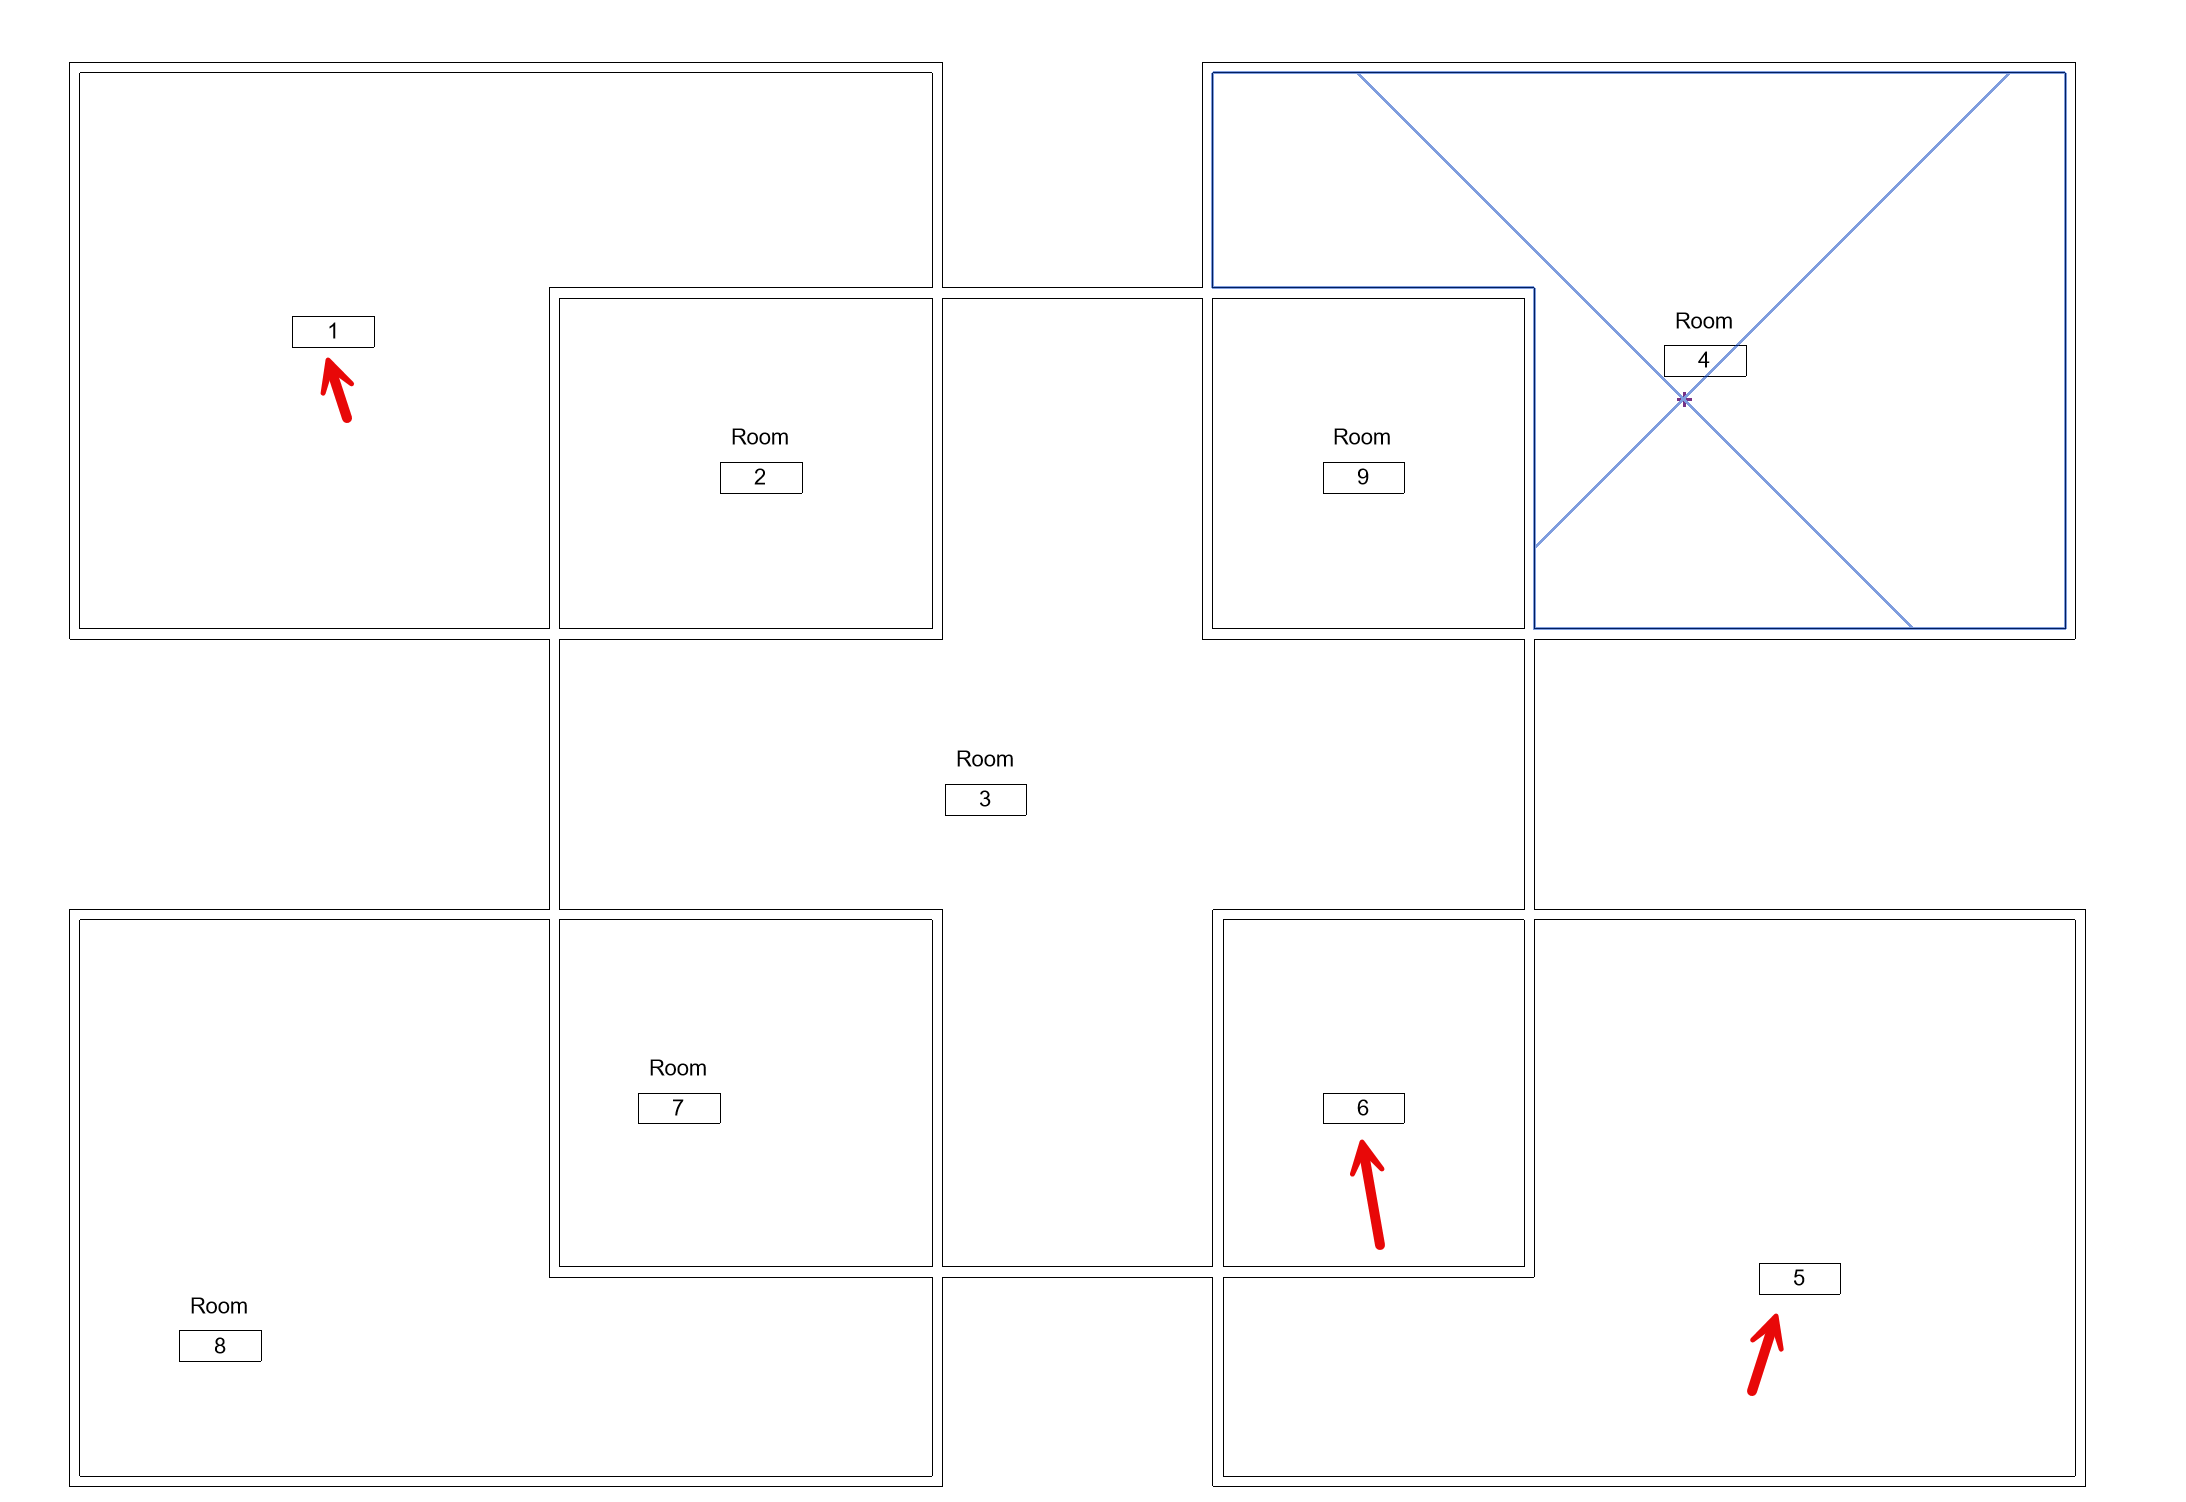
As you see our model has 9 rooms. 3 of them don’t have Room name defined. We want to catch it and fix it using Model Checker.
Now you know the tools we will use and what we will check. Let’s dig in.
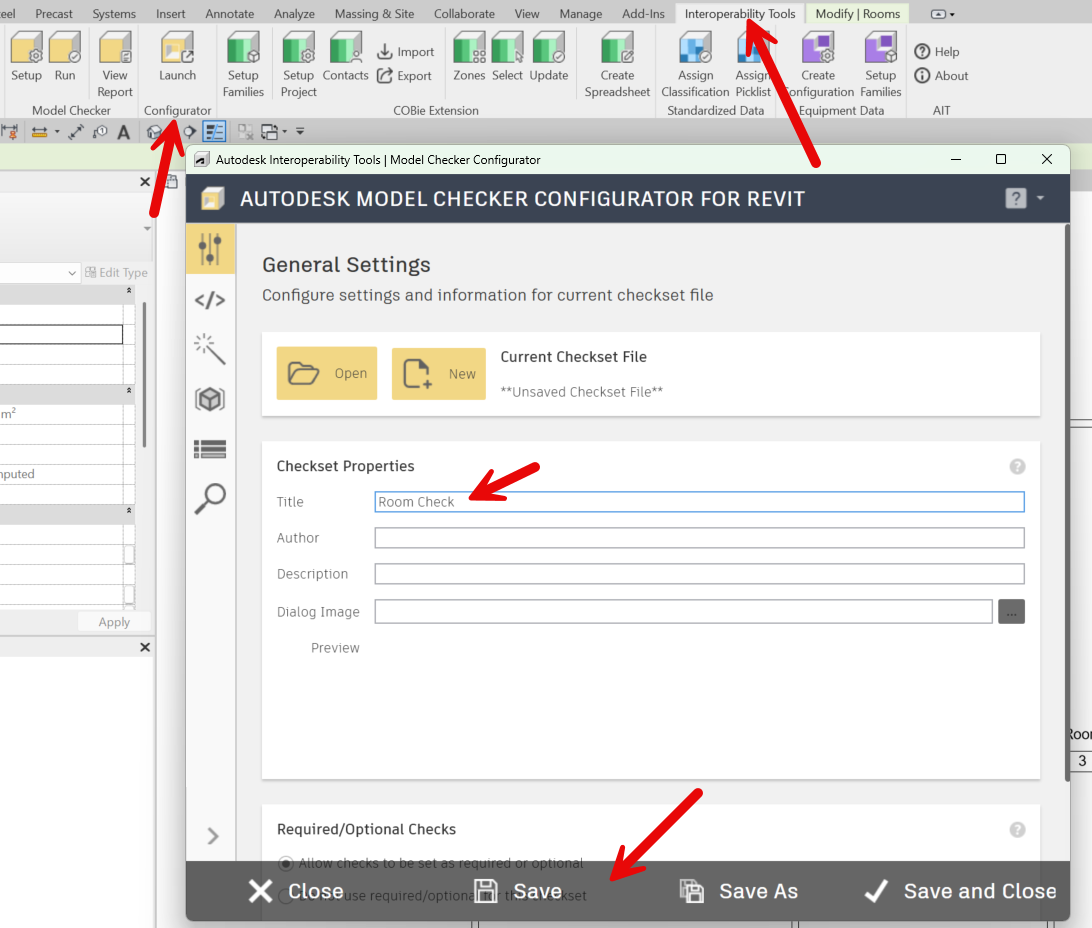
Step 1: Launch Configurator
1.1 First, launch the Model Configurator by clicking the launch button in the ribbon tab. Navigate to general settings, where we’ll define the title of our check set—in this case, “Room Checks.” Hit save.
Let’s save the file as “Room Check.XML”
Step 2: Define what you want to check
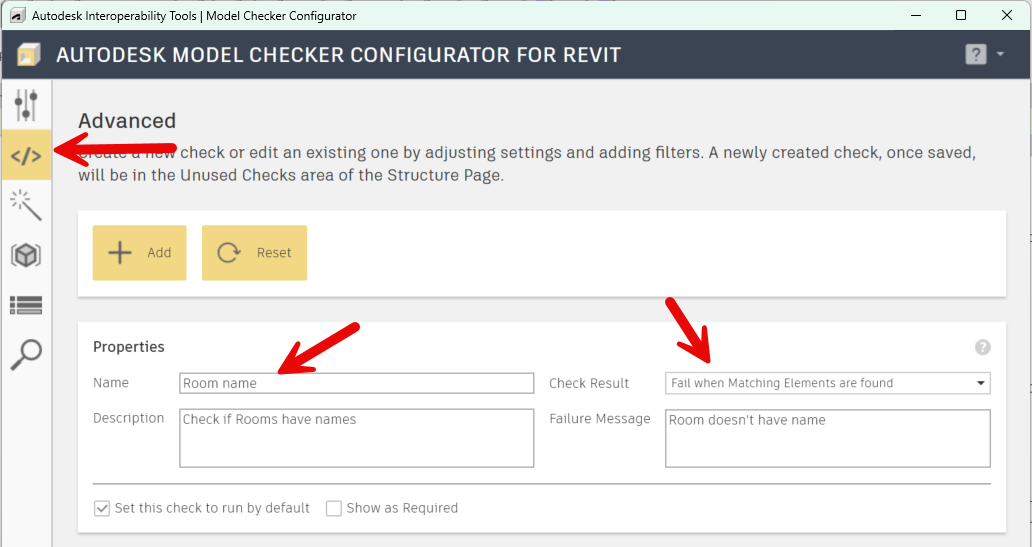
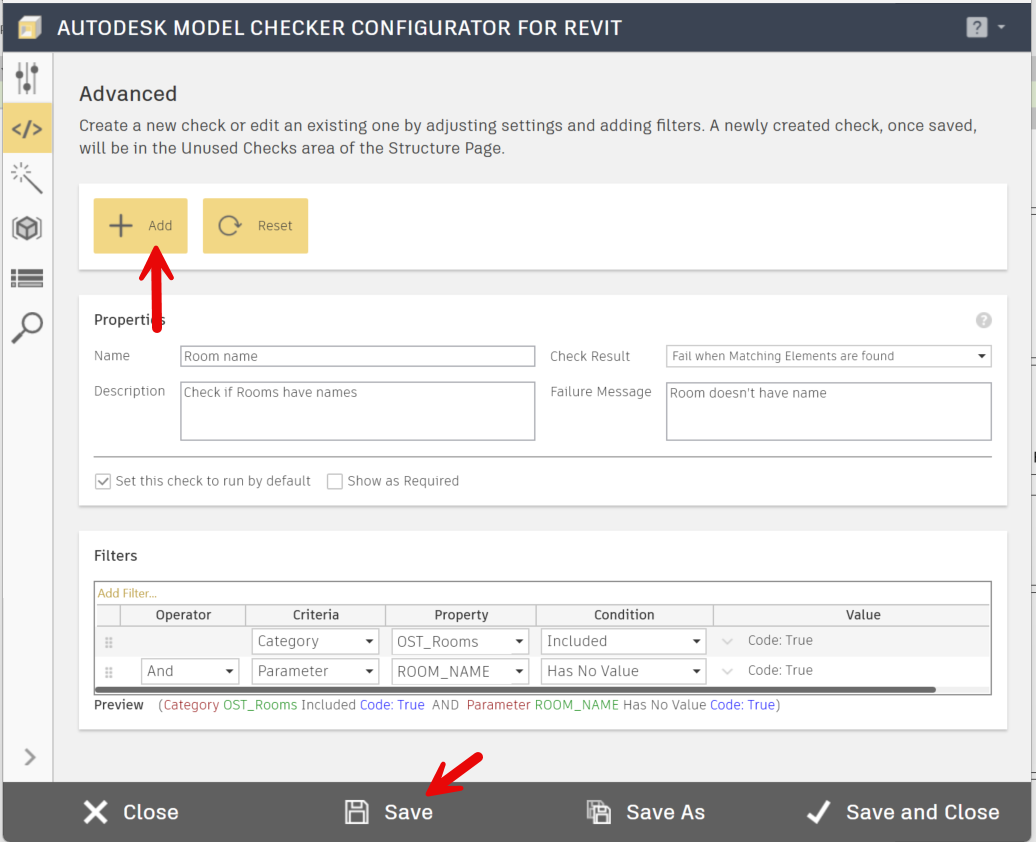
Let’s go to the Advanced Checker Builder section.
Here we need to define filters—or rules—that tell Model Checker what to check.
In the Property tab, enter “Room Name.” Under Check Results, we have several options. In our case, we want Checker to fail when it finds elements matching our filter, so we’ll keep the default setting.
We can also add a description for this check and a failure message—for example, “Room does not have a name” will appear when Revit finds an issue.
Now here comes the important part where we define filters.
Click “Add Filter” and choose “Category” as the criteria.
When you click the dropdown icon, you’ll see that properties start with the prefix “OST” – these are the built-in names for Revit’s object categories.
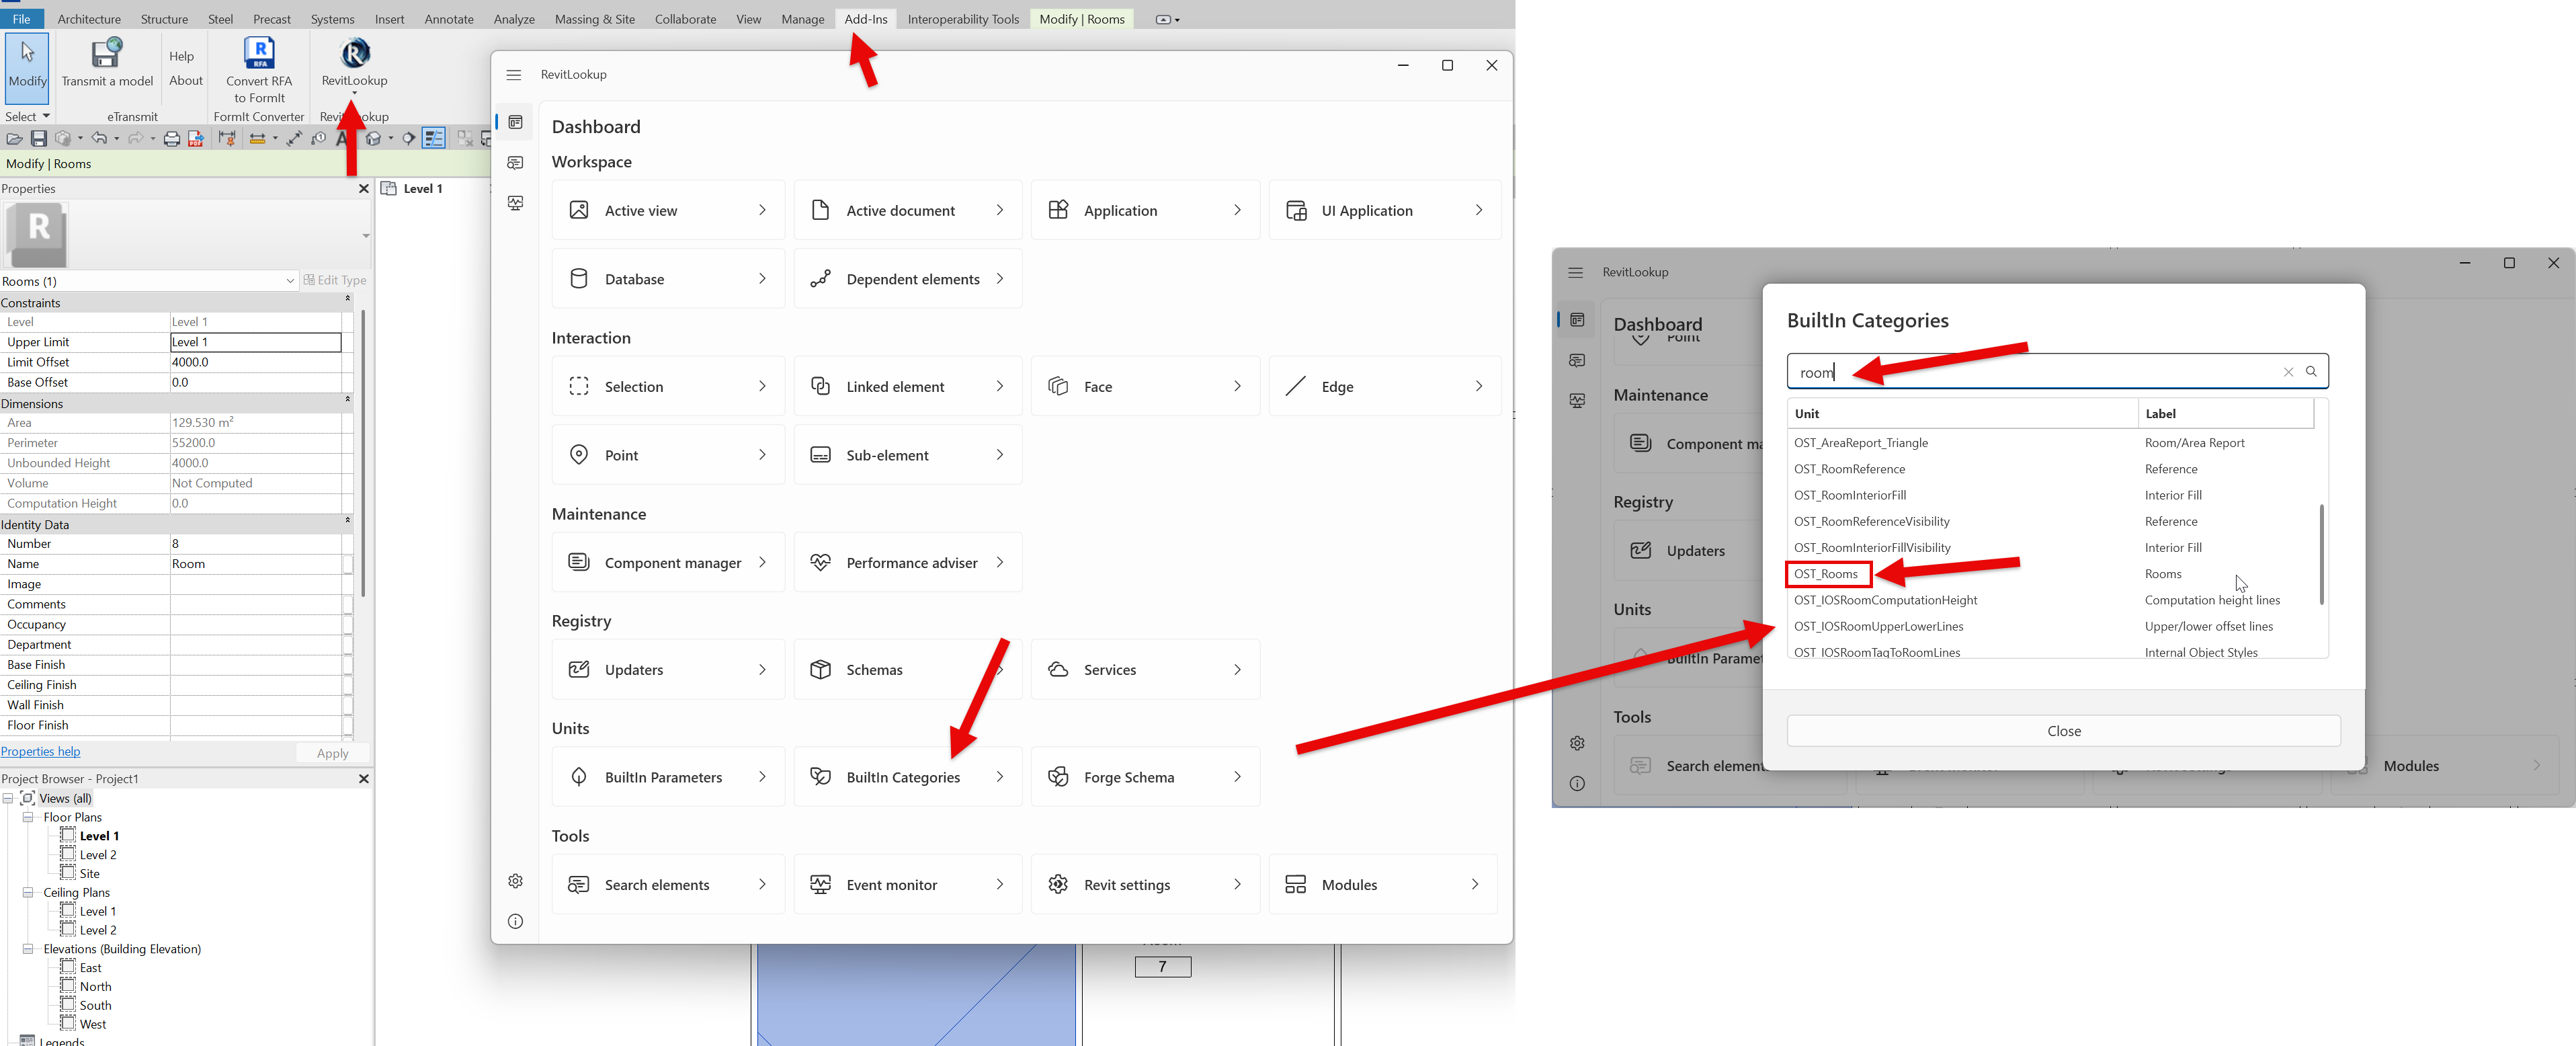
If you’re unsure about the exact category name for a specific Revit object, you can use Revit Lookup to find it. Simply click on Revit Lookup, go to the Built-in Categories section, and search for what you need.
For example, since we’re looking for rooms, type “room” in the search box to find the proper category name. Check the picture blow👇
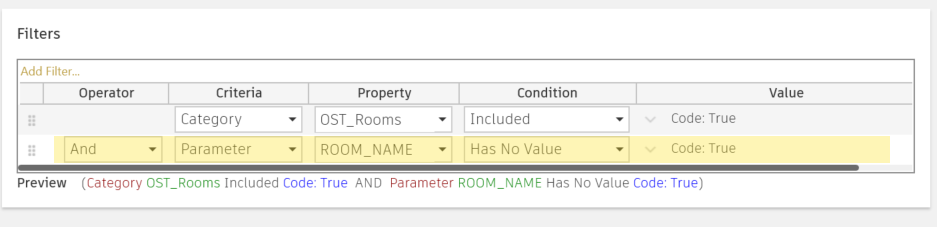
Now we need to add another filter to this check.
This time, we’ll define a condition to find rooms where the “Room Name” parameter has no value.
As before, you can use Revit Lookup to find the correct built-in property name in Revit. In our case, it’s simply “ROOM_NAME,” as shown in the picture below.
Let’s save our work and click the Add button to include this check in our checkset structure
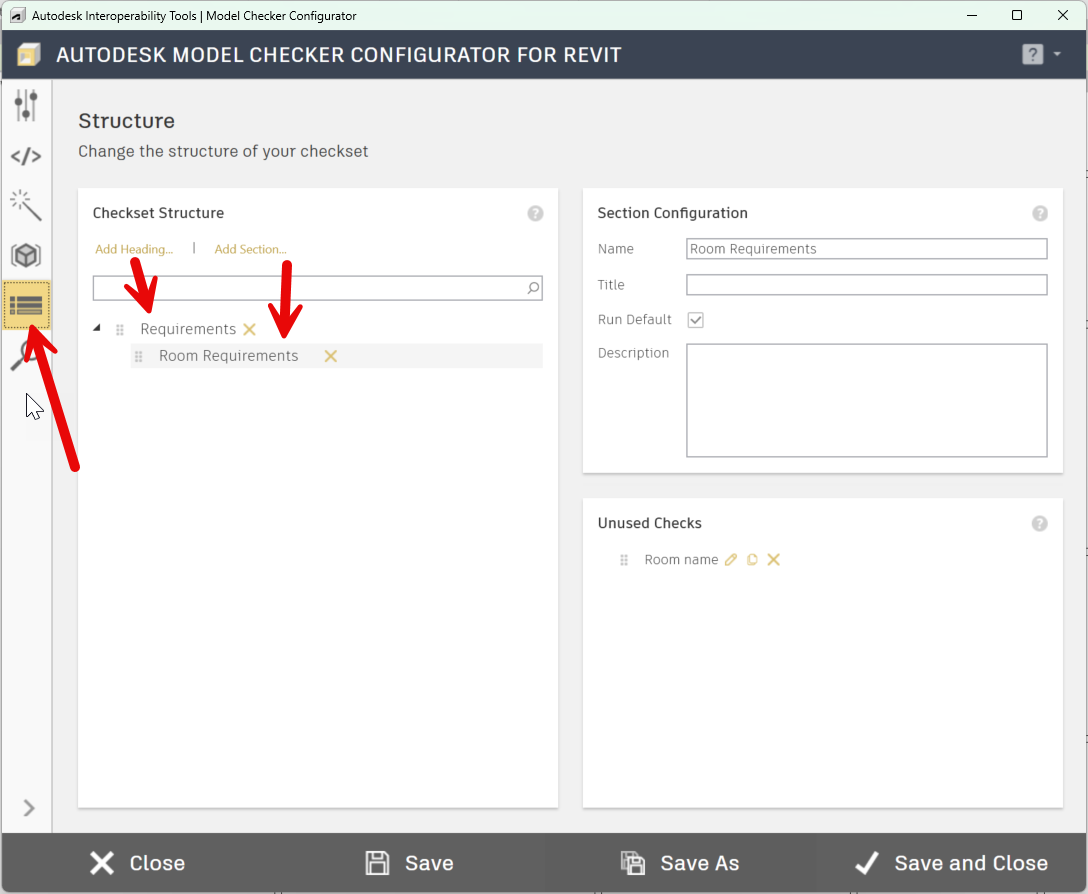
Step 3: Create Checkset Structure
Now we need to create an organized structure. In order to do it let’s go to the Structure and Organization section.
The checkset structure determines how our checks are organized. Since we’re creating a check for room names, we’ve created a hierarchy with “Requirements” Heading at the top level and “Room Requirements” Section below it.
Let’s define a heading by clicking “Add Heading” and naming it “Requirements”.
Next, we’ll add a section by clicking “Add Section” and naming it “Room Requirements”.
In the “Unused Checks” window, we need to move the room name check under the Room Requirements section as shown below.
Now let’s save and close the Configurator since we’ve finished configuring our room-checking rule.
DOWNLOAD BIM COORDINATION GUIDE
Subscribe to our list and download Practical Guide to start with BIM Coordination. Interactive BIM Coordination guide full of tips, graphs, mind maps, and practical exercises.
It will teach you the basics of BIM Coordination. All for free.
Step 4: Open Configured check in Setup then RUN a report
Next, we need to load this configured rule into Model Checker.
To do this:
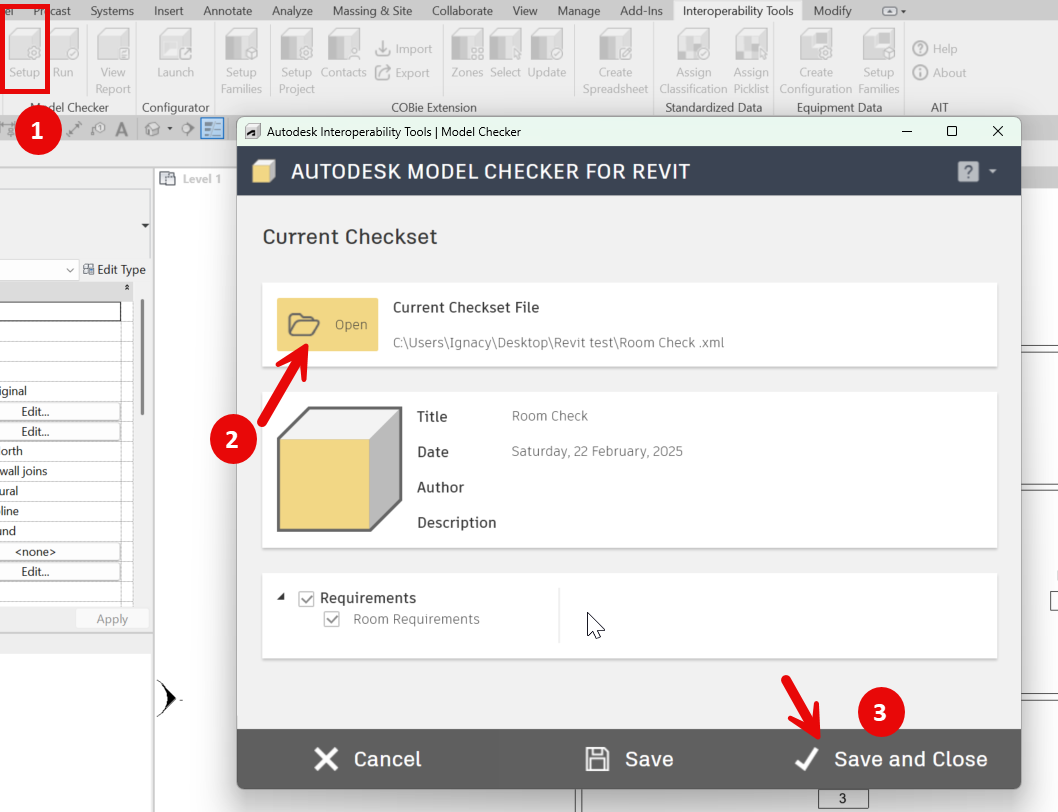
Click Setup and open the XML file we saved to our hard drive.
Once file is loaded click save and Close
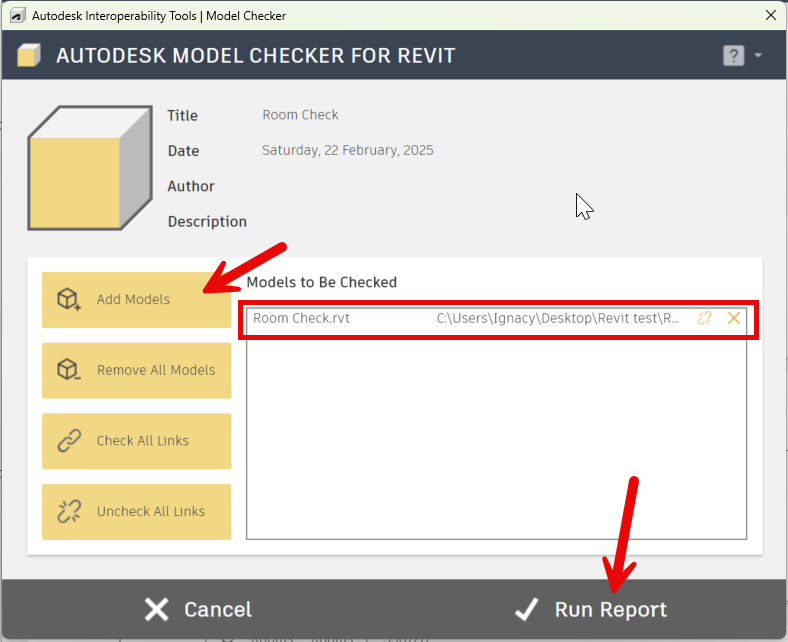
Next, click the Run command in Model Checker Ribbon.
If your model hasn’t been added to the “Models to be checked” section, click “Add models” and select your existing model.
Then simply run the report—Model Checker will analyze the selected model using the rules we created in Configurator.
Step 5: Go throught the report and Fix issue in the model
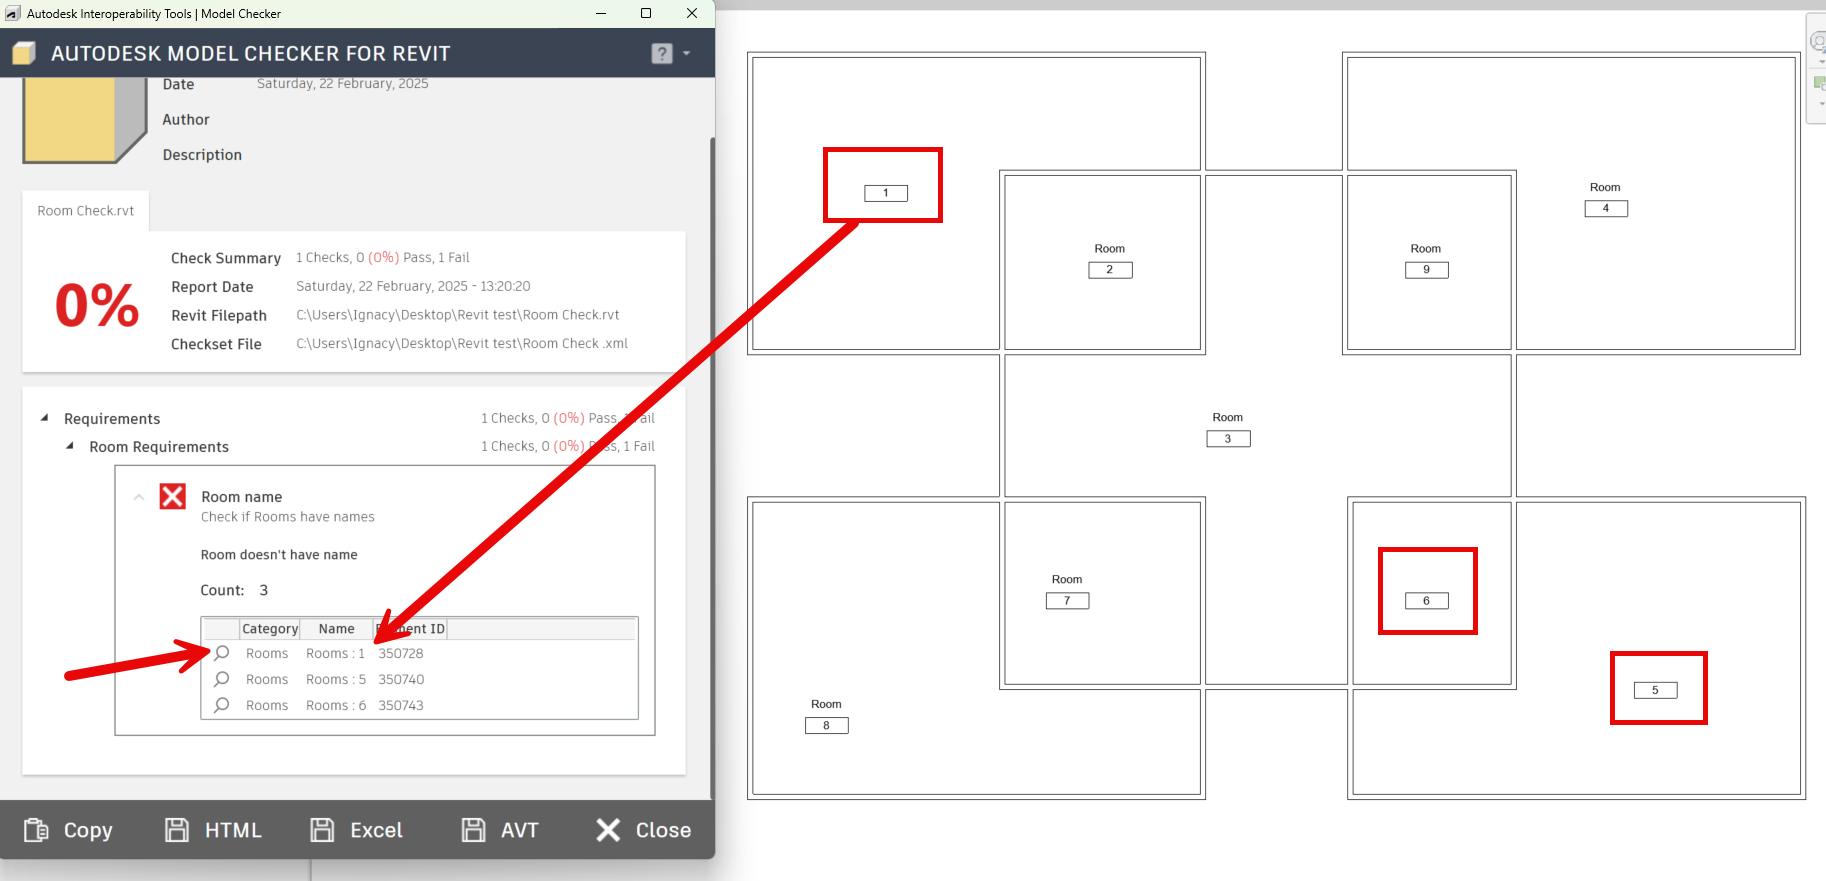
Now that Model Checker has run the test. It found three rooms that don’t have names.
To locate these elements, simply click the magnifying glass icon, which will highlight them directly in Revit.
This makes it easy to find the rooms and add their missing names to fix the issue.
Step 6: Rerun the check to verify all errors have been fixed
The final step in our process, after filling out all the missing room parameters, is to rerun the check to verify that all errors have been fixed.
To do this:
Close the existing report
Click “Run” button in Model Check Ribbon
Hit “Run Report” again.
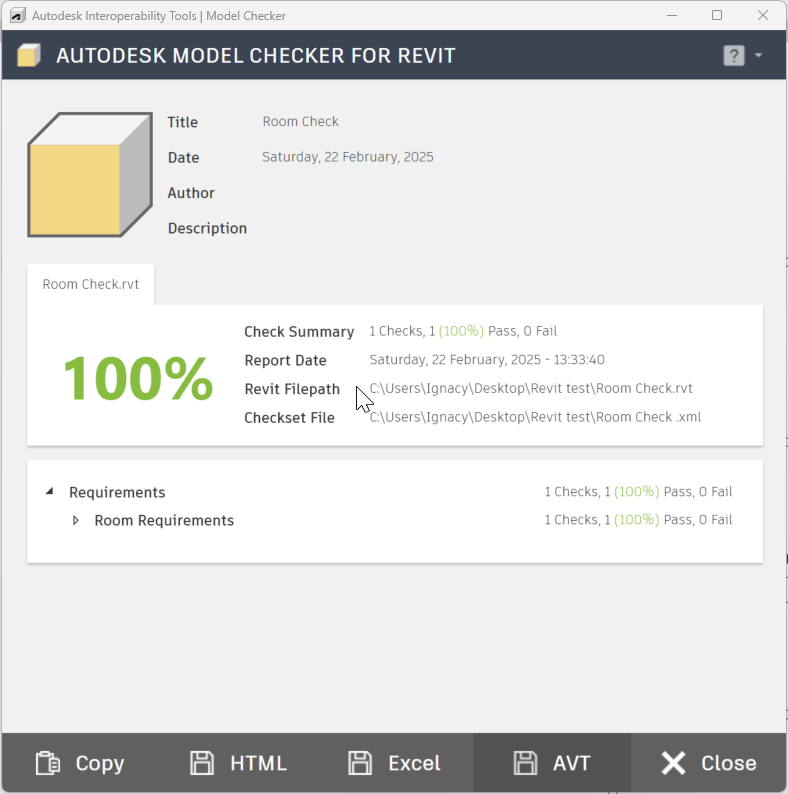
In our case, since I fixed all the room names, my report shows green with 100% of issues resolved.
This demonstrates how to run a simple test in Model Checker using predefined rules to verify your model data.
Summary
So there you have it.
The process shown helps BIM Coordinators and managers maintain consistent in Revit model standards.
This example only scratches the surface of what’s possible. The workflow can be adapted for more complex checking requirements and different model elements.
Literally, Sky is the limit here.
If you’d like to learn more about Model Checker, I recorded a session with Jason Kunkel. The example I presented today comes from that session. In the workshop, he demonstrated several ways to use Model Checker for checking various Revit parameters and shared valuable insights about the tool.
Interactive BIM Coordination guide in the form of Notion notebook
A lot of tips, graphs, mind maps, and practical exercises
Guided step-by-step process on how to conduct simple BIM Coordination
Exercise files will help you go through each homework
Thank you!
You have successfully joined our subscriber list. Check your inbox. Confirm email in order to get access BIM Case Studies from the biggest Norwegian projects.
Reasons to Subscribe to the BIM Corner List:
BIM CASE STUDIES
After reading this guide, you will learn:
How BIM is used on the biggest projects in Norway
What were the challenges for the design team and how were they solved
What were the challenges on the construction site and what was our approach to them
News From BIM World
Every Thursday you will get a package of news and useful links from the BIM world.
No Hype
Just real content that’s meant to make a difference in your BIM knowledge.
This site uses cookies to offer social functions, analyze traffic and conduct remarketing activities. Details can be found in the privacy policy (info button).