
The construction industry is steadily going through a digital transformation. There is a rising demand for better model coordination between various project stakeholders. BIM stands in the centerpiece of this transformation.
BIM not only removes ambiguity related to project information but also increases potential value by allowing to embed of more data about building assets. However the amount of available information in models right now exponentially grows and becomes more complex.
What’s more, I observe increasing requirements from clients and building owners to manage and check the information being produced. Verification of information is essential to getting the data that we can rely on over time. We need to assure the information is being delivered as required and to the declared standards.
But how do we know that model and all information it contains is accurate? How can we use technology to validate our models in an automated way?
In this article, I would like to briefly explain how rule-based model checking can help us with that.
Various types of model checks
I can see that when people talk about model checking they often refer to the process only as 3D geometrical checks. Such checks are known as “clash detection” or “clash checks”. But BIM models are more than just w pure 3D geometry. They are a combination of:
- geometry, known as graphical data,
- structured alphanumeric attributes and properties, known as non-graphical data,
- project requirements, standards, and documentation
Model checking is the process of validating these types of data. Model checking can be done in several different ways, serving different purposes. Before starting any kind of checking you will have to decide what is the goal of the specific check. Asking questions like:
- Do I need to check only if 3d geometry is modeled properly?
- Do I need to validate model parameters?
- Does my model follow project / national standards?
we get a better picture of what we need to check.
Let’s now differentiate various types of checks and explain them briefly. These types can be used separately or combined, depending on your particular goal.
Geometry checks
- Clashes – a check on if 3d geometry of the different building elements intersect each other or near each other within a given margin,
- Distances – validate if the distance between 2 elements is accurate and meets the design requirements,
- Duplicates – a check on duplicates in the same place,
- Presence/absence – of certain building elements: a basic check on what has been modeled or what elements are missing
Non-graphical data checks
This type of checks focuses on model information, mostly stored in parameters. Typical data checks can include:
- Presence/absence of parameters: We check if required parameters exist in the model,
- Value check: we check if the parameter’s values are empty or not,
- Value correctness: we check if the parameter’s value is correct or within a given range and limit. In that case, we are looking for:
- Typos: and Case Sensitiveness: so all kinds of writing/textual issues like forbidden symbols, wrong placement of spaces, capital letters, etc.
- General standards: for example COBie, have fixed names or syntax that needs to be followed
Project requirements checks
In that case, we verify if all building assets fulfill the requirements that apply to your project. These can relate to national, govermental or project standards and requirements set by the client or your own company. Within this group we check:
Design criteria:
- Program of demands
- Minimal door/window sizes
- Do floor areas matching with the room type?
Legislation, building codes:
- Minimal ceiling heights for certain types of spaces
- Minimum amount of toilets and bathrooms
- Minimal dimensions for accessibility of wheelchairs
- Minimal door widths and heights
- Minimal width of emergency routes
Standards:
- Correct syntax of all building elements?
- COBie parameters present and filled out?
- Assembly Codes all filled out and matching with the Revit Category?
- Technical descriptions correctly matched with the corresponding building elements?
Rule-based model checking
Ok, now you know what BIM Coordinators are checking in the model. There is a lot of it, isn’t it? how can we check and verify all this?
Now imagine that you work on a project where you have over 50 models to check. A total number of building objects exceeds 200,000 and information requirements are several pages long.
How we are able to handle the quality assurance process with so much data to check?
In such cases, we need a structured, repeatable, and automated validation process. Such a process can be performed using BIM quality assurance programs and with the use of so-called rules. Rule-based model checking is efficient and can be automated, reducing the time spent coordinating models. There are several programs on the market that can check the model using rules.
In this article, we will focus on the Solibi Office and I will show you how to apply such rules and how they work, based on a few information requirements examples.
Rules examples
Rules are a set of specific rules/conditions that we impose on the checking program. These conditions define what is checked in the model and how. Usually, the rules are grouped in the so-called rulesets.
To create rules in the Solibri program, we need to open Solibri’s Ruleset Manager.
It’s a place where you can create new rulesets and modify existing ones. Ruleset Manager comes with many ready-to-use rulesets and a rules library. We can treat them as templates and use both things to build our own customized rules. In that case, we don’t need to define everything from scratch.
Anyway, I won’t go into detail on how to use libraries and rule templates. In this article, I just want to show you some rule examples that we can use to check the model against 3 different requirements.
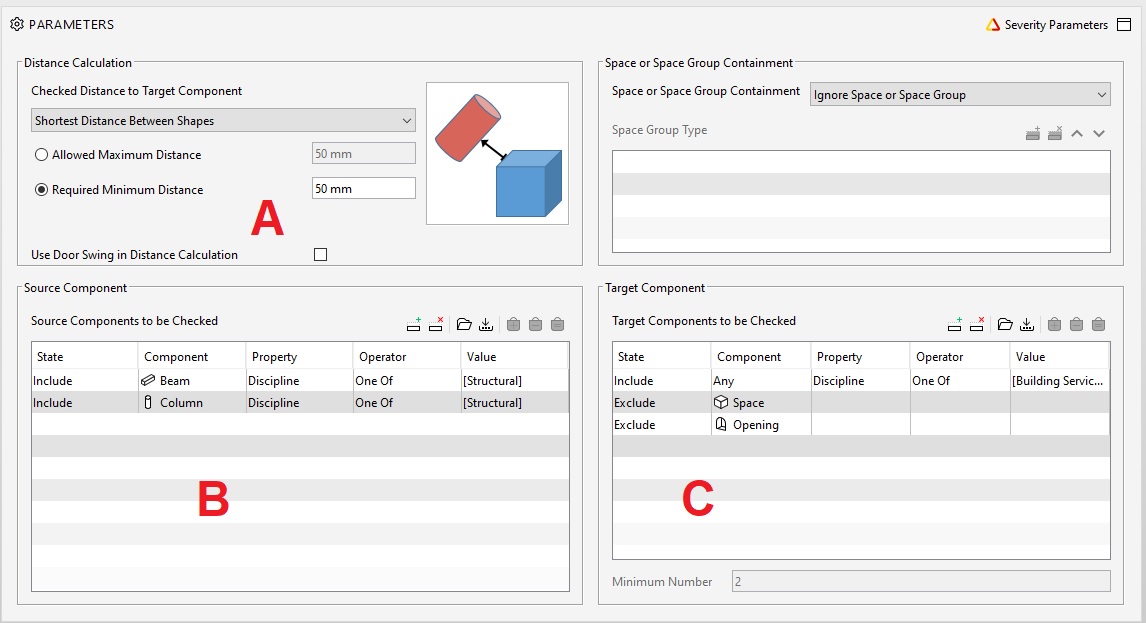
Example 1: Distance between Structual columns/beams and HVAC components
To begin with, let’s assume that we have a design requirement that all structural columns and beams need to be placed min. 50mm from the HVAC system. We want Solibri to inform us about all building objects that don’t meet such requirements.
Below we see a screenshot from Solibri, where we create a checking rule according to our requirements.
A – In this field, we define the minimal distance between 2 elements – in our case 50 mm.
B – Here we define the first group of elements that we take into account during the check – structural columns and beams
C – Here we define the second group of elements that we take into account during the check – HVAC system
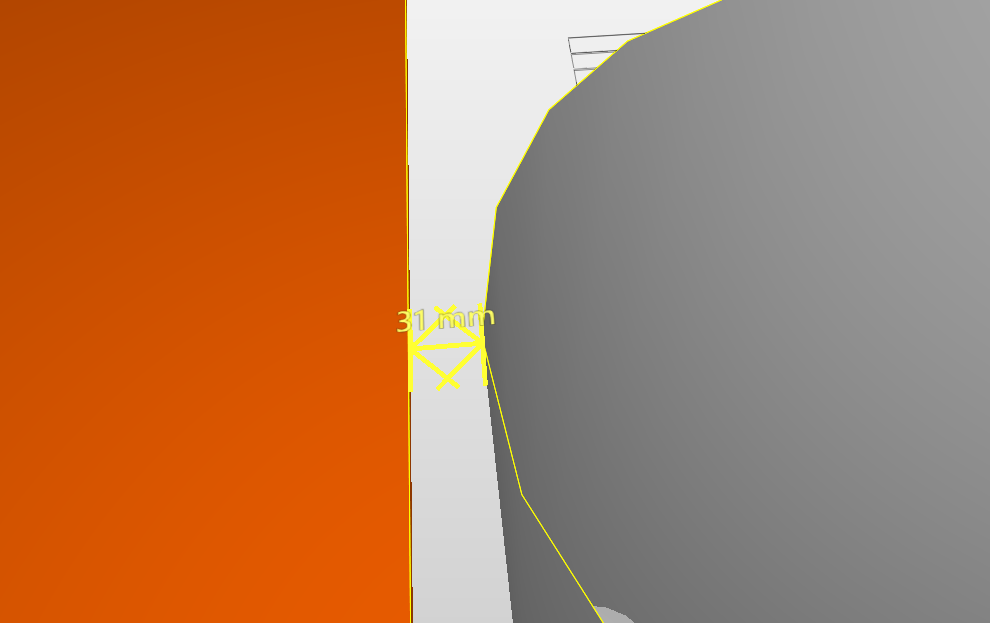
I used this rule to check an example model. After the check, Solibri found such an issue:
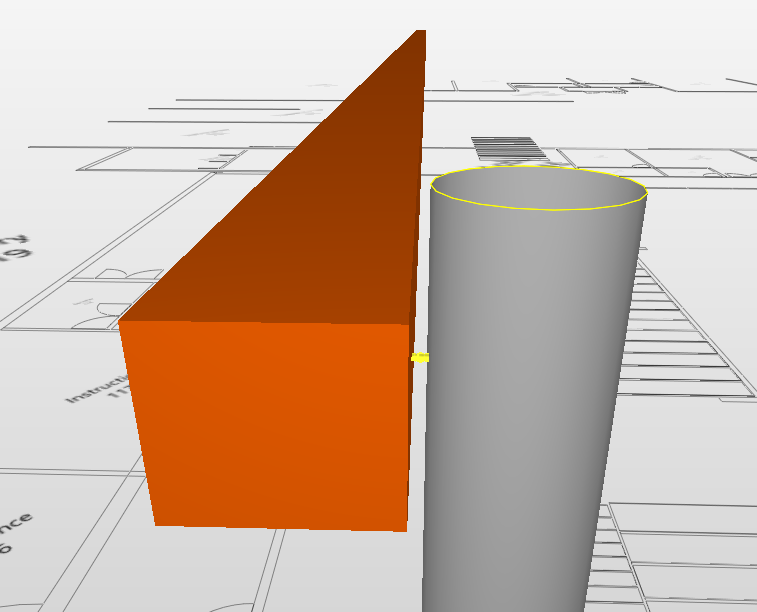
As you see HVAC duct (orange) is too close to the structural column(gray). The distance between them is 31 mm which is less than 50mm. Solbiri treats this case as an issue and warns us about it.
Example 2: Floor names must agree
In the next example, let’s assume that we have a project requirement saying that all level names must be defined as follows:
- 01 – Floor
- 02 – Floor
- 03 – Floor
- Roof
- Parapet
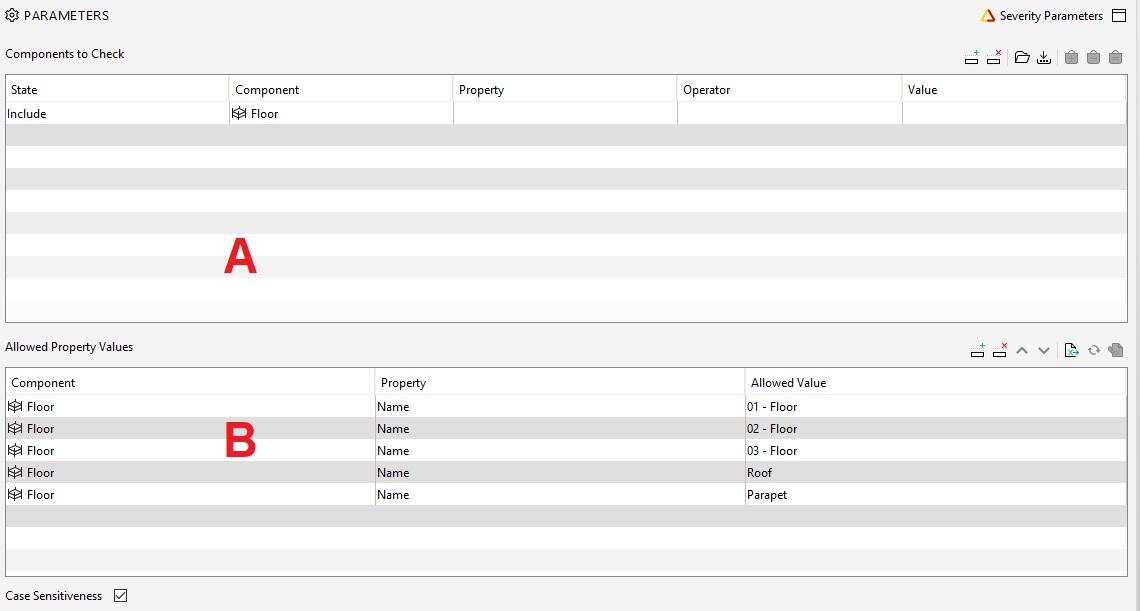
Below we see a screenshot from Solibri, where we create a checking rule according to the requirements that the model must meet.
A – In this field we define what parameter the given rule will apply to – in our case it’s a Floor
B – Here we define what allowed values a given parameter can have.
Note: At the very bottom, we set the Case Sensitiveness so that Solibi catches errors of small / capital letters
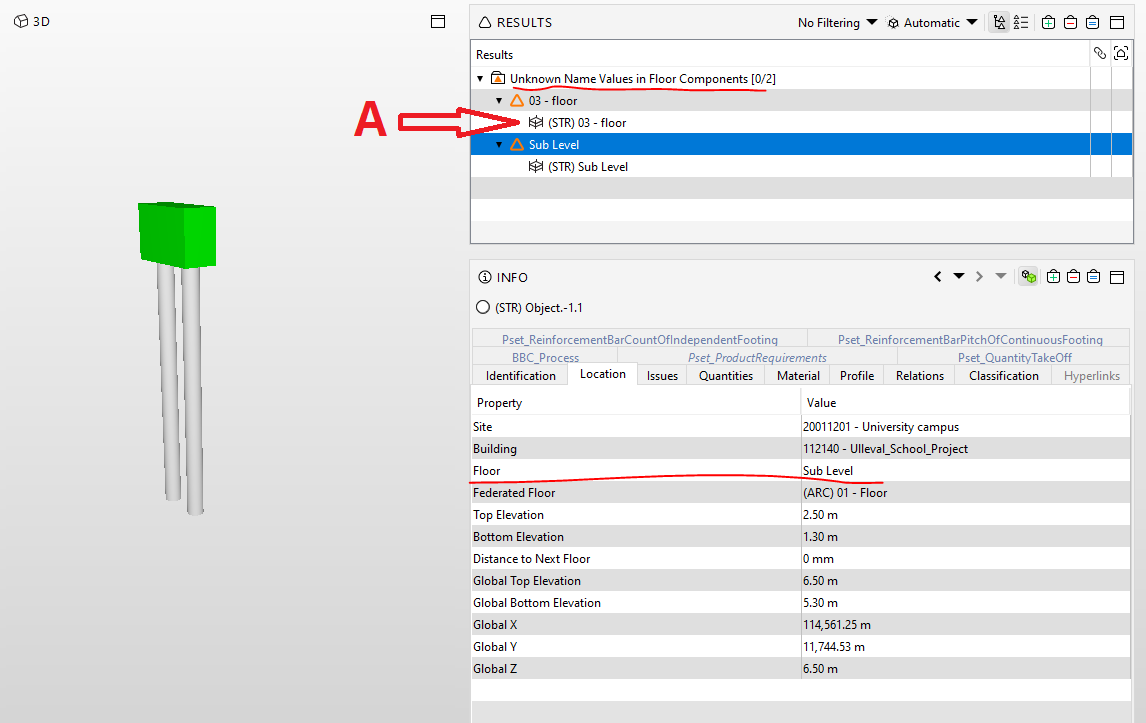
After the check, we can see that the program found elements that are associated with level – “Sub Level”. This isn’t a valid level name, so Solibri automatically considers it as an error. We are able to react quickly and send a given issue to the designer for revision.
What’s more, note that the name of the level (letter A in the picture below) 03-floor is also considered an error as it is not capitalized since we set the Case Sensitiveness option enabled in the rule above.
Would you like to learn more about BIM COORDINATION? JOIN AN ONLINE PROGRAM TO BOOST YOUR SKILLS
Example 3: Parameter “LoadBearing” must exist
The final requirement is that all structural elements need to have “LoadBearing” properly filled in. Load Bearing property comes from IFC common property set. More about IFC common properties you can read here.
In section A – of the rule, I define what elements will be included. In this case all structural elements.
In section B – I tell Solibri that LoadBearing property in IFC Common property set for walls, beams columns, and slabs must exist.

After the check, Solibri warns us that some of the slab elements (in this case piles) don’t have LoadBearing property filled in.

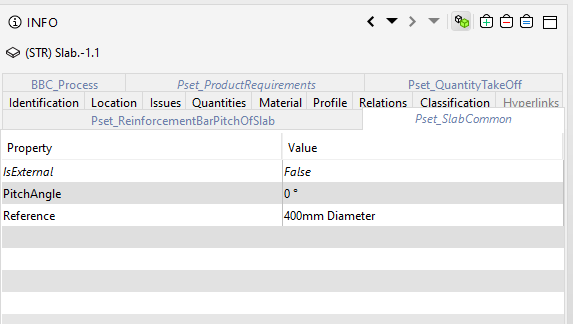
As you see in the picture above, LoadBearing parameter doesn’t exist in the pile elements.
Other rule-based BIM quality assurance software
As you can see from the above examples, building a rule and checking the model using them gives BIM Coordinators super powers. Thanks to well-defined rules, the model verification process is structured and automated.
Apart from Solibri, there are also other programs availble on the market that use rules to validate BIM models.
It is worth checking applications such as:
- BIMcollab Zoom – that integrates perfectly with the BIMcollab model error management cloud,
- Varifi3d – which is a web based application used to validate BIM models,
- BIM Interoperability tools – If you are a Revit user, it’s also worth checking a FREE plugin called BIM Interoperability tools. It has a module called – Model Checker for Revit where by setting appropriate rules, you can verify model information already in the design authoring tool.
To sum-up
We should start treating the BIM model as a treasure trove full of information. As I showed you today it not only describes a geometric form but also has a lot of non-geometric data linked to the elements. This data is becoming more important every day (More about data in BIM you can read here).
We need to make sure that the quality of that data meets the client’s expectations and requirements. Rule-based model checking helps us achieve that by making the coordination process automated and less error-prone.
In this post, I’ve wanted to show you the general idea round rules in BIM coordination and the quality assurance process. I’ve just touched the tip of an iceberg and there is a lot more to tell about. In the next articles, I will gradually reveal other aspects of rule-based checking showing you its practical examples.
And what about you? Do you use rules to check the quality of models in your company? Leave the comment below 🙂


Hey Ignacy! You can now add Plannerly (The BIM Management Platform) to the list of automatic rule-based checking of models too
Great to hear. Looking forward to checking its funcionalitites