Welcome to our easy-to-follow guide on getting started with Tekla Live Link! If you’re new to using Tekla and Grasshopper together, this article is perfect for you. We’ve broken down the process into five straightforward steps so you can quickly learn and start using these powerful tools in your projects.
Table of Contents
1. Download
The first step is all about getting the necessary software. I will guide you on how to download Tekla Structures, Rhino, and Tekla Live Link.
1.1. Tekla Educational Version
Create a free Trimble identity in order to get a educational license.
Sign in to your Tekla Online Profile using your Trimble Identity. Activate the student subscription on the Activate licenses tab.
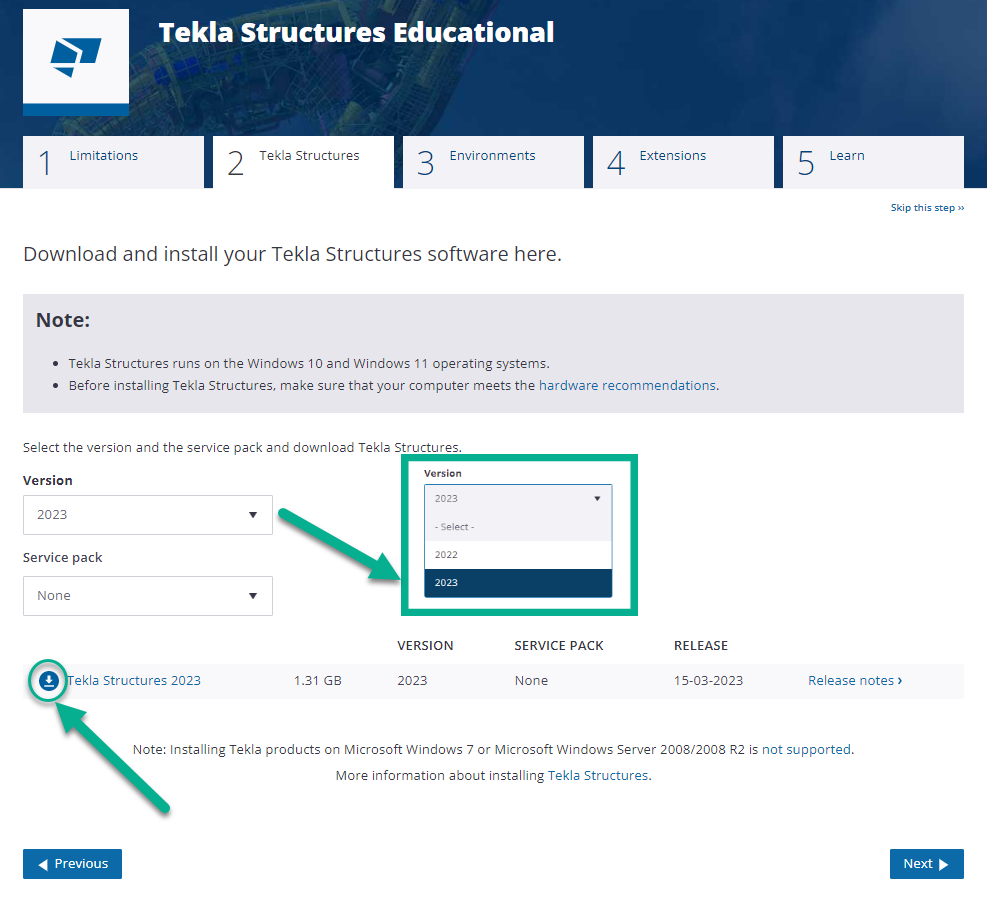
Download the latest version of the Tekla Structures Educational software from Tekla Site. Choose latest 2023 version and then click download button.
You need Trimble ID in orded to download the Tekla
1.2. Rhinoceros
Rhino offers both evaluation and commercial licenses. Evaluation licenses are valid for 90 days and can be used to evaluate the software before purchasing a commercial license.
Navigate to the Rhino website and click on the “Download” button.
Select the version of Rhino that is compatible with your operating system (Windows or Mac).
Follow the prompts to complete the installation process.
Obtain a license:
To obtain an evaluation license, navigate to the Rhino website and click on the “Evaluate” button. Fill out the form, and you will receive an email with your evaluation license key.
After creating an account, you will be able to download the Rhino evaluation version. It is the full version of the software with no limitation of use.
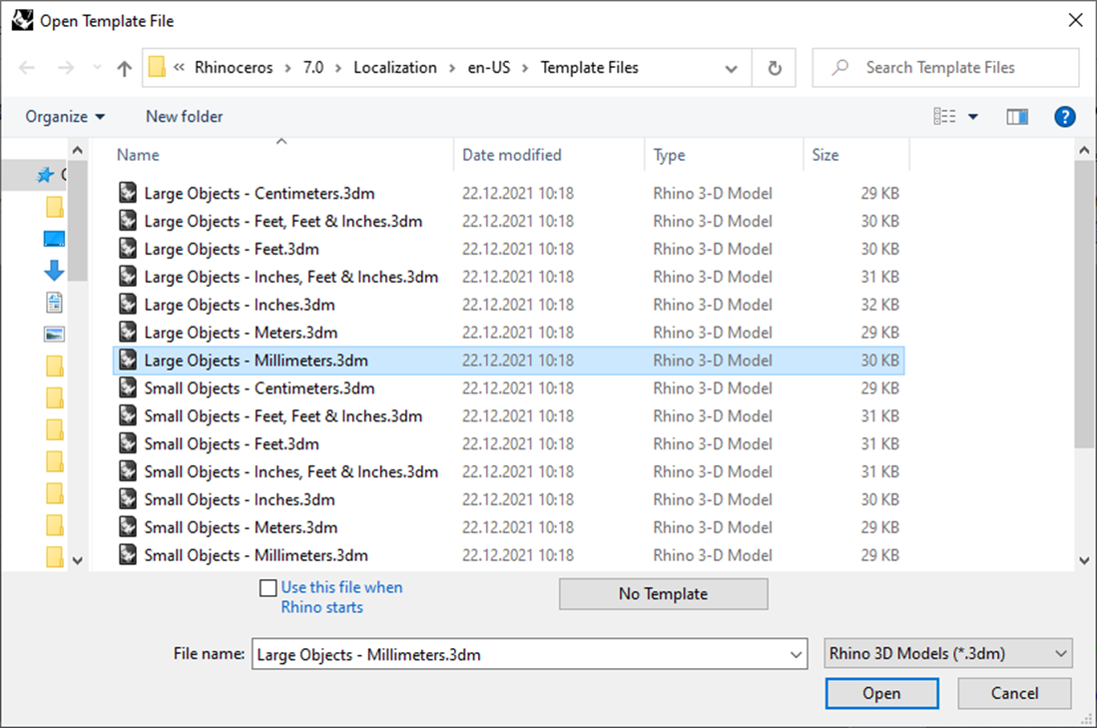
After successful Rhino installation, you can lunch it. If the window with templates will appear, choose Large Objects – Millimetres or inches if your prefer that.
Grasshopper
GH is a free add-on for Rhino and does not require a separate license key.
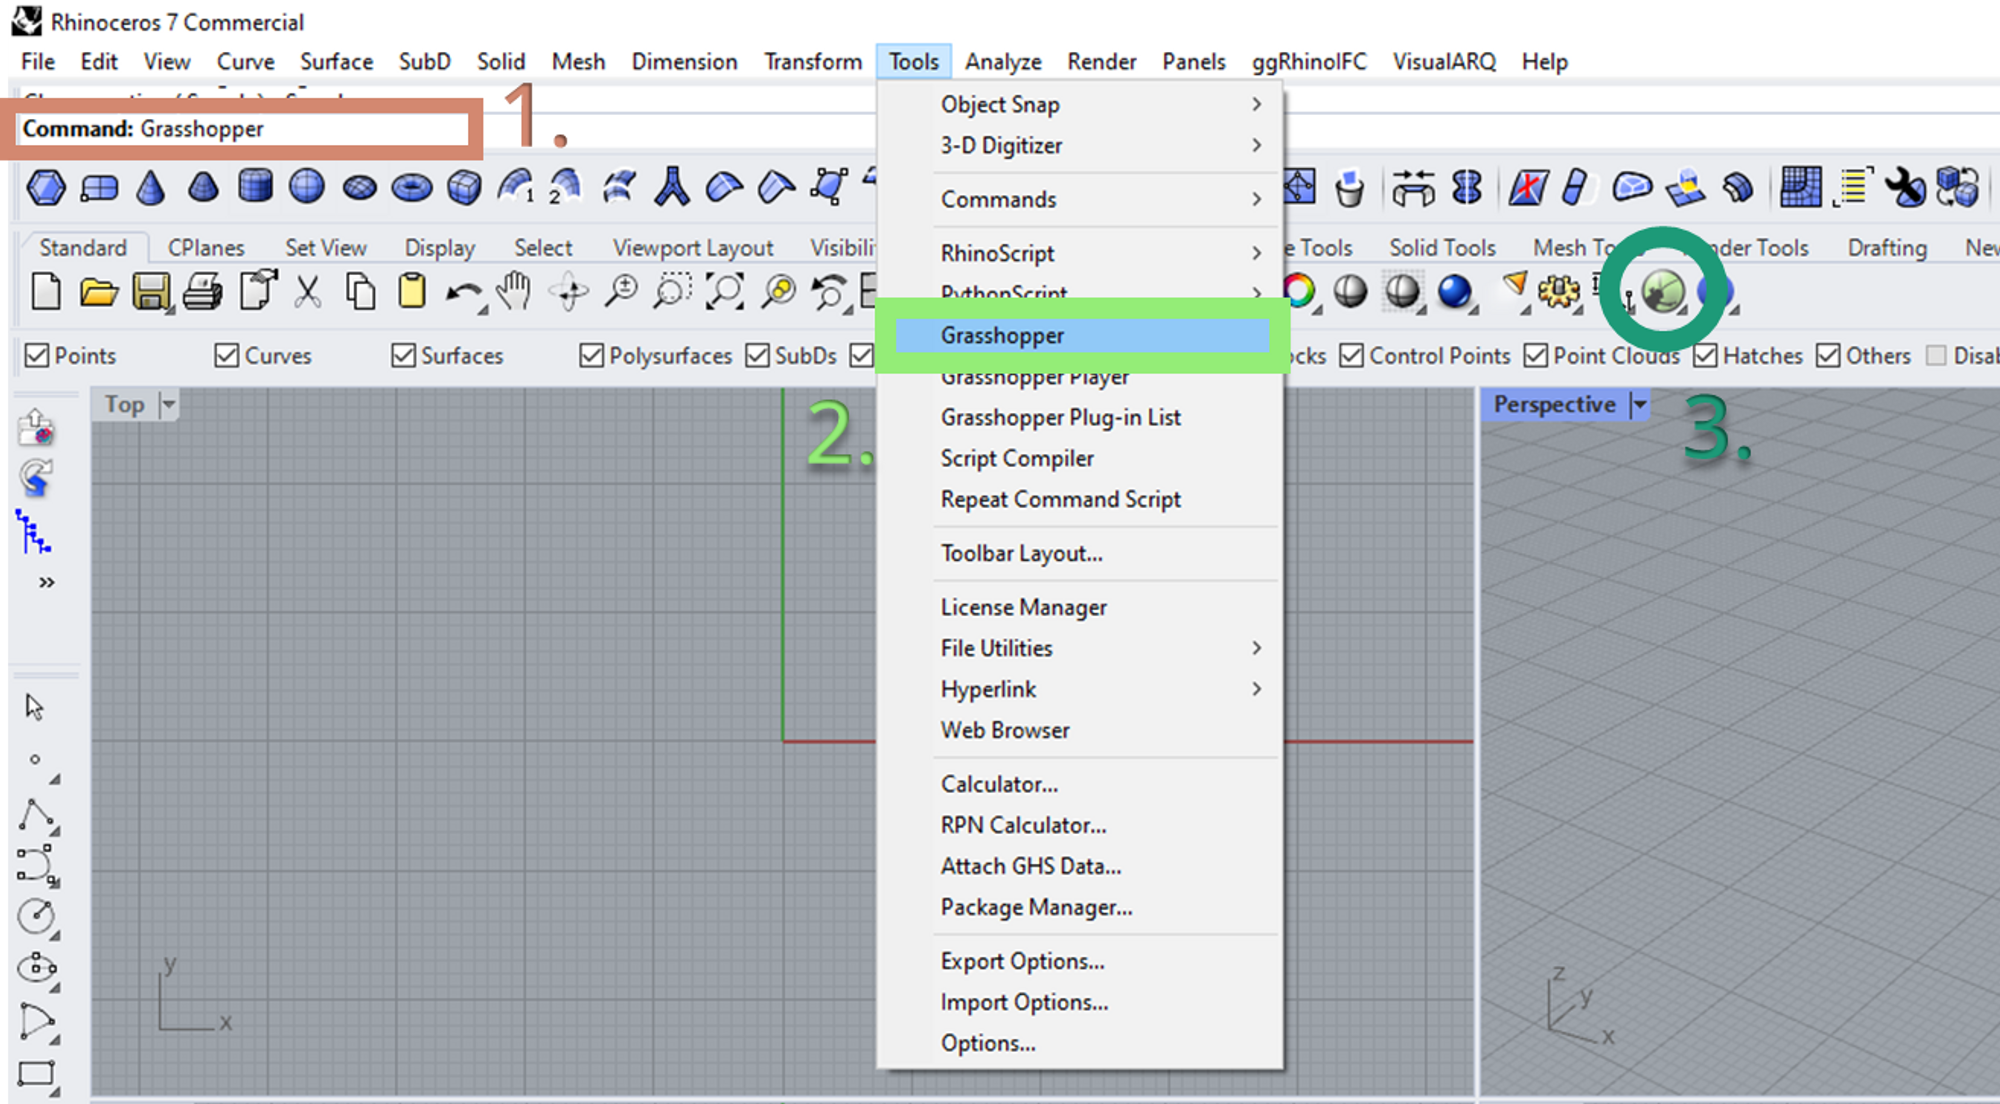
Grasshopper can be launched in several ways:
Writing command ”Grasshopper”
Selecting Grasshopper under the ”Tools” dropdown menus
Selecting Standard –tab and press the Grasshopper icon
Grasshopper can be launched in several ways.
1.3. Tekla Live Link
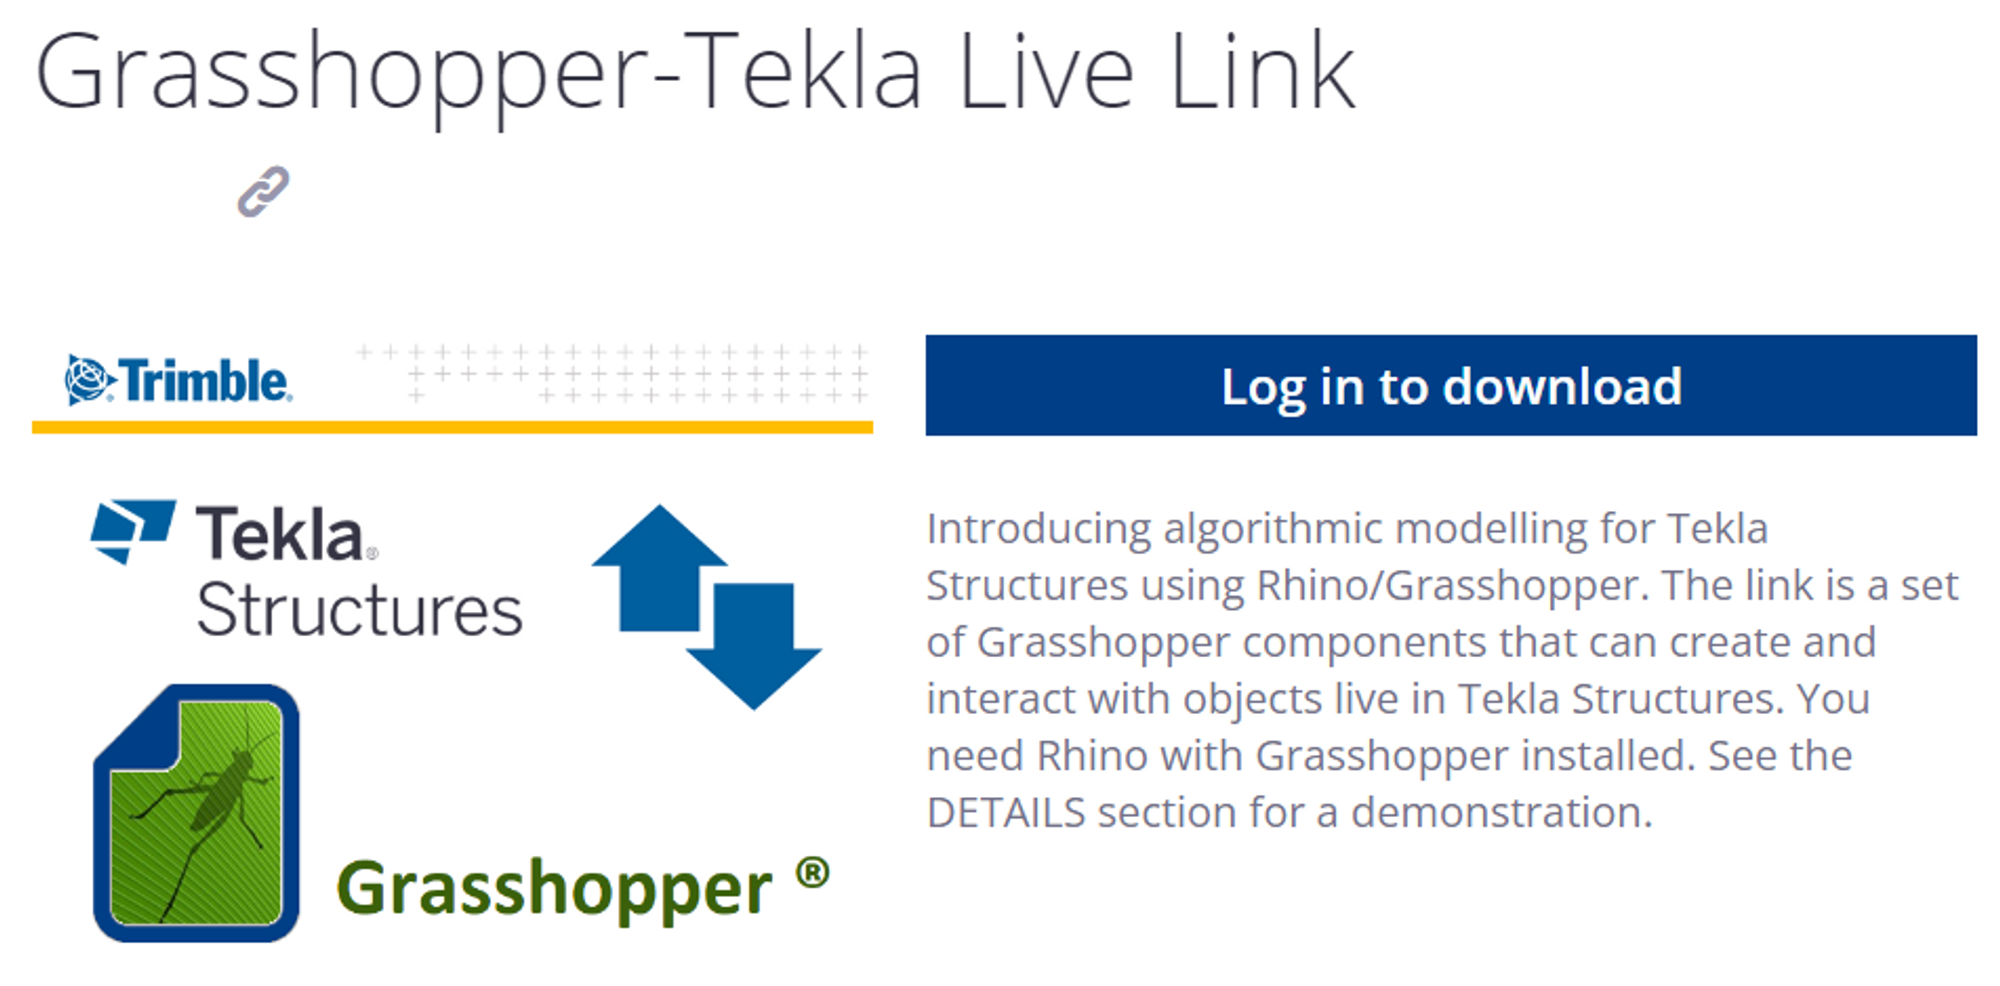
In order to download the latest version of the Grasshopper-Tekla live link associated with the Tekla version that you are using go to link from Tekla Warehouse.
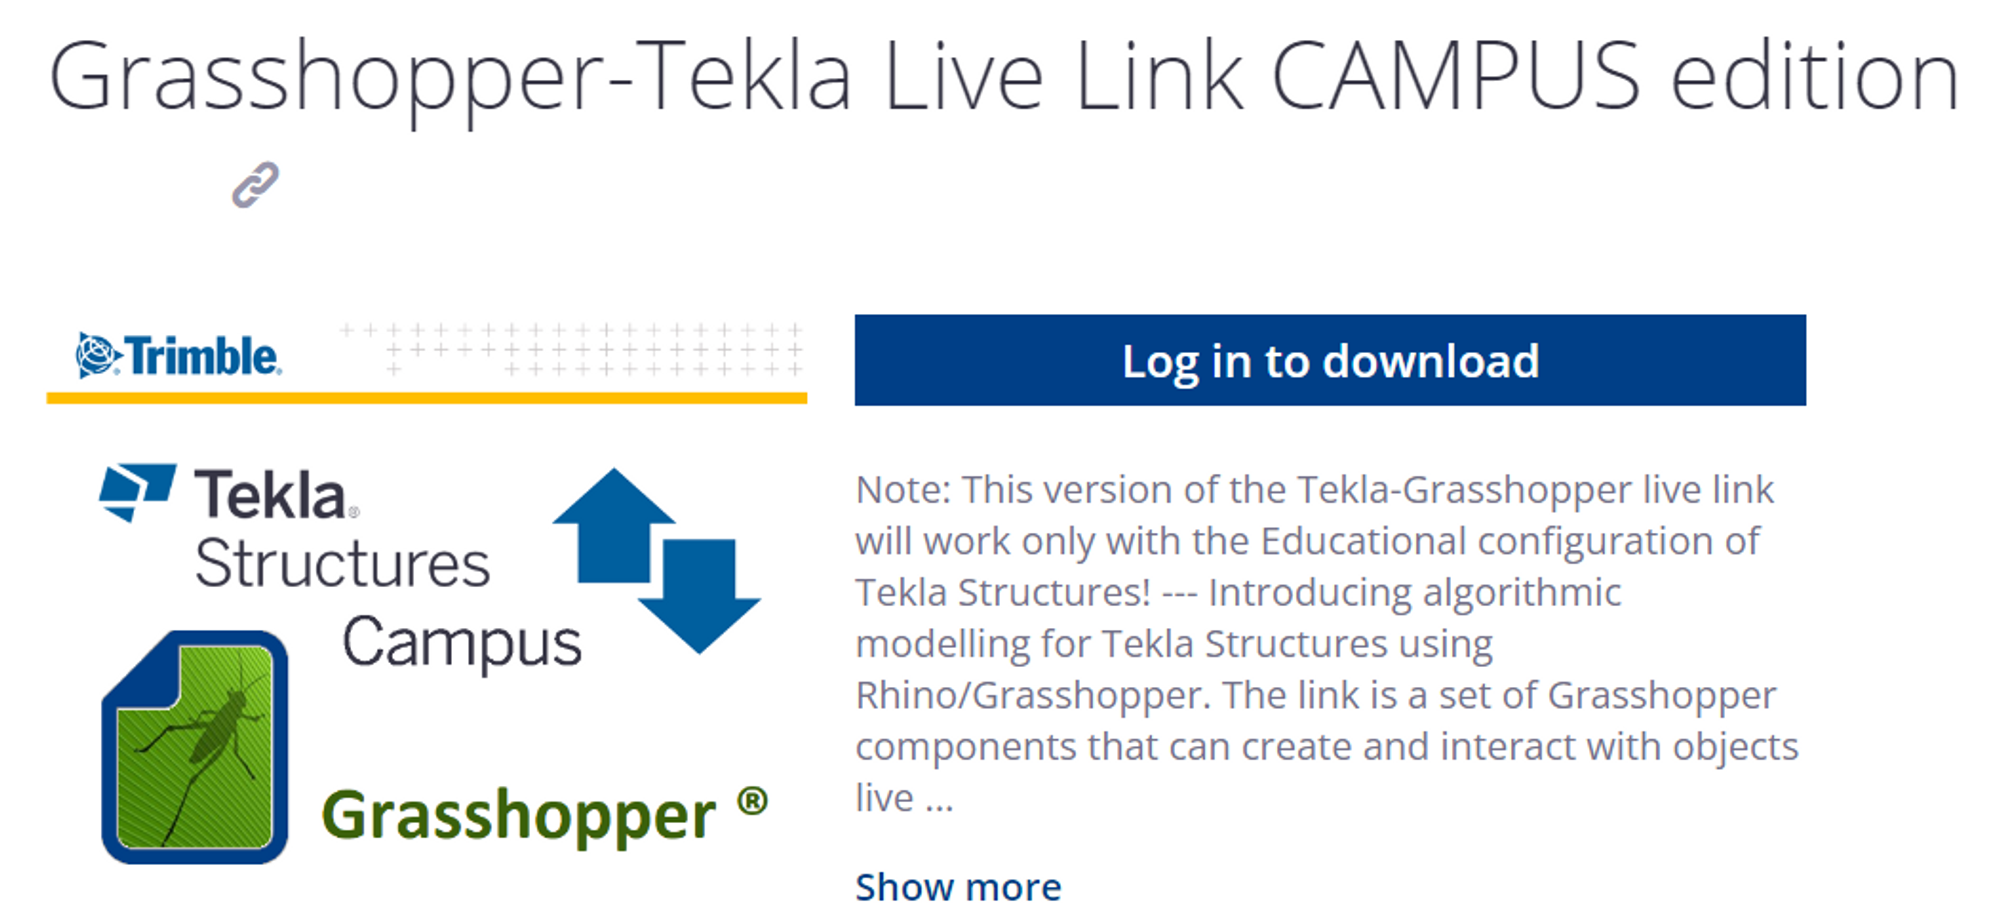
You need a Trimble account and Tekla maintenance in order to download the connection. If you are using an Educational Tekla license, you have to download an educational version of a plugin as well.
The standard version of the Live link
The educational version of the Live Link
The downloaded Live link is in the form of a Grasshopper Assembly file.
Make sure you download a package targeting the (installed) Tekla Structures version you’d like to work with.
2. Set-up
Step-by-step process of installing the Tekla Live Link:
1. The first thing to do is to check if the Grasshopper file is Unblocked.
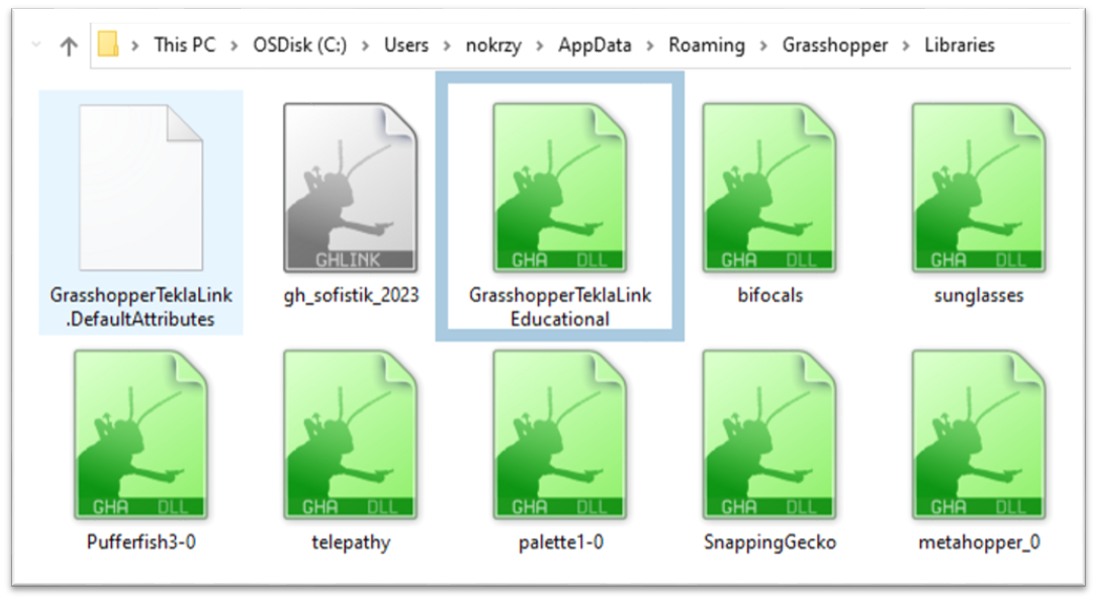
After unpacking .zip file GrasshopperTeklaLink_[version].[edition], you will see green .gha (Grasshopper Assembly file):
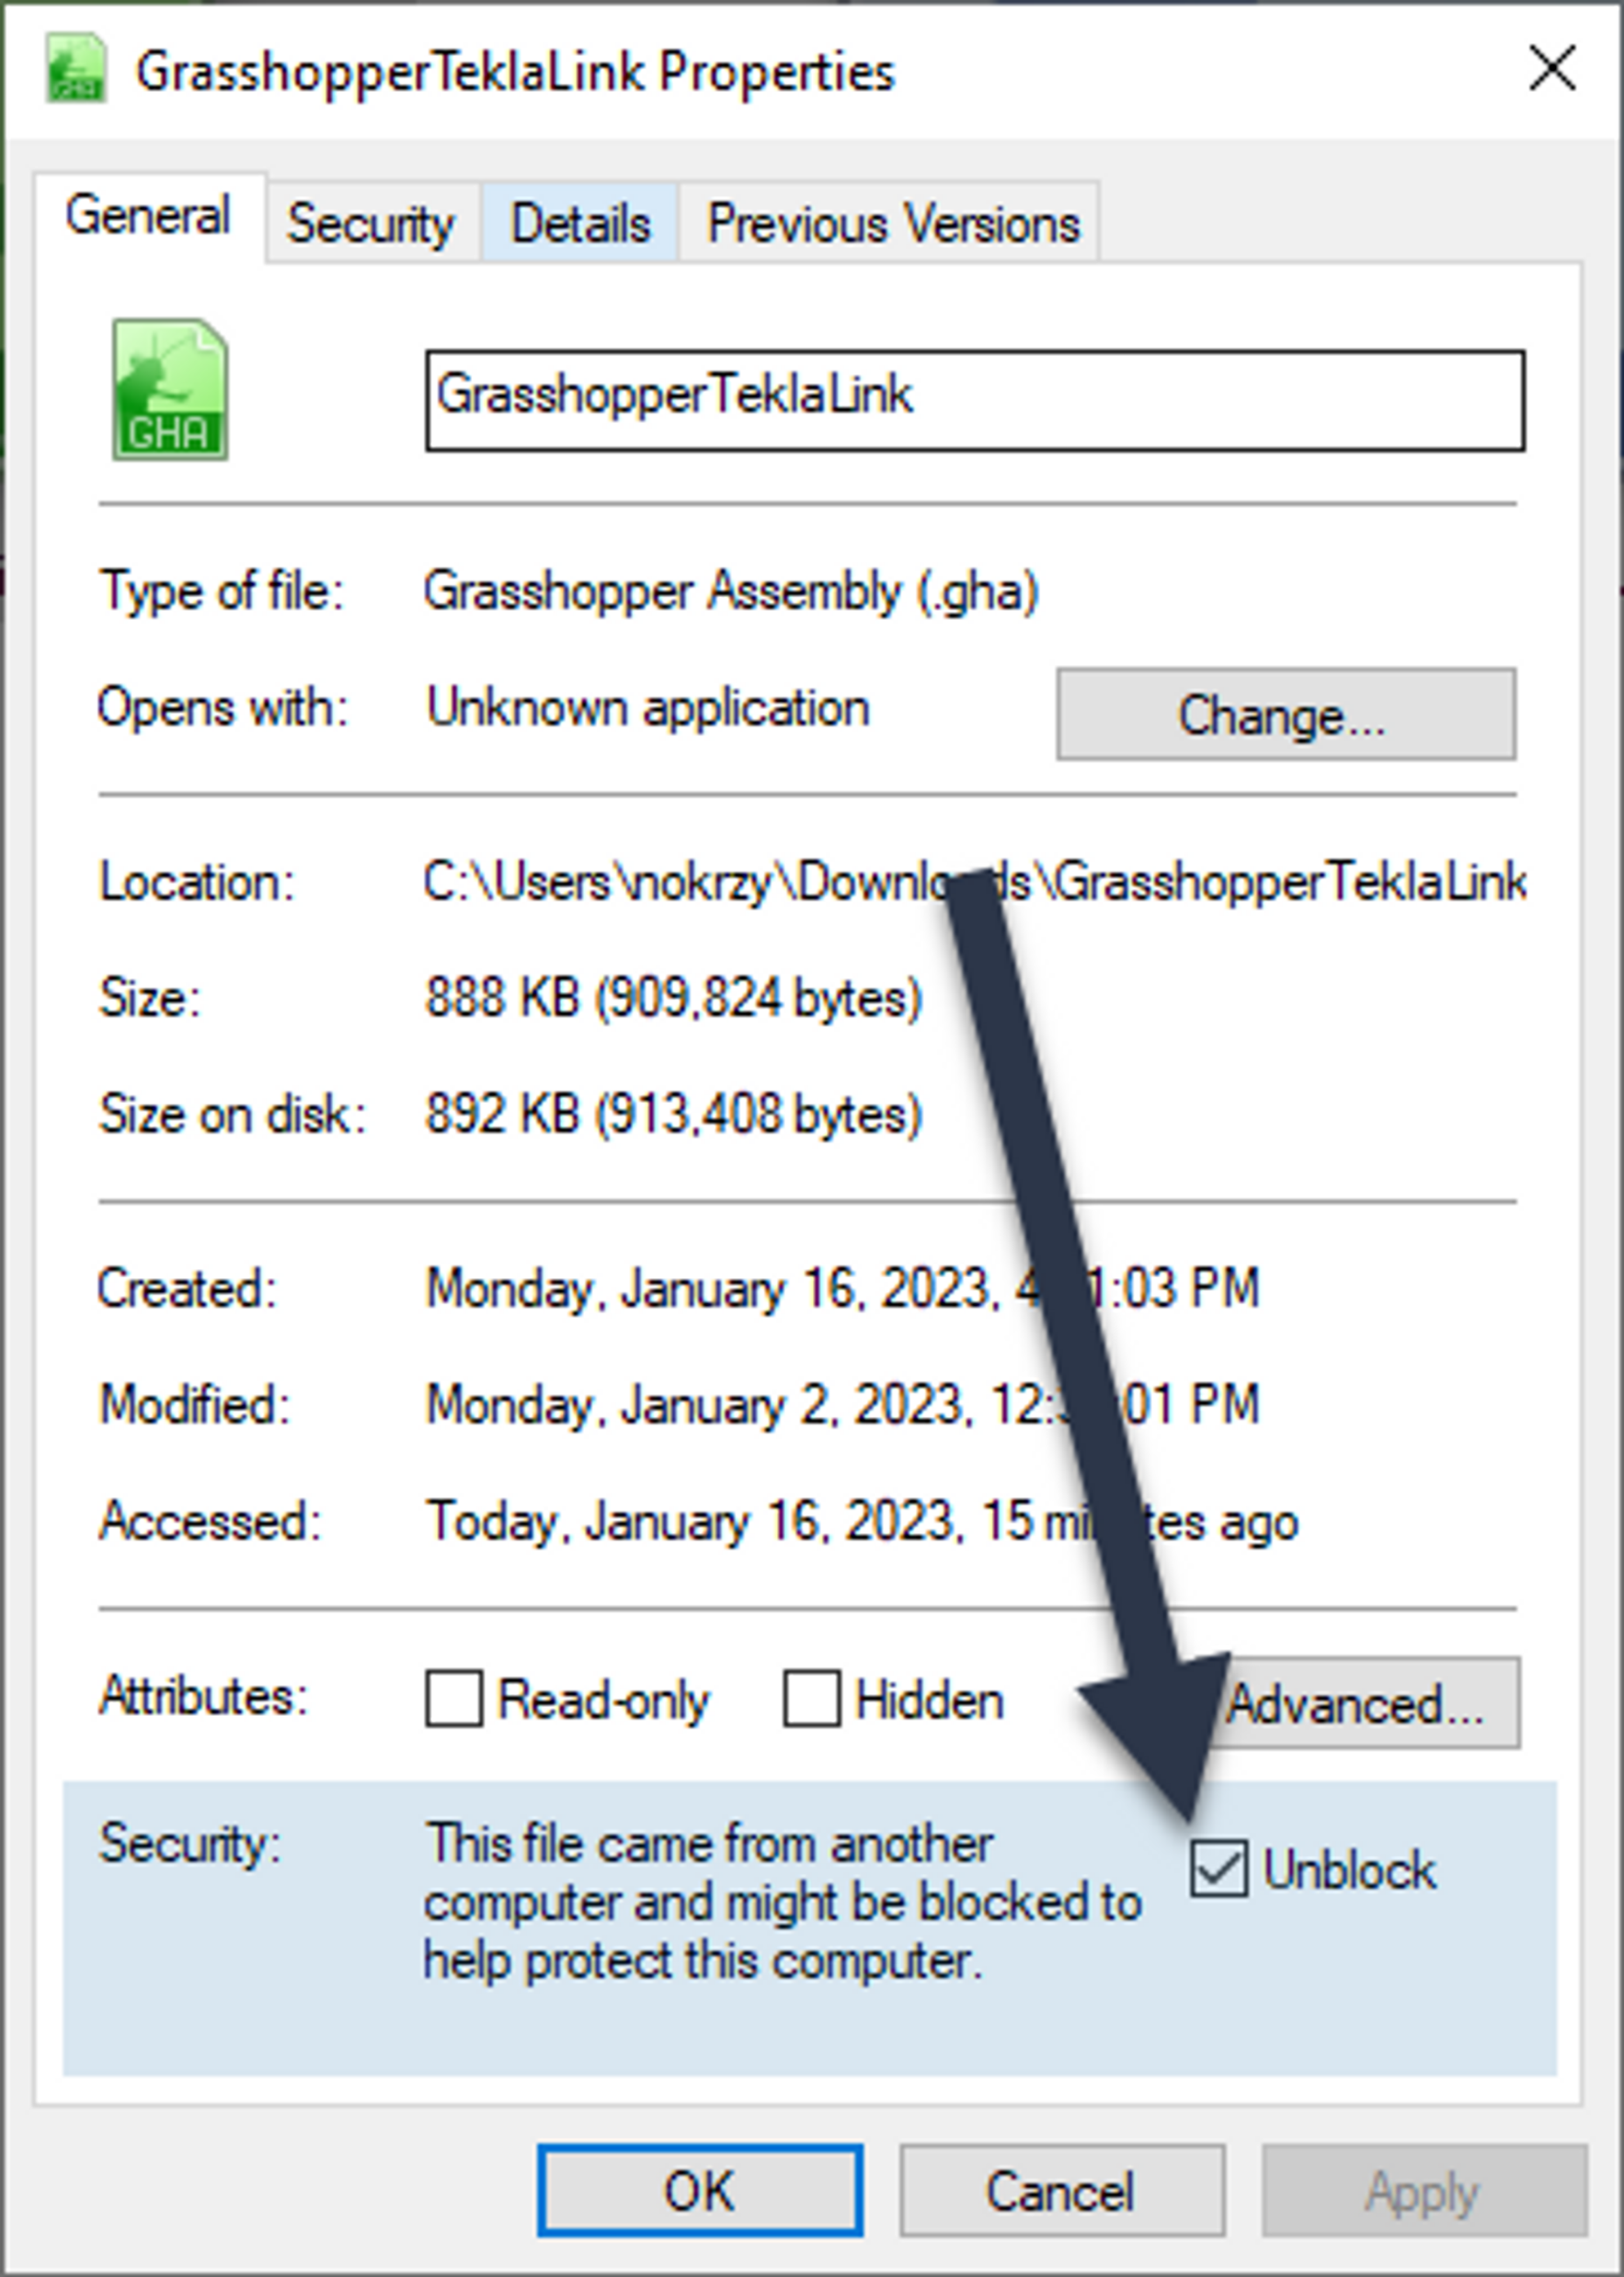
Right-click GrasshopperTeklaLink.gha and click Properties.
If you see an Unblock button, check the box and click Apply and OK buttons.
Unblock your GH assembly file
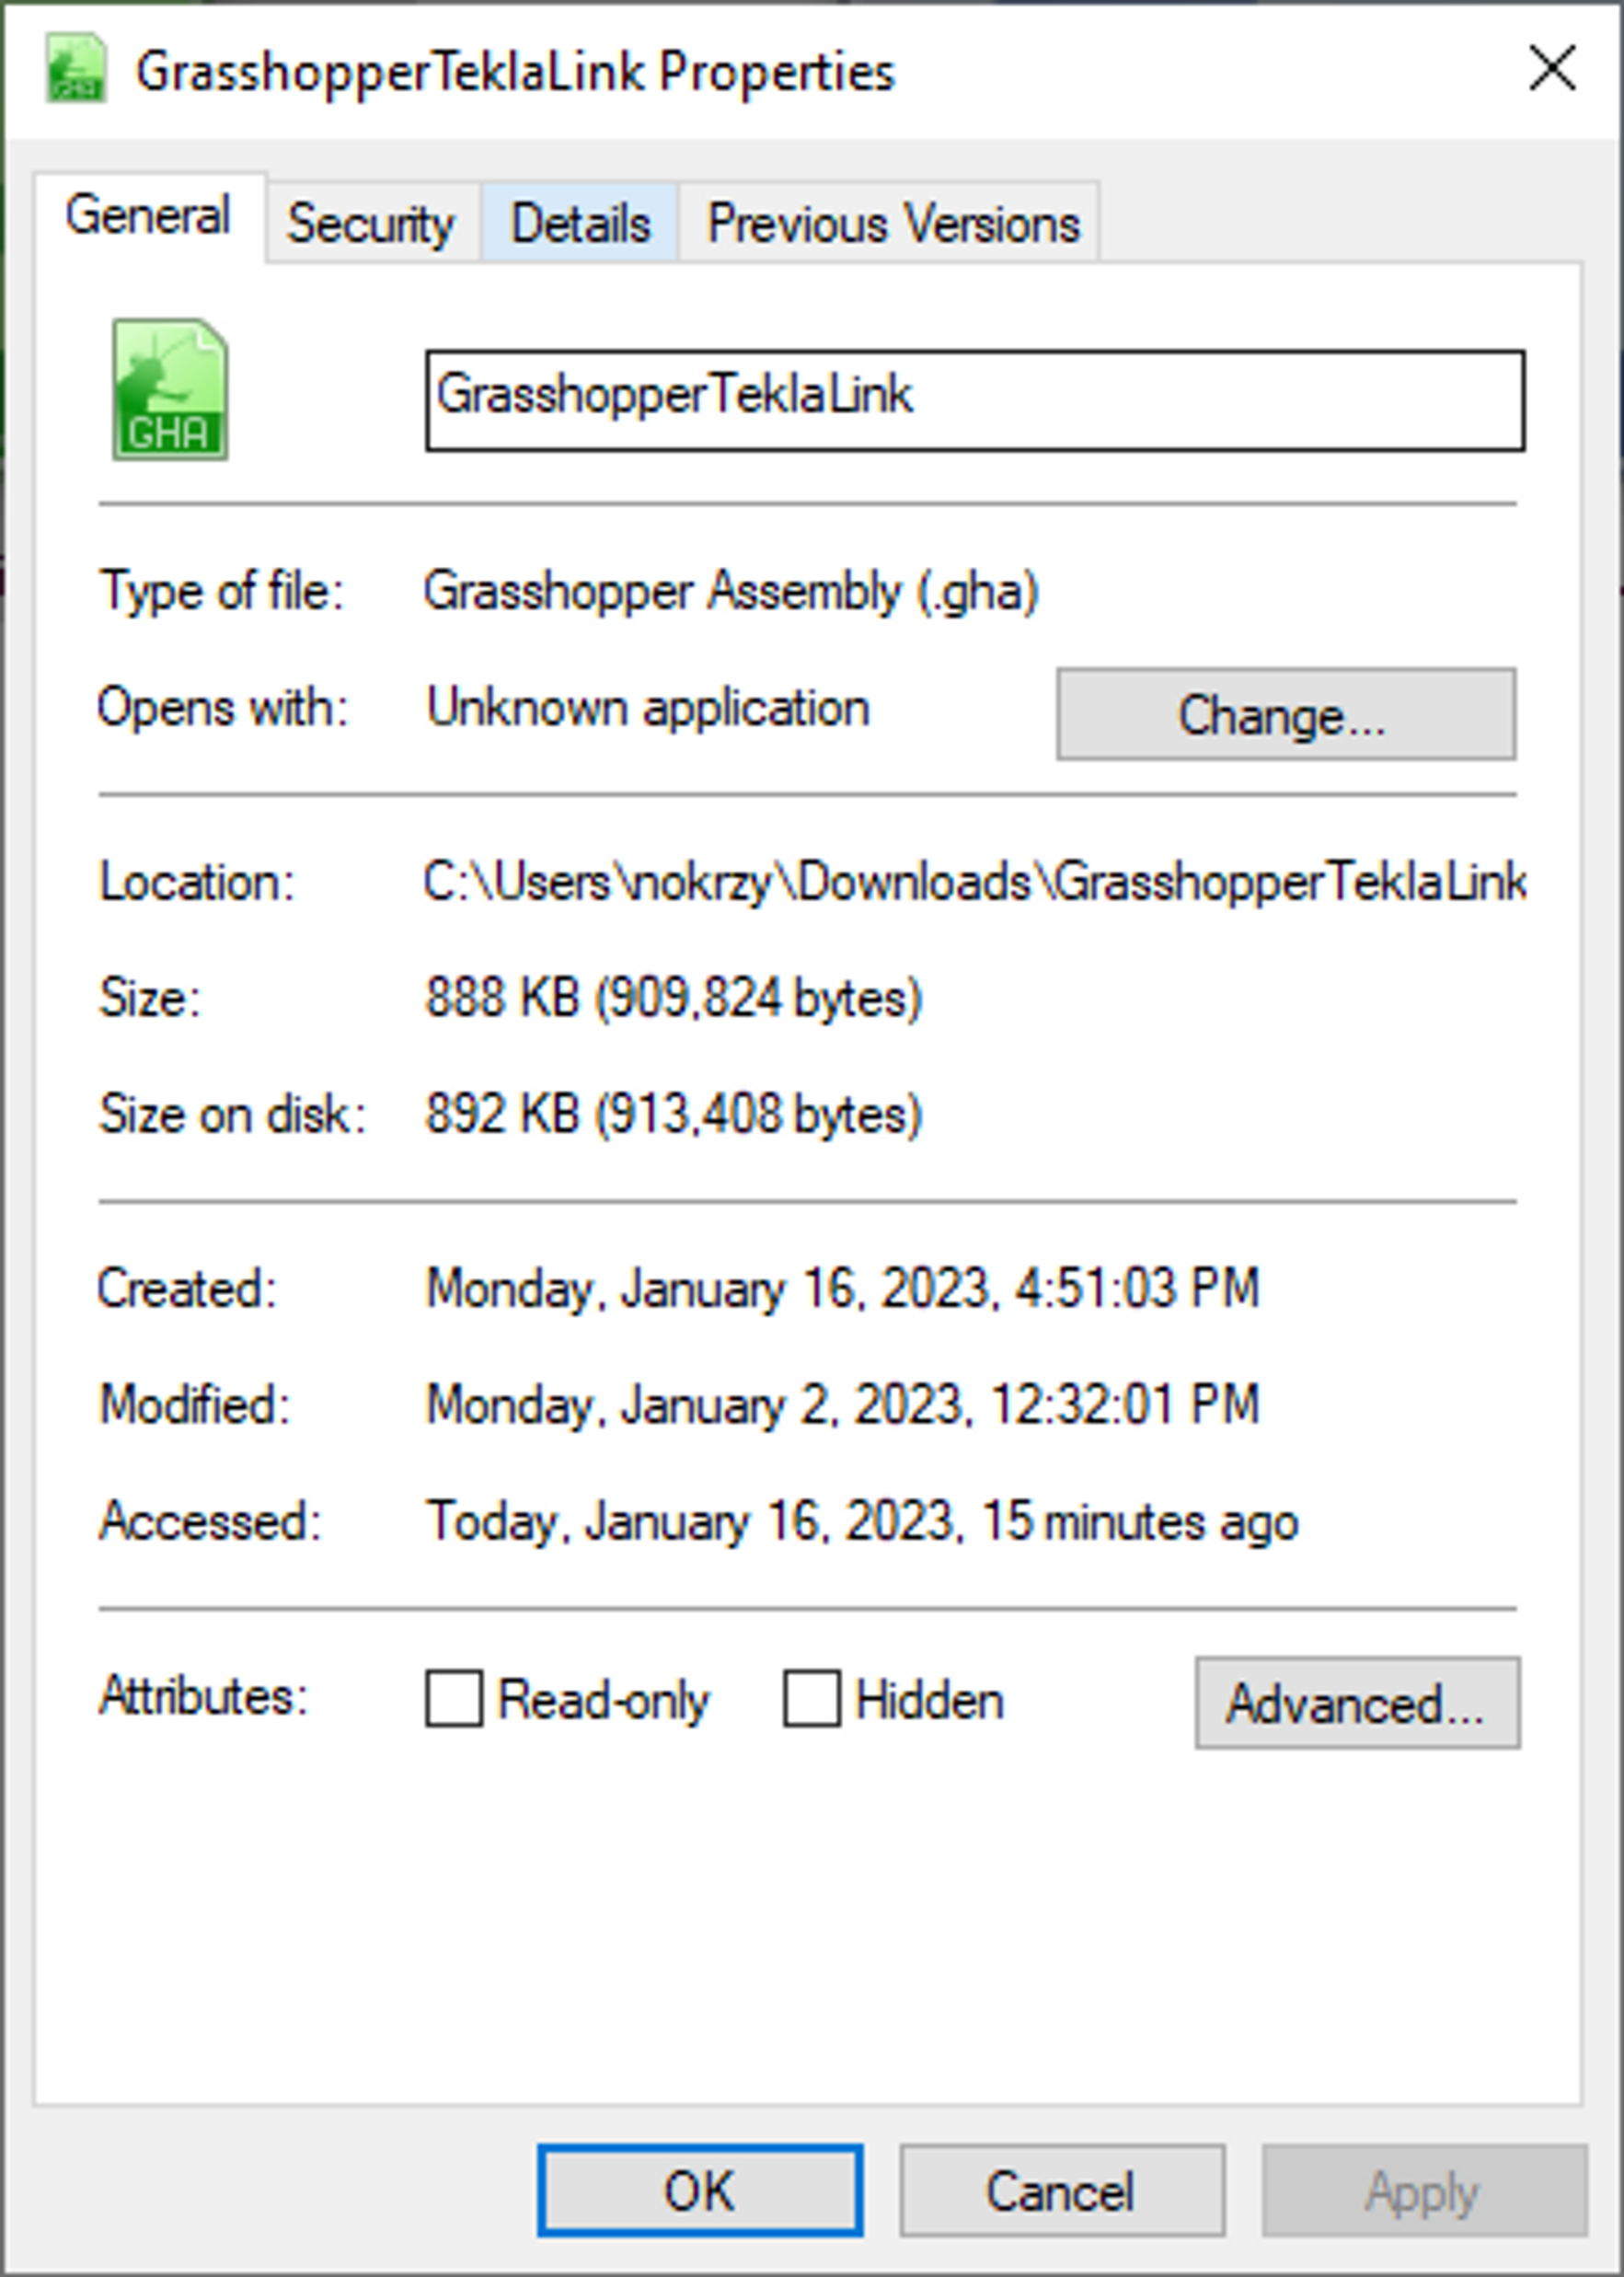
If you don’t see an Unblock button, the file is not blocked and is ready to install.
Properties of a GHA files after unblocking
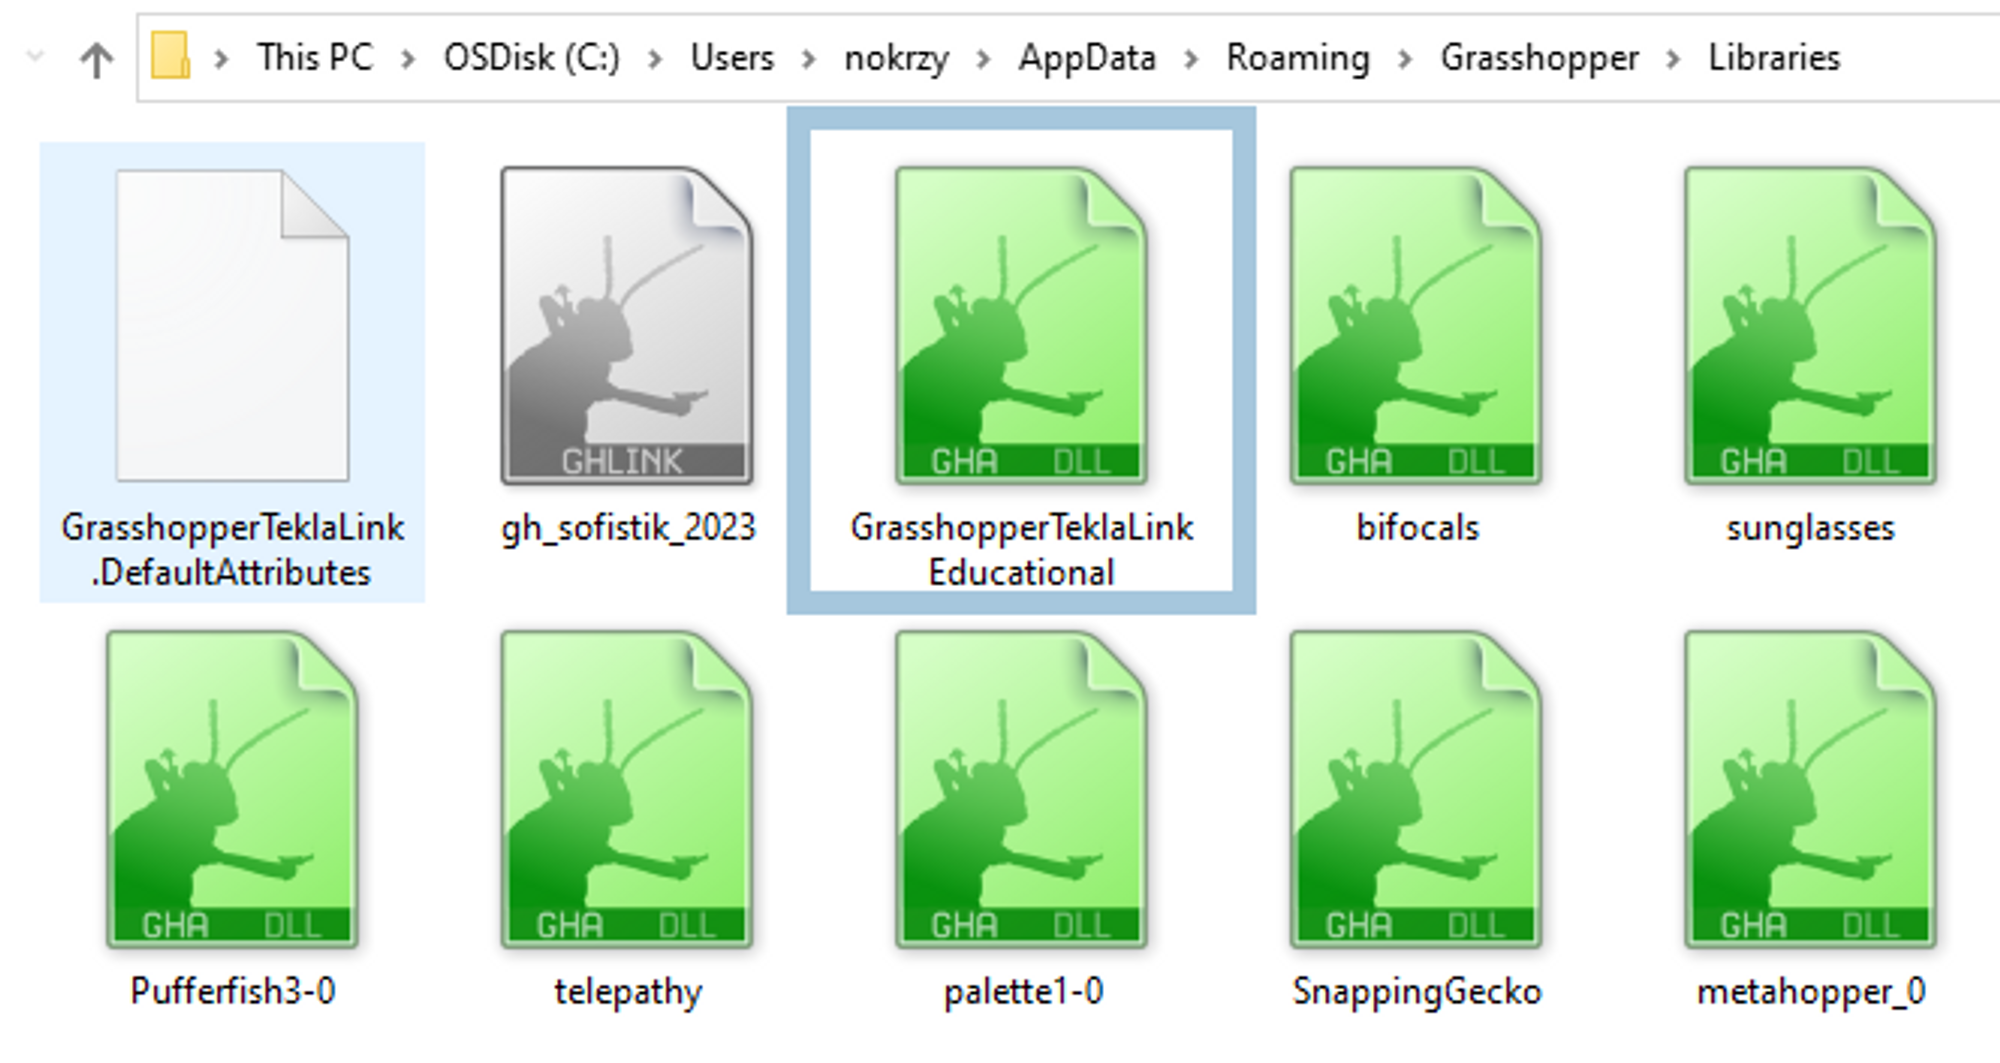
2. Open the Components Folder in Grasshopper (\Grasshopper\Libraries). This folder contains all 3rd party Component Libraries.
This is where you can find Components Folder
3. Copy and paste into the Components Folder the unblocked GH assembly file downloaded from Tekla Warehouse.
4. Close Rhino and Grasshopper.
5. Launch Tekla Structures [version] and create a new model.
6. Launch Rhino and Grasshopper again. A new component tab labelled Tekla [version] should appear, as well as a menu labelled Tekla in the menu bar.
Tekla Ribbon in Grasshopper
After the connection is established, you can use the Grasshopper-Tekla live link component to transfer data between Grasshopper and Tekla Structures.
But remember That you ALWAYS have to start your Tekla model first, then Rhinocores and Grasshopper.
Why doesn’t the link create anything in Tekla Structures?
Make sure you launch Tekla Structures and open a model first, and then launch rhino and Grasshopper.
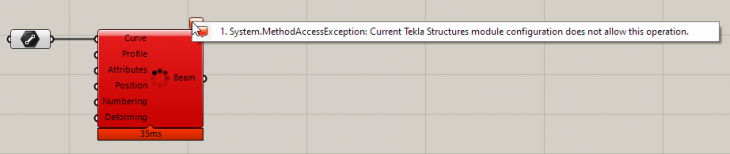
Make sure you’re not using the viewer or planner configuration of tekla structures, or the carbon license, as you can’t create objects with these.
Check if you have the correct Service Packs for Tekla Structures installed.
Set work area to entire model and adjust the view depth.
Check that the profiles and grades are choosen.
Error while creating Tekla element
How to update the link to another Tekla version?
To update the link or switch to target another Tekla version, you need to replace the link .gha file. Delate the old one and replace with new unblocked file.
Pro TIP: I have a separate folder with different GHA files and I am just replacing files.
GHA File should be copied to Grasshopper Libraries folder
3. Navigating
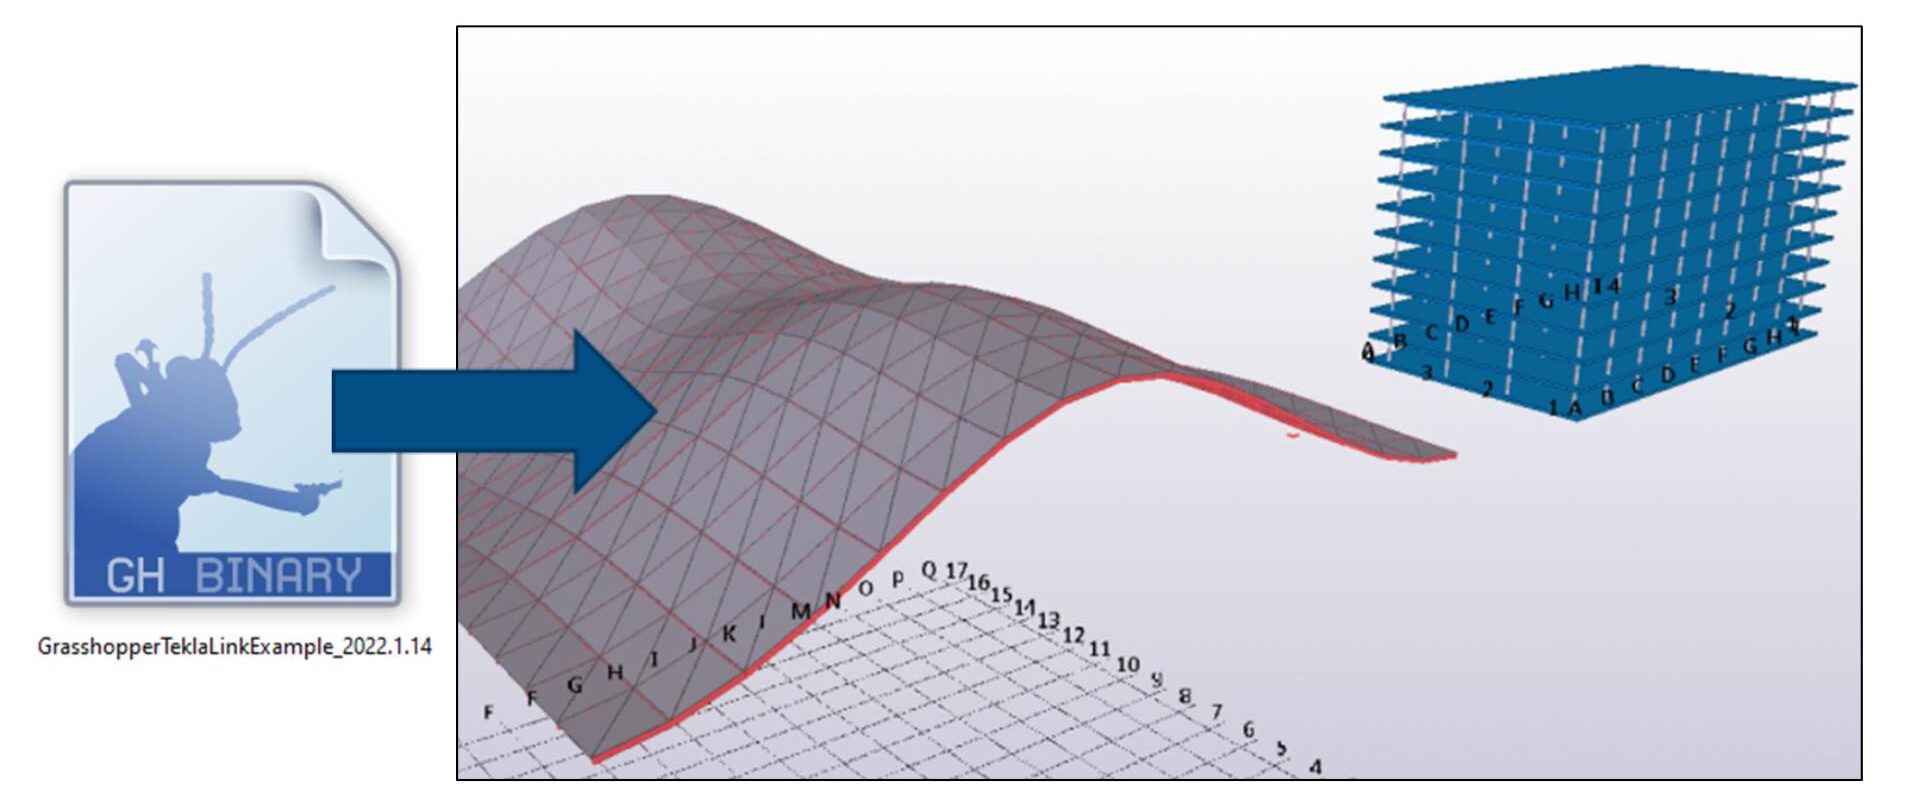
Together with Tekla Live link file you should find Grasshopper File (Blue one). Open the TeklaGrasshopperLinkExample.gh file in Grasshopper.
Pro Tip: You can easly drag and drop GH file into GRasshopper canvas
The solution should run and generate some example objects in the Tekla model
If some objects aren’t showing up, you probably need to expand the work area and/or view depth
TeklaGrasshopperLinkExample.gh
4. References
This critical section covers how to work effectively with imported files. We’ll discuss setting the correct model unit, establishing a base point, and placing your model accurately within the local coordinates.
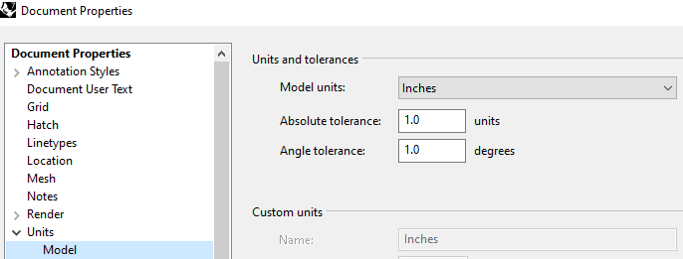
4.1. Model units
Template Large Objects and millimeters units is recomended
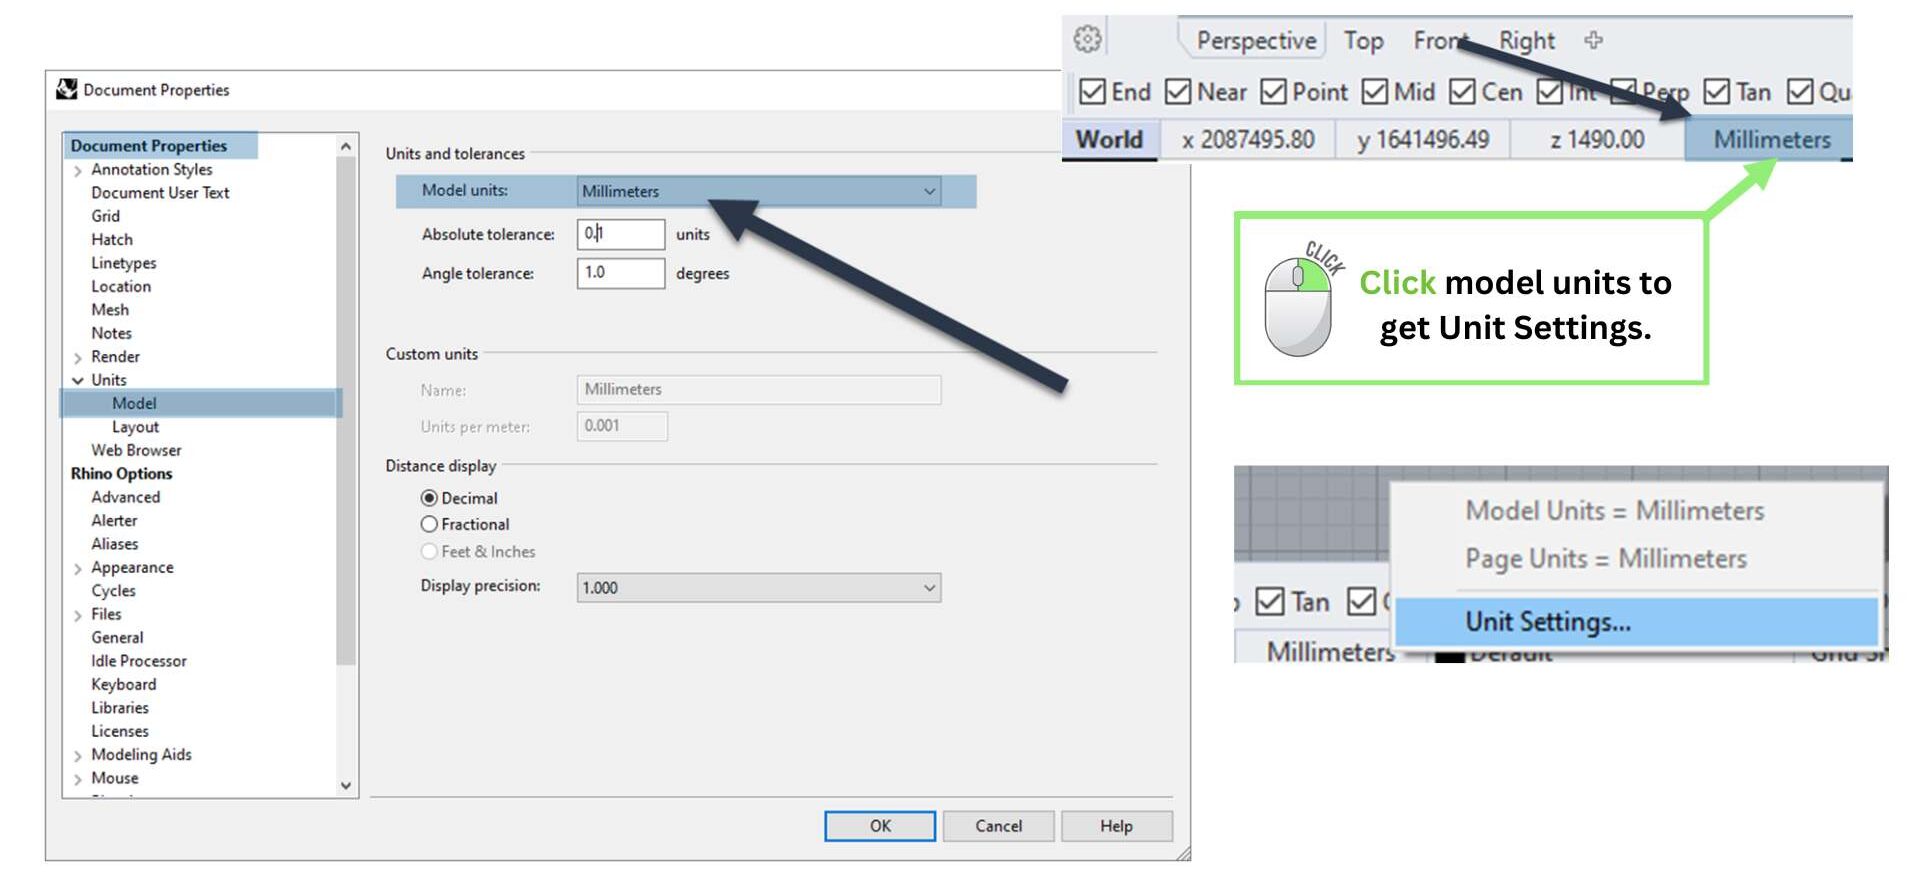
In document properties you can change the units
NOTE! While changing units in Tekla or Rhino, always restart two programs
While changing the units to mm in Rhino, look at the Tekla grid spacing (Tools > Options… > Grid) and set that to something sensible like 1000 mm.
4.2. Imperial units
For the geometry, the Tekla components will use the units of the currently open Rhino document and translate that to the units of the currently open Tekla model.
Certain attribute inputs like parametric profile sections might need to be in mm even if the Tekla and Rhino models are using something else like feet and inches. Scale accordingly.
If the Rhino document is changed, points picked in Tekla will use the new scale. However, referenced or internalised Rhino/Grasshopper point and geometry values won’t adapt. Keep this in mind if reusing a script from a different system.
Imperial units in Rhino
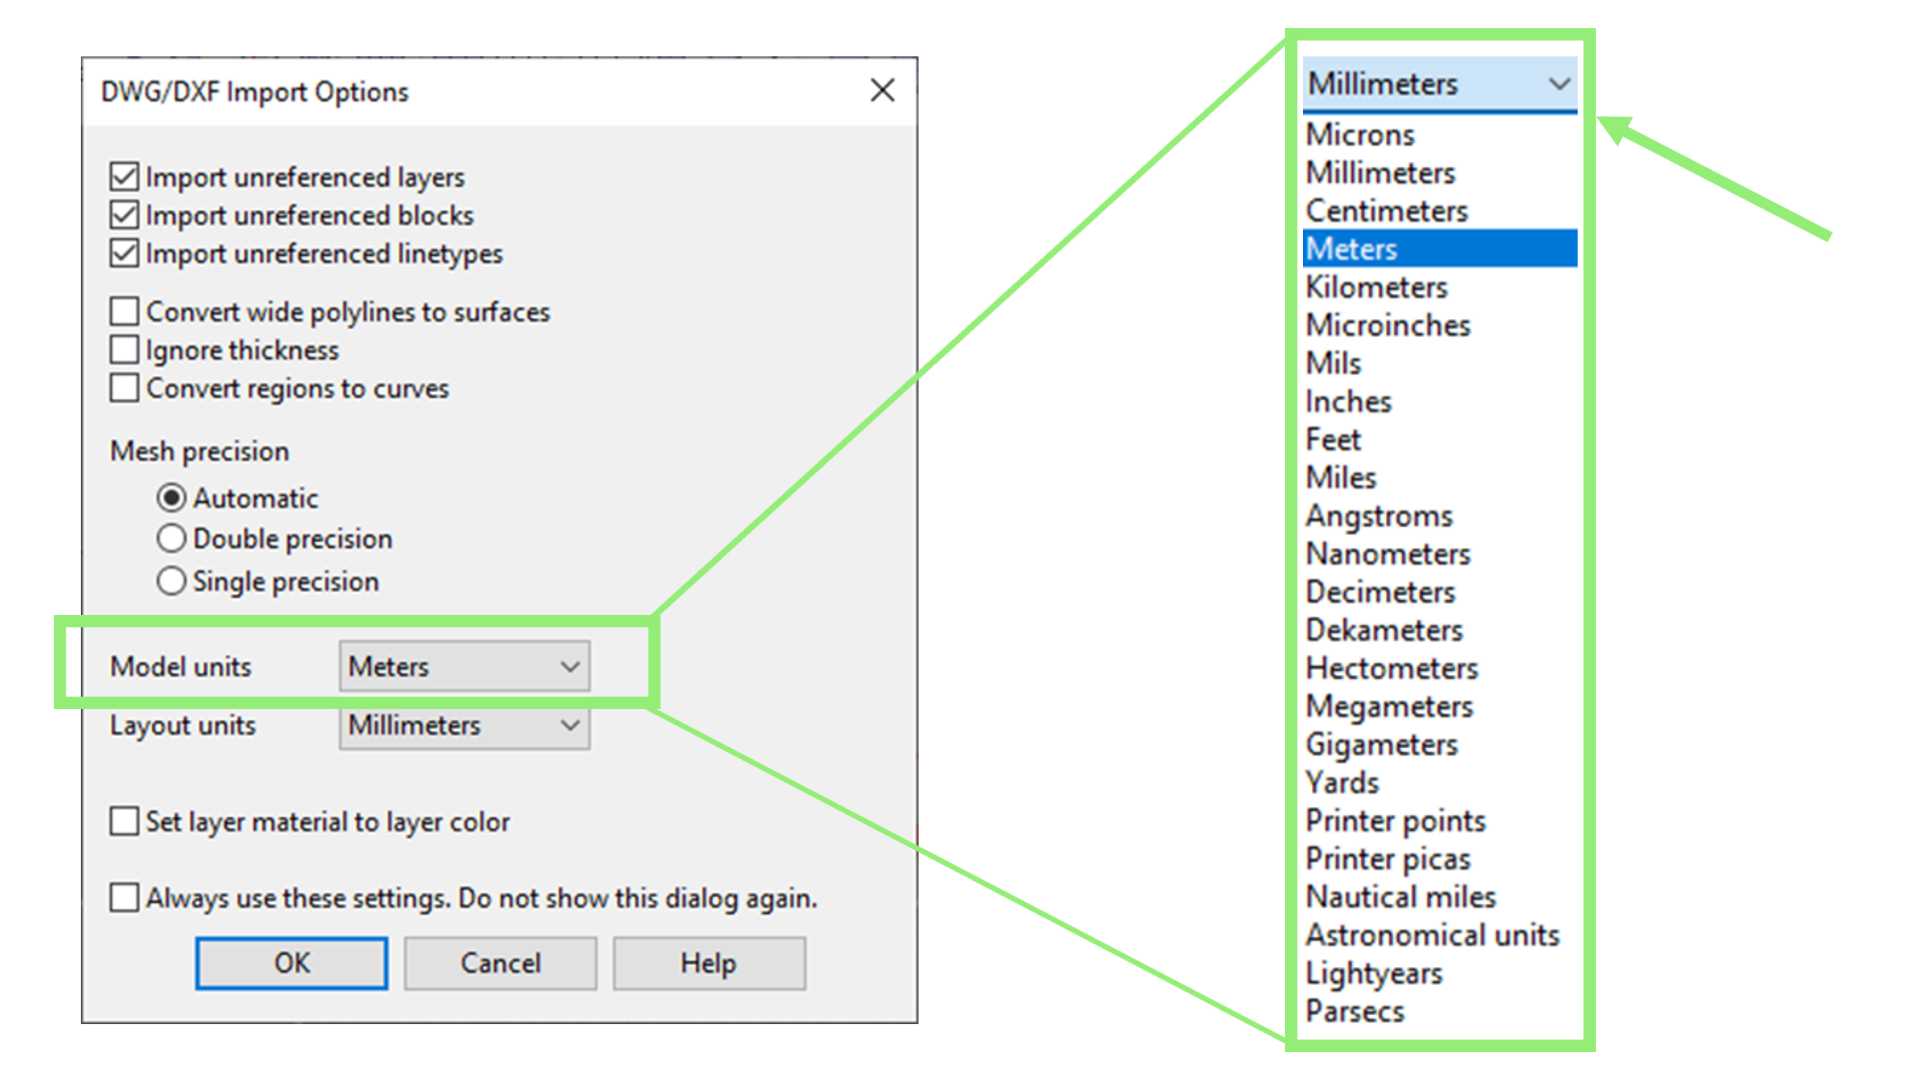
4.3. Automatic scaling
Rhino has and option fo automaticly scaling the references file. In the Model unit you can easly change the model unit. For example from mm to m.
Automatic scaling of references files
4.4. Manual scaling
If you would like to have full control over your geometry than do it manually. Check the process below.
Write ‘Scale’ in the command
Select objects in Rhino
Type basepoint for scaling 0,0,0 and confirm with enter
Type scale factor. For example:
1000 when changing meters into millimetres
0.001 when changing from millimetres to meters
Manual scaling process in Rhino
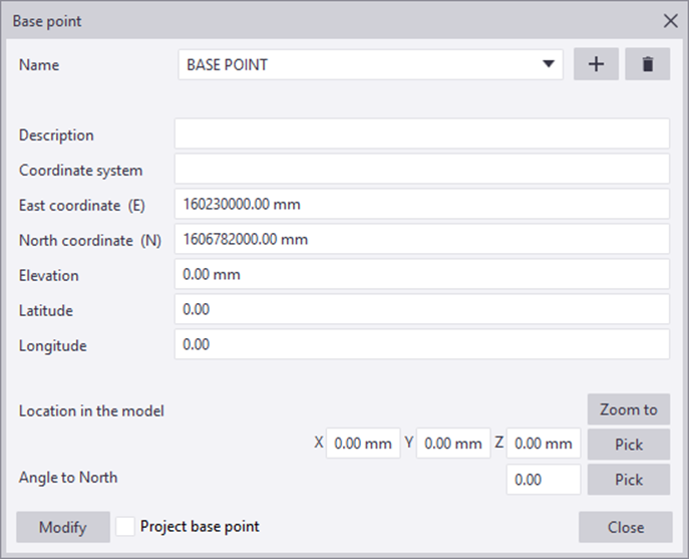
4.5. Base Point in Tekla
Rhino doesn’t have a base point like Tekla. That’s why in order to work together with the Tekla Structure model placed locally, we have to make changes in the Rhino model.
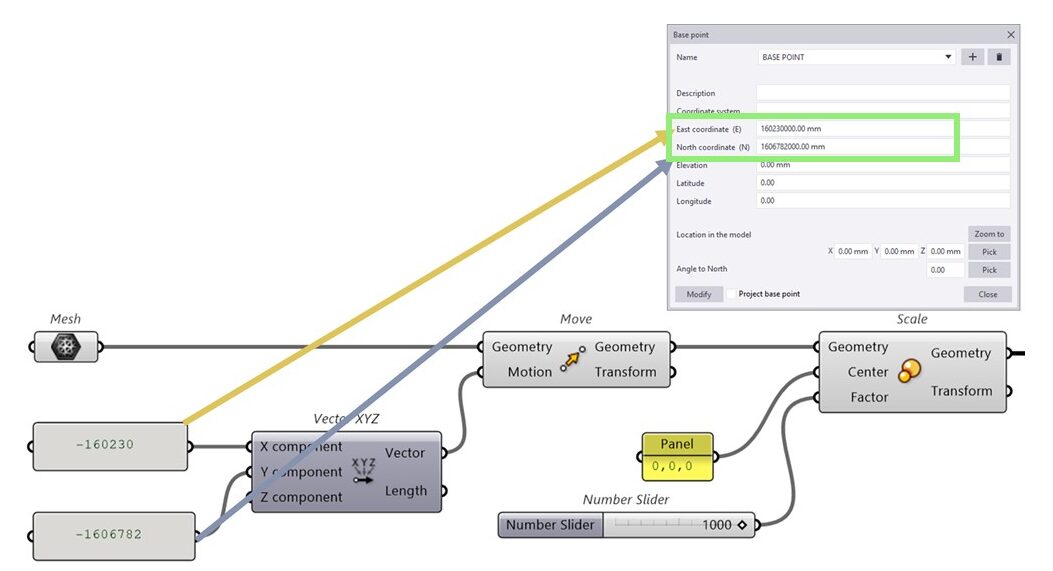
Base Point in Tekla
Remember that units in Tekla and Rhino should match!
Base point values in Tekla – East coordinate (E) and North coordinate (N) will be the NEGATIVE values of the vector.
East coordinate (E) = minus X Component
North coordinate (N) = minus Y Component
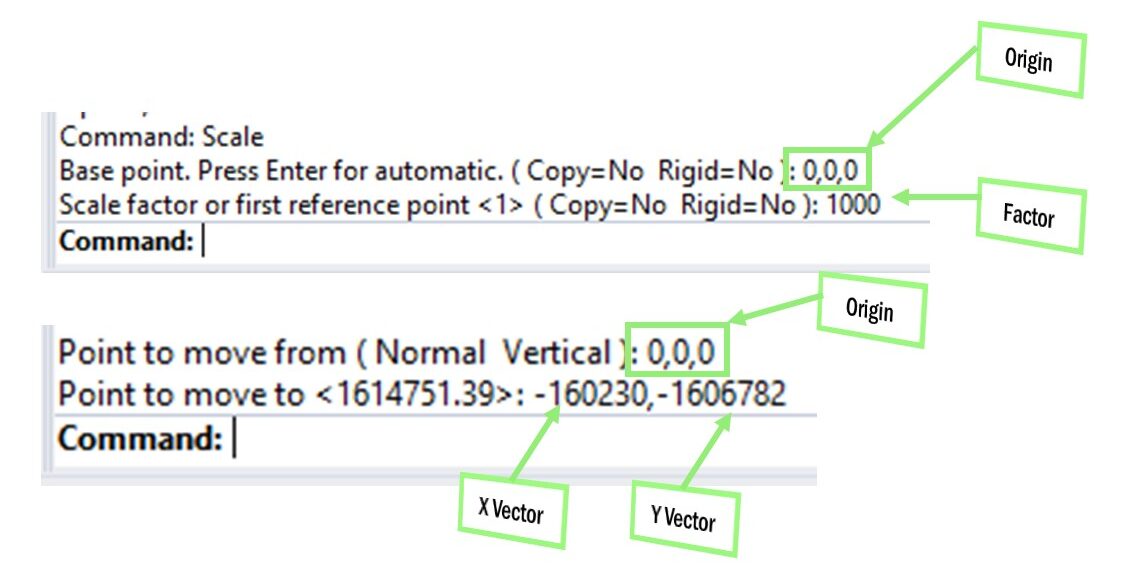
4.6. Operations in Rhino
Below you will find the manual process of scaling and moving reference files by the vector. In this way you can move the references files to the local coordinate system, the same as you use in Tekla Structures.
Changing reference files to local coordinate in Rhino
4.7. Script in Grasshopper
Manual Rhino operetions descibed above can be replaced with more elegant and automated solution in Grasshopper
Changing reference files to local coordinate in Grasshopper
5. Start simple
Finally, I provide you with hands-on exercises accompanied by tips on where and how to start. I’ll suggest the best components to begin your journey in Tekla Live Link, offering practical advice to help you gain confidence and skill.
One of my favourite components in Grasshopper Tekla Live link
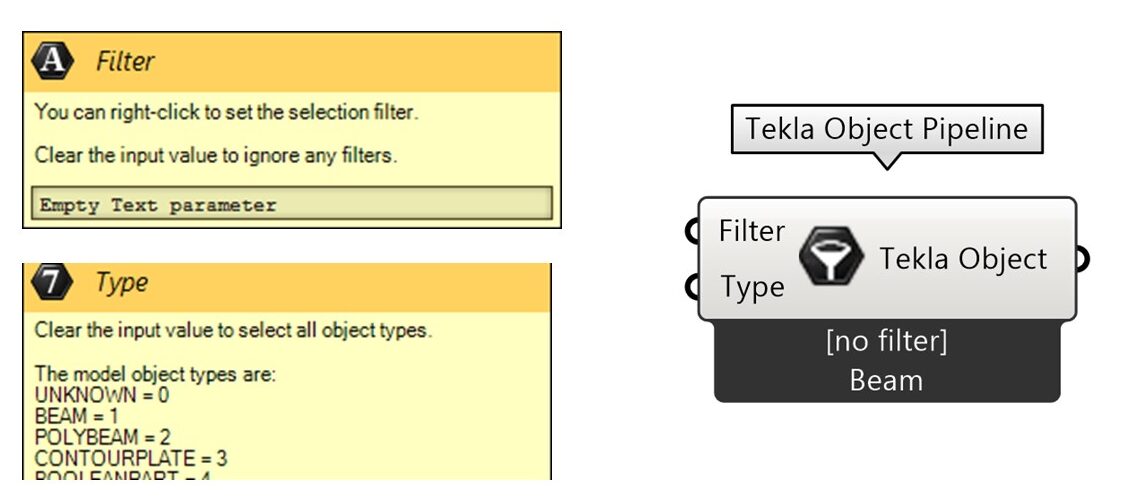
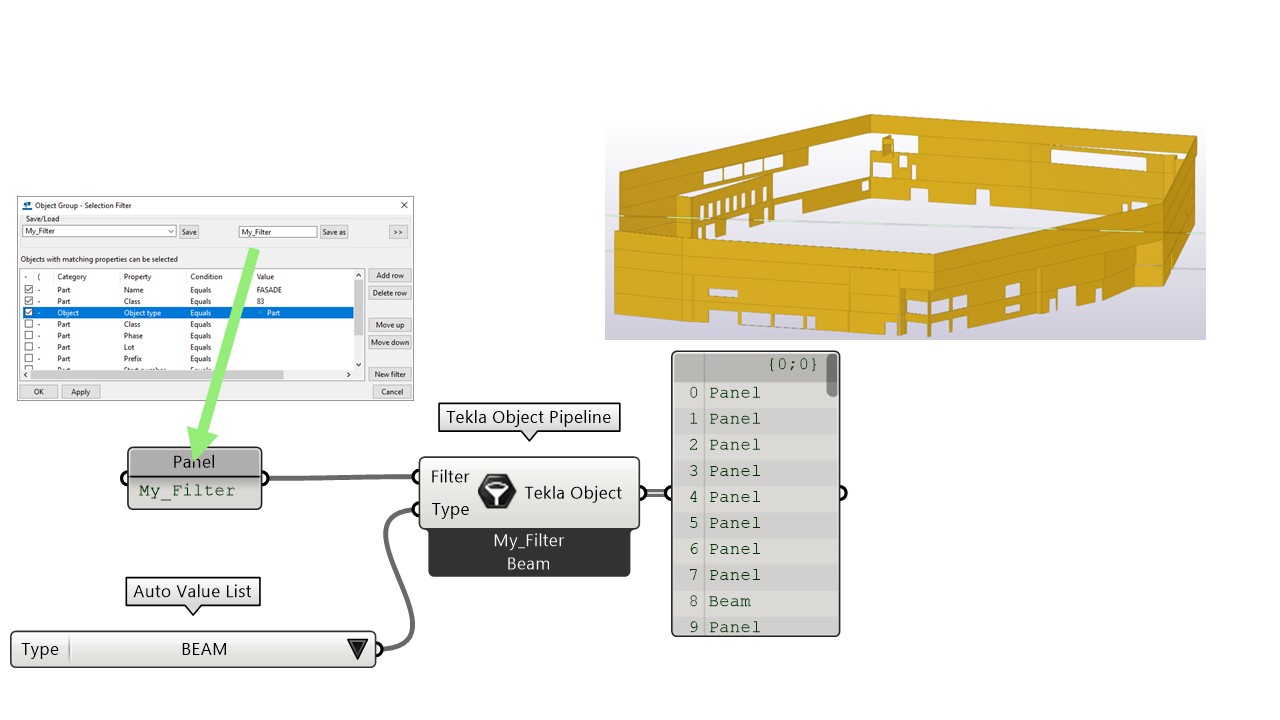
Object Pipeline can reference objects from the Tekla model based on their type and/or a selection filter.
Tekla Object Pipeline component
Object Pipeline can reference objects from the Tekla model based on their type and/or a selection filter.
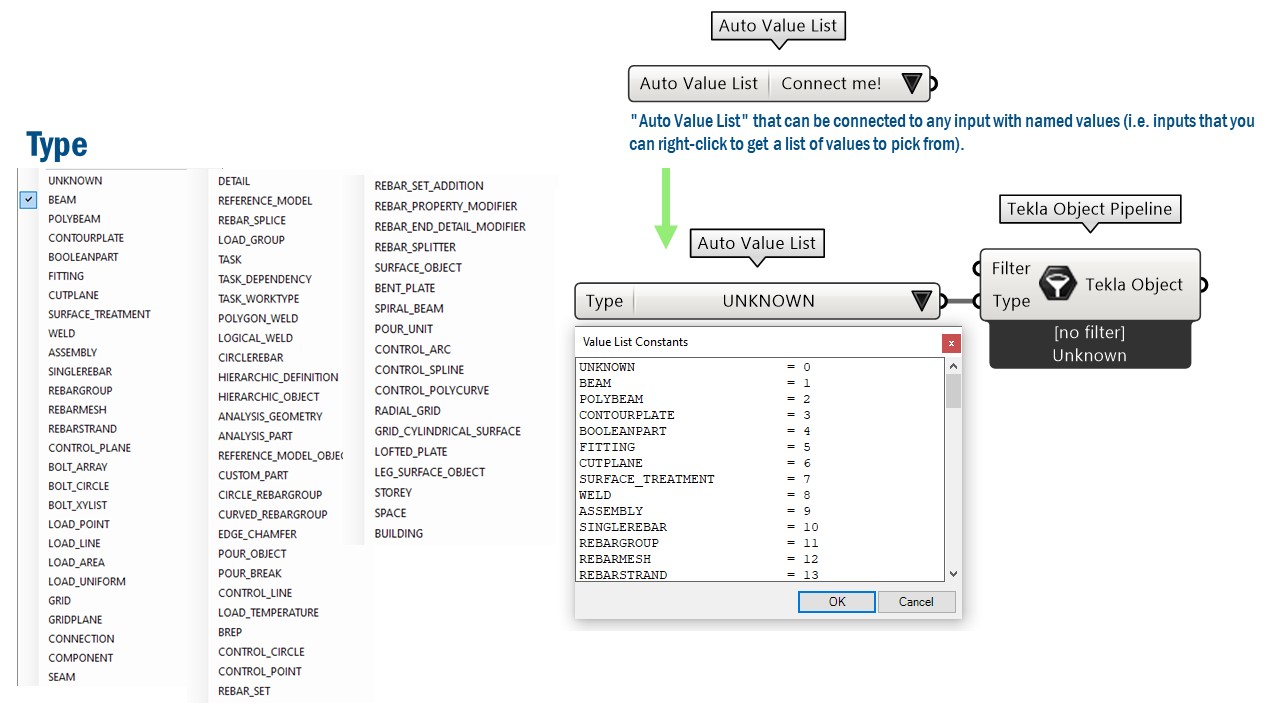
Use Auto Value list to get all Tekla object types
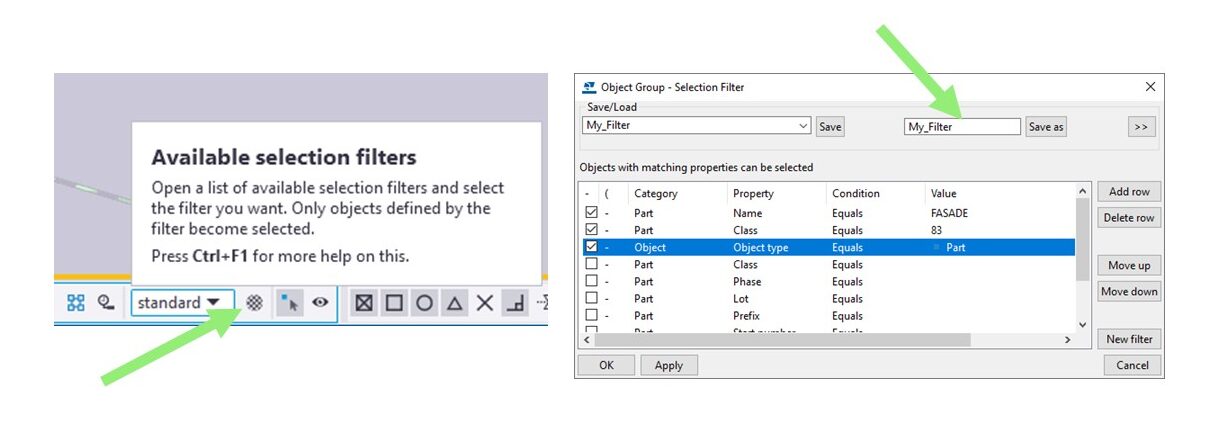
Remember that it is possible to set wildcard in the selection filter in case of similar names:* – Matches any number of characters ? – Matches a single character [ ] – Matches whatever is enclosed in the brackets
Setting up a Selection Filter in Tekla
Refering Tekla selection FIlter in Grasshopper
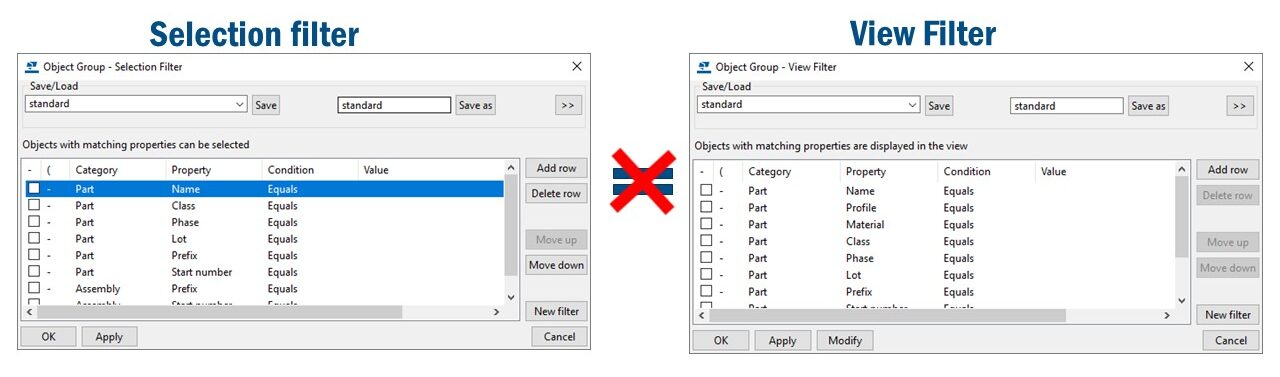
Be aware that Selection Filter in Tekla is not the same as View filter. Setting up View filter will not work with Tekla object Pipeline.
Selection FIlter is not the same as View Filter
That was all in this practical, step-by-step companion that will support you as you explore the exciting capabilities of Tekla Live Link.
Would you like to learn more? Download the guide and join the waiting list for Grasshopper in Tekla Training.
You have successfully joined our subscriber list. Check your inbox. Confirm email in order to get access BIM Case Studies from the biggest Norwegian projects.
Reasons to Subscribe to the BIM Corner List:
BIM CASE STUDIES
After reading this guide, you will learn:
How BIM is used on the biggest projects in Norway
What were the challenges for the design team and how were they solved
What were the challenges on the construction site and what was our approach to them
News From BIM World
Every Thursday you will get a package of news and useful links from the BIM world.
No Hype
Just real content that’s meant to make a difference in your BIM knowledge.
This site uses cookies to offer social functions, analyze traffic and conduct remarketing activities. Details can be found in the privacy policy (info button).