Welcome to the next part of the “IFC export from Revit” article series . In the previous, first post I covered the topic of correct mapping Revit categories to appropriate IFC classes (link).
Today we are taking a step forward. This time we are going to work with Top-level IFC entities. First of all, you will learn what they are, why they are important. Then I will show you how exactly adjust Revit data to correctly set correct properites for these Top IFC entities.
So first, let’s find out what entites we are talking about.
Link to Revit file and IFC file from this article can be found here

DO YOU WANT TO BECOME A BIM COORDINATOR ? I AM BUILDING AN ONLINE PROGRAM TO BOOST YOUR CARRER IN BIM
Top-level IFC entites
The structure of the IFC schema is complex and contains many abstract layers which are not visible to the end-user. We described the structure of IFC files in the previous blog posts, you can find them here:
1. Secrets of the ifc format – article
2. Secrets of the ifc format part 2 – article
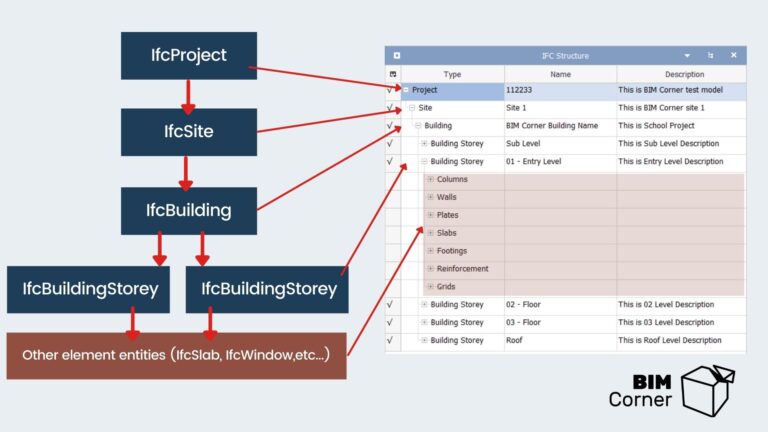
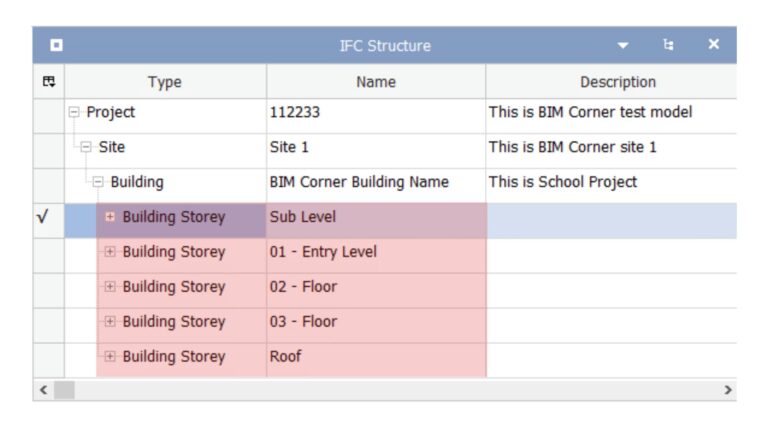
However, the whole IFC schema structure is not visible in most IFC viewers which we know and use on a daily basis. IFC viewers are showing us such hierarchical structure:
As you see in the diagram we have a four main top-level IFC entities which are:
IfcProject, IfcSite, IfcBuilding, and IfcBuilidngStorey.
These top entities we can treat like information containers in the tree structure when we load IFC into an IFC viewer (on the right view of IFC from BIMvision IFC viewer ).
Many projects have specific requirements about the naming of these IFC containers. (More technically speaking – requirements about correct naming of IFC attributes for these top-level entities)
You may ask:
Why correct naming of these IFC entities is important?
Because this ensures that the naming convention through IFC structure is the same in each project’s model. When we have standardized naming of these IFC containers, we can perform searching, filtering, and checking of model information using universal rules and criteria which can be used for the entire project.
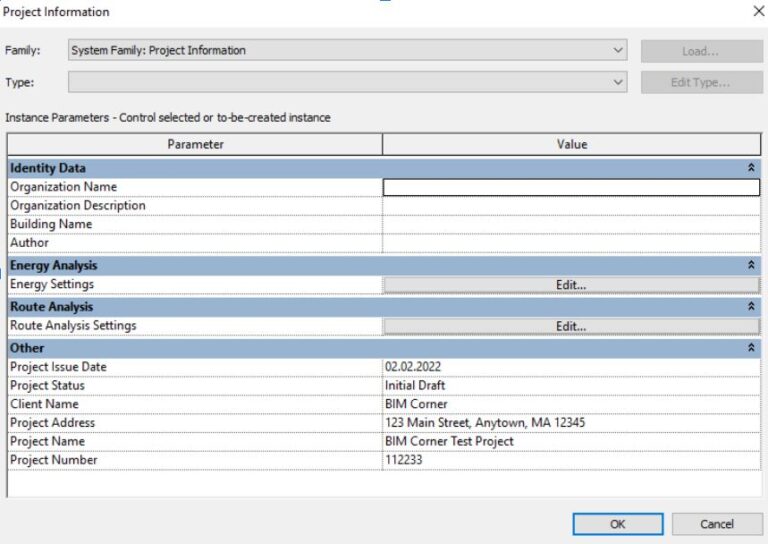
So, Today I would like to show you which Revit properties we need to edit and add in order to define various attributes of these IFC containers. In order to do it, first, we need to go to Revit’s Project Information Dialog in the Manage Tab.
IfcProject
First let’s take care of IFC project naming attributes like IfcProject Name, IfcProject Long Name , IfcProject Description, and IfcProject Phase.
Here is how the Project information parameters list looks like when we open Revit by default (of course the values of parameters will be different).
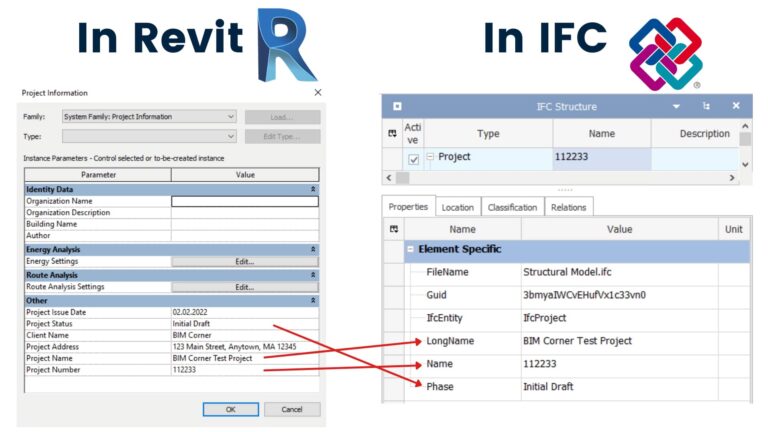
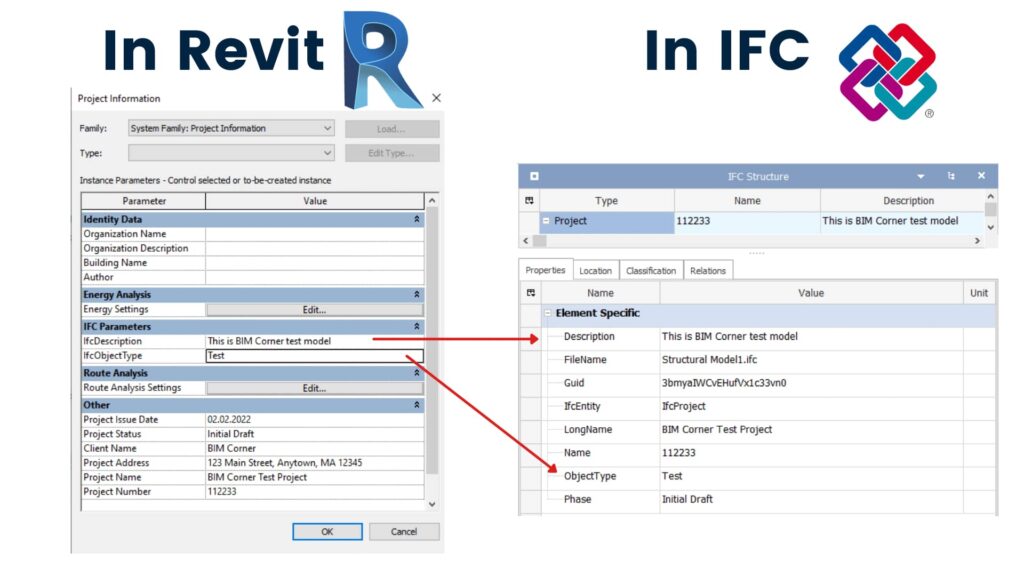
Revit has a few build-in properties which by default corresponds to specific naming properties in IfcProject entity.
As you see from the picture above:
– Revit property Project Number corresponds to IfcProject Name property,
– Project Name corresponds to IfcProject LongName,
– Project Status corresponds to IfcProject Phase,
Now let’s say that I want to add an additional parameter to IfcProject, e.g. IfcProject Description or IfcProject ObjectType (often required by clients).
We can do this using IFC shared parameter file which comes with IFC exporter. The developers of the Revit IFC exporter have created a set of shared parameters that we can use to prepare our model for export.
I’ve already mentioned this IFC shared parameter file in the first article about mapping. So if you don’t know how to use this file, check the previous article.
You can download this IFC Shared Parameter File here.
To define IfcDescription and IfcObjectType in IfcProject entity we need to add two parameters from mentioned shared parameter file: IfcDescription and IfcObjectType.
Then we assign them to Project Information Revit category. Next we just specify values so that parameters will be populated to IFC. The result is following:
So properties from Revit’s shared parameter file < — > exported IFC property:
IfcDescription corresponds to IfcProject Description
IfcObjectType corresponds to IfcProject ObjectType
Now since we know how to define properties for IfcProject so let’s take care of IfcSite.
IfcSite
Second information container in IFC structure represents project’s site. We can define it’s attributes in the similar way as we’ve done with IfcProject entity. We can add a specific “site parameters” from IFC shared parameters file to Project Information category and then add desired values.
Here is a list of Revit IFC Shared parameters which correspords to specific IfcSite attributes:
– SiteName corresponds to IfcSite Name
– SiteDescription corresponds to IfcSite Description
– SiteLongName corresponds to IfcSite LongName
– SiteObjectType corresponds to IfcSite ObjectType
In the picture below – you can check how Revit parameters are populated to IFC
IfcBuilding
Next, we have an IfcBuilding entity which is a representation of the building. Similar to two other entities we define its IFC attributes in Revit’s Project Information Dialog. There is already one hard-coded parameter in Revit which corresponds to IfcBuilding Name, and its named – Building Name.
The rest of the parameters we take from a shared parameter file. Here I list which Revit IFC Shared parameters corresponds to specific IfcBuilding attributes:
– BuildingDescription corresponds to IfcBuilding Description
– BuildingLongName corresponds to IfcBuilding LongName
– BuidlingObjectType corresponds to IfcBuilding ObjectType
IfcBuildingStorey
Next IFC container is a Building Storey which relates to project levels. These containers are the hosts of all model components like doors, slabs, ducts and so on.
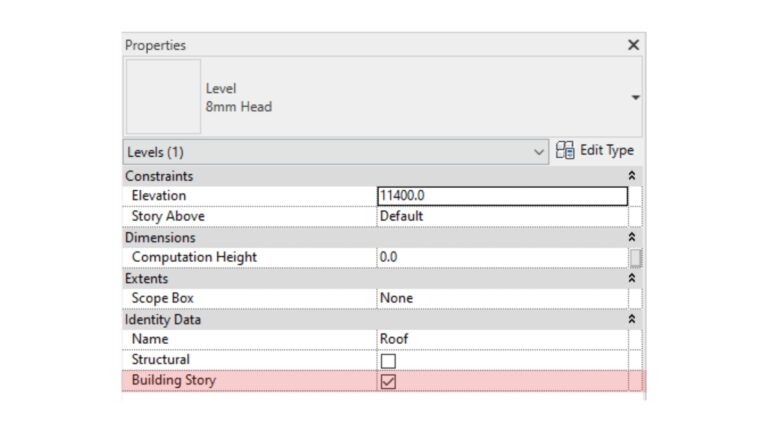
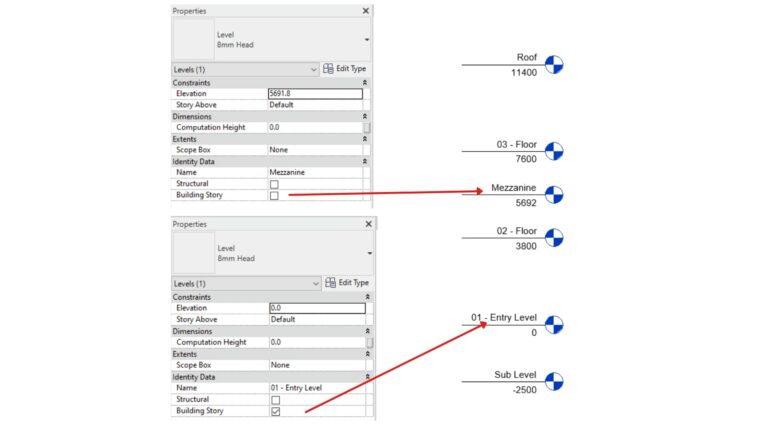
During our work with models we can have many various levels in our project. Of course we don’t necessarily want to transfer all of them to IFC. In Revit there is a Building Storey property. If this one is ticked then, a particular level will be exported to IFC, if it’s not, then it won’t be.
So in our example, I have one level called “Mezzanine” which is not a Building Storey. The rest of the levels are (check picture below).
The result of the export looks like this.
All floors with BuildingStorey property ticked were exported, Mezzanine was ignored from the export.
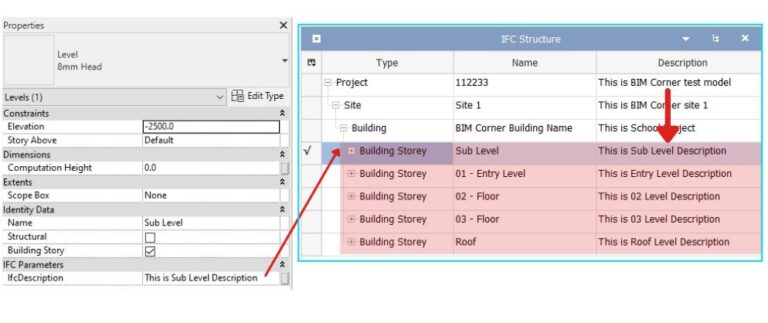
To add an additional description to IfcBuidingStorey entity we need to add IfcDescritpion parameter to the Revit Level category. This need to be implemented at the instance level.
REMEMBER TO REGISTER FOR WEBINAR
24th NOVEMBER at 20:00 CET
10 TIPS TO IMPROVE YOUR BIM COORDINATION PROCESS
All registred will receive 
 GIFTS
GIFTS
MIND MAPS AND WORK FILES
To sum up
It’s worth remembering that if in your Revit model there are elements that are assigned to a non-building story – (like in our case “Mezzanine level”), they will be automatically assigned to the next lower building story – (in our case – 01 – Entry Level ).
If there will be no lower building stories, they are going to be assigned to the next upper building story.
It’s important also to remember that every project should have at least one level which will be assigned as a Building Story so we ensure it’s exported to IFC.
As you see it’s relatively easy to export Revit data to correct IfcProject, IfcSite, IfcBuilding, and IfcBuildingStorey entities. There are a couple of parameters that you need to add to your Revit file in order to export Name, Description, or Object Type attributes correctly.
I hope that you’ve learned something useful from this article and from now on your IFC exports from Revit will look much better 🙂
In the next post, I will explain how we can export common IFC properties from Revit.
Just as a final word. I explain the topic “IFC Export from Revit” in detail in my online course BBC – Become BIM Coordinator, which will be released soon. More than 150 lessons, more than 25h of video content full of BIM knowledge. If you are interested, feel free to visit becomebimcoordinator.com website and subscribe to the list. I will send you all details about the course in comming weeks.
Remember that if you find this article useful and you think it might be interesting to one of your friends, please share it. 🙂
Thank you in advance. Take care.
