Today I will continue our discussion about IFC export. A lot has already been said about it on our blog.
As a quick summary – first, Janusz described the basic information related to IFC. All is wrapped up in a series of articles:
1. Everything worth knowing about the IFC
2. Secrets of IFC format – part 1
3. Secrets of IFC format – part 2
4. Secrets of IFC format – part 3
Then Konrad described some general rules that should be followed when performing IFC export:
1. IFC Export rules. Part 1: Why is it important?
2.IFC Export rules. Part 2: What parameters to export? Dos and Don’ts
Next, the natural step is to show our readers how to export IFC using the various popular programs available on the market today. Recently, Janusz presented this process using the Tekla Structures:
Short about "IFC Export from Revit" series
Today I will tell you how to do it correctly using Revit. Since exporting to IFC from this software can be a quite challeging task, I have divided this topic into 4 parts:
In part 1 – We will talk about correct mapping of Revit categories to the appropriate IFC classes.
In part 2 – I will talk about exporting IFC basic information containers such as IfcProject, IfcSite, IfcBuilding and IfcSpace.
In part 3 – We will learn about exporting different kinds of parameters.
In the final part 4 – We will go through the various Revit IFC Exporter options one by one.
Thanks to this series, you will be able to adjust your Revit IFC export to your individual needs. There is a lot to talk about. So let’s start with the mapping.

DO YOU WANT TO BECOME A BIM COORDINATOR ? I AM BUILDING AN ONLINE PROGRAM TO BOOST YOUR CARRER IN BIM
IFC export from Revit - Introduction
At first glance, exporting a model to IFC from Revit seems very simple and can be described in two simple steps.
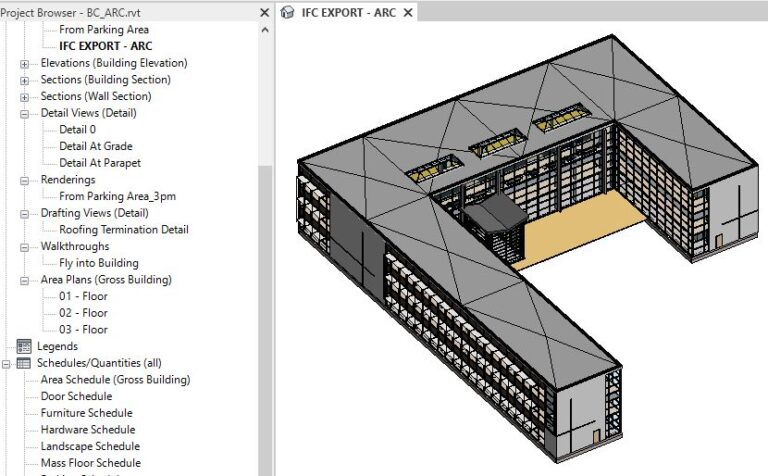
Step 1. Create the appropriate 3D view which contains all the model elements which you want to export.
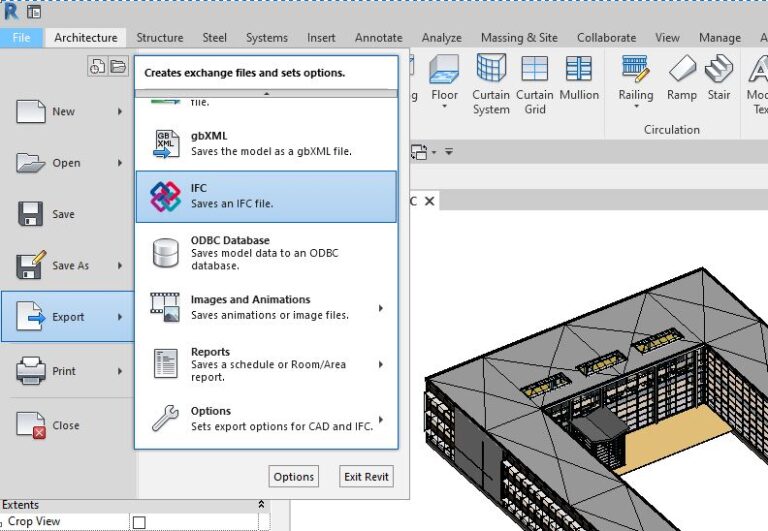
Step 2. Then we go to File – Export – IFC and press the EXPORT button.
Simple isn’t it?
Well, basically yes… but by proceeding in this way, without prior export preparations, we don’t know what model elements and what data contained in these elements were exported to IFC. We also don’t know if the exported data is properly structured.
If you are a person who is responsible for export, you need to know such things. There are often many client requirments related to IFC files and it’s content. In order to meet such requirements , proper export preparation is a must.
Now I will show you the first step of such preparations. I will tell you about IFC class mapping.
IFC class mapping using table
It’s good to know that IFC schema which we export is made up of classes (hence the name IFC – Industry Foundation Class). Simply put, you can treat IFC classes as different Revit family categories.
For example, the Revit category Wall has a corresponding class in IFC called IfcWall, while the Structural Column category is an IfcColumn class.
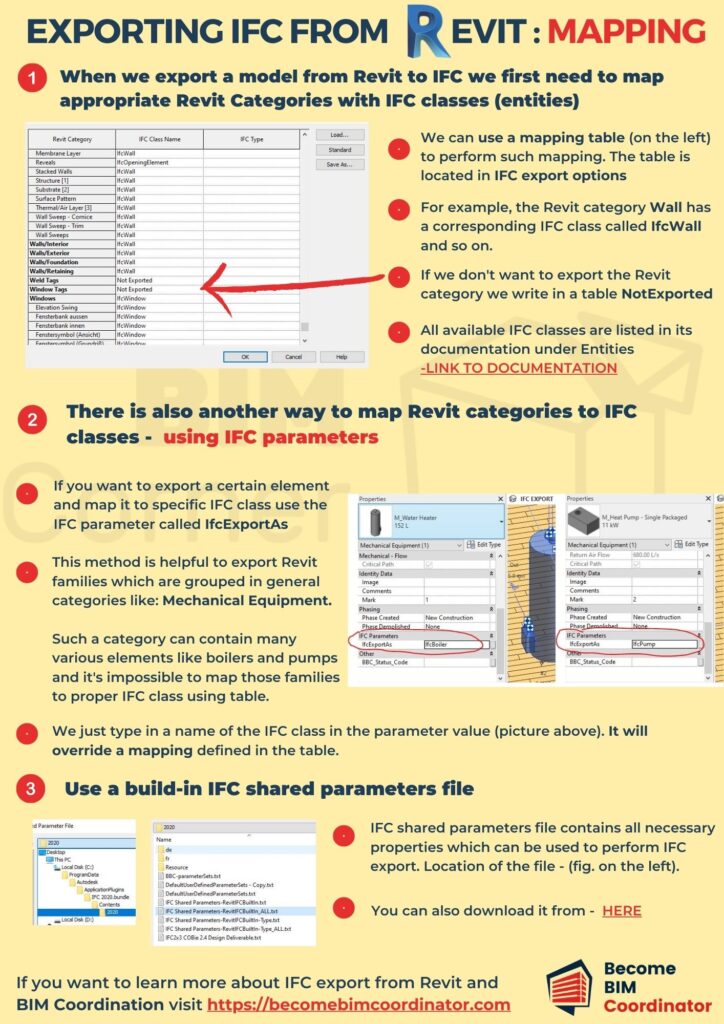
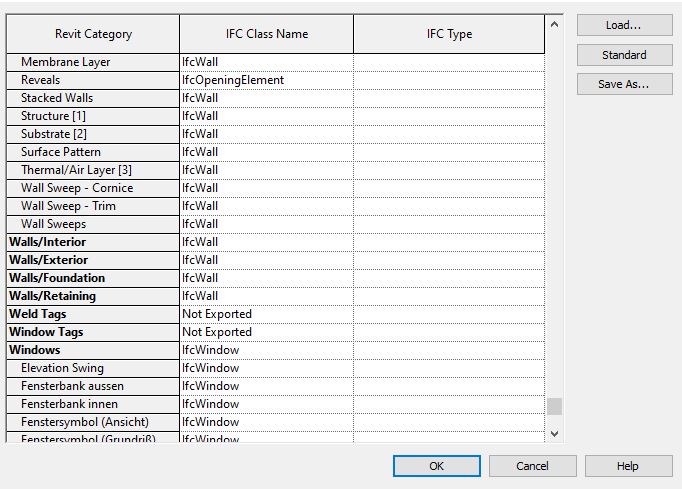
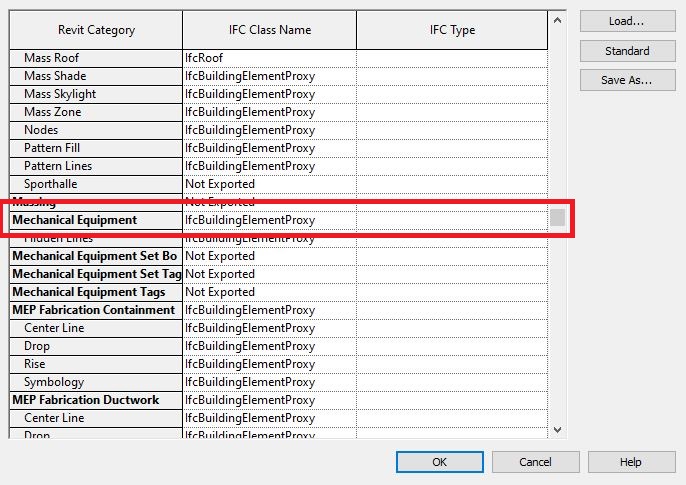
When we export IFC from Revit, Revit sets automatically what categories should be assigned to the appropriate IFC classes. These settings can be changed in the IFC export options (File – Export – Options – IFC options) using the mapping table. Such table looks like this:
On the left we have the Revit categories, and on the right we have the names of the IFC classes to which the given category will be exported. If we don’t want to export a given category, we can enter NotExported into the table. In this way, the given Revit category will be exluded from export.
You may ask – How do I know the IFC class names?
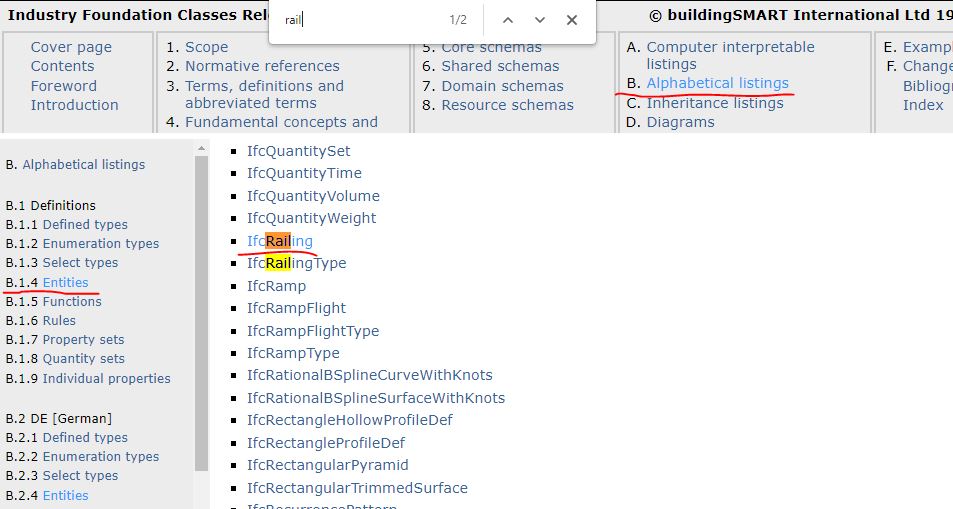
We use IFC documentation, which describes all IFC classes, which are called there – entities. You can find the full list of IFC classes here:
When I’m looking for the appropriate IFC class name, I turn on a search bar in the browser (for Chrome – CTRL + F) and enter the name of the element. For example, for a Railing, I write the name and I immediately get the searched result. In this case, IfcRailing.
However, you must know that a lot of IFC classes have no equivalent in Revit categories. Revit has far fewer categories than there are classes in the IFC schema.
This creates a problem because Revit elements are often exported to general IFC class – IfcBuildingElementProxy, which don’t specify exactly what kind of element we export.
Problem with mapping using table
In order for you to understand the problem, I will present an example.
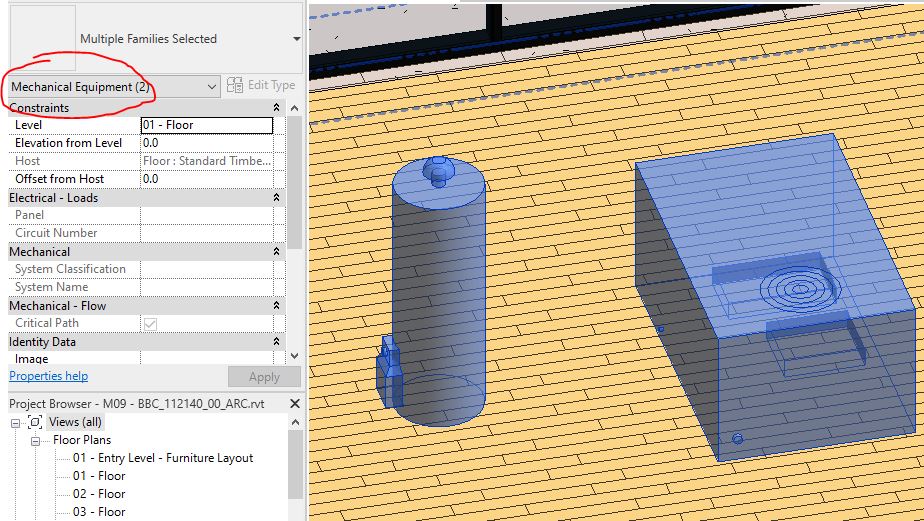
Let’s take, for example, 2 elements of the building mechanical system. One is a Boiler and the other is a Heat Pump. In Revit, they will be classified under the Mechanical Equipment category (as shown in the picture):
Now, when we look at the mapping table in Revit, we will see that the Mechanical Equipment category has only one item (one row) that maps its elements.
This means that we can’t use this table to assign two different IFC classes to the boiler and the heat pump (whose IFC classes are IfcBoiler and IfcPump, respectively).
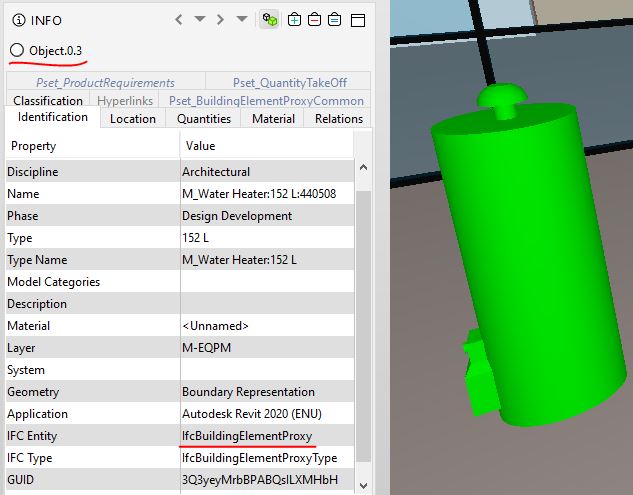
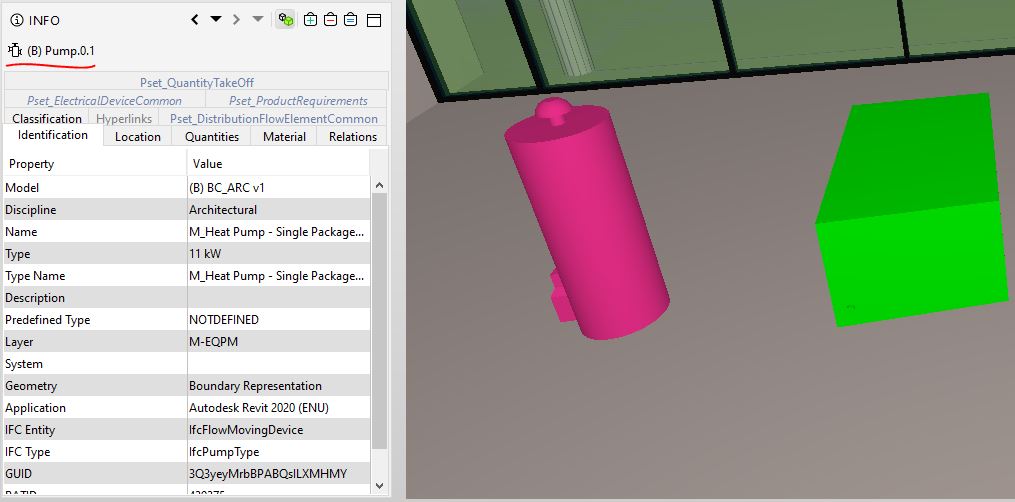
Additionally, by default, all elements of the Mechanical Equipment category will be mapped to IfcBuildingElementProxy class. IFC viewer (eg Solibri) will treat such element as general building element and puts it into Object category.
Mapping using parameters
However, there is a way to export these 2 components correctly to their IFC classes. Revit has a set of parameters that can be used for mapping.
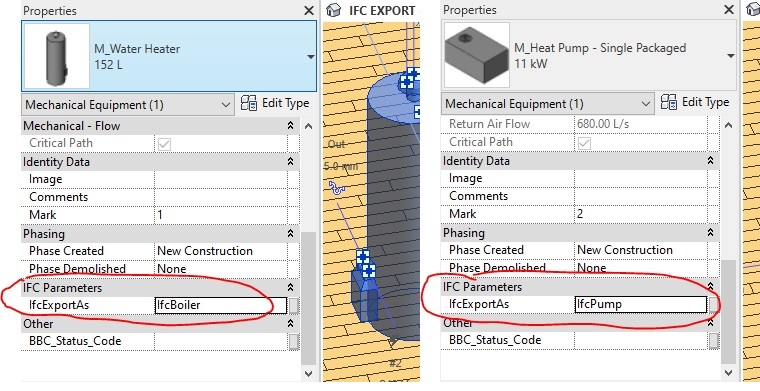
In our case we will use the parameter called IfcExportAs. It’s worth adding it to each element that we want to export to IFC. As a value, we just enter the name of the IFC class which we want to assign a given element (see Fig. Below). So I will enter IfcBoiler in the boiler family and IfcPump in the heat pump family.
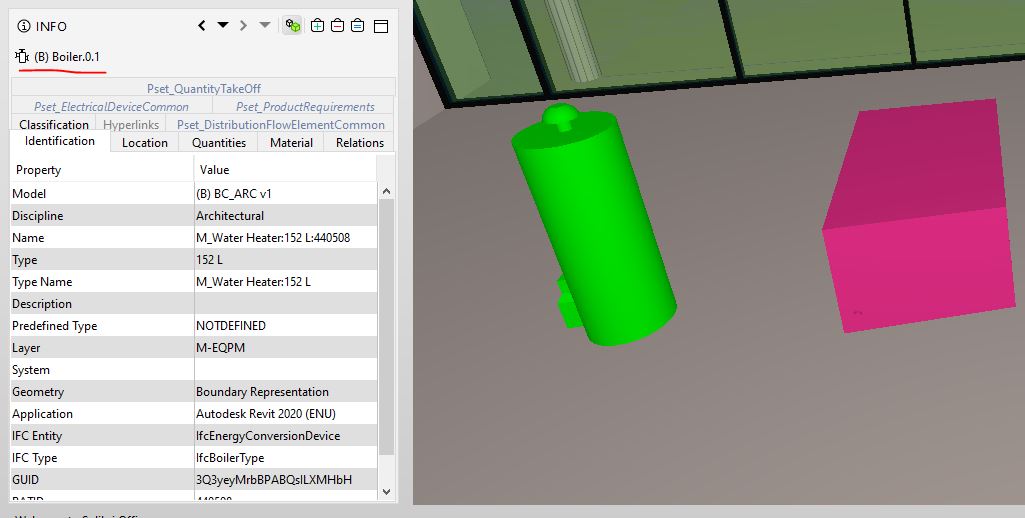
Using this parameter, we can overwrite the default mapping that is specified in the mapping table. If we export a new file – Now the boiler and heat pump are “recognized” by Solibri and categorized accordingly.
IFC shared parameters
Finally, I would like to mention IFC parameters that can be added to Revit elements. The developers of the IFC exporter have created a set of shared parameters that we can use to prepare our model for export.
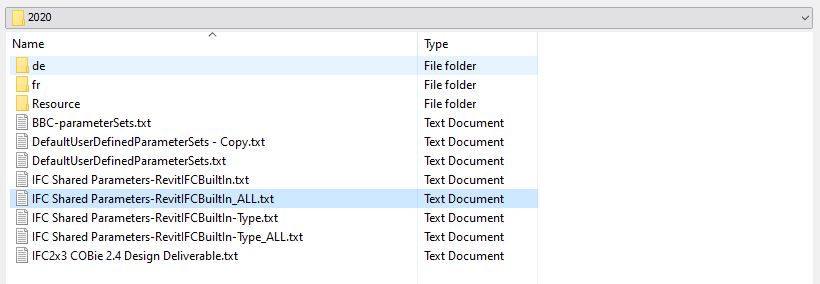
Among these parameters, there is also the above-mentioned IfcExportAs parameter. The default location where the parameter file is located is following:
Of course, the year number may differ depending on the version of Revit and Exporter you are using.
The file which I usually use is: IFC Shared Parameters-RevitIFCBuiltIn_ALL.txt – it can be downloaded from HERE.
I recommend using this file each time we want to use special parameters related to IFC export from Revit. It is also worth grouping these parameters within families in the IFC Parameters subgroup to maintain order.
To sum up
Appropriate mapping of Revit categories to the appropriate IFC classes is just the tip of the iceberg when it comes to IFC Export. I hope you’ve learned something useful from this article.
In the next post, I will focus on exporting basic IFC schema information containers such as IfcProject, IfcSite, IfcBuilding, and IfcSpace. You will learn what such containers are and what needs to be done to export them correctly.
Just as a final word, I wanted to tell you that I am explaining how to properly export IFC from Revit in detail in my BBC online course – Become BIM Coordinator, which I will publish this fall (2021).
If you are interested, you can subscribe to the course mail list – SUBSCRIBE
Every week you will receive from me a lot of free stuff about BIM Coordination. Whta’s more, when the course will be available, I will inform you about it.
That’s all from my side. Thanks for being with us and reading our blog 🙂 See you in the next post.
REMEMBER TO REGISTER FOR WEBINAR
24th NOVEMBER at 20:00 CET
10 TIPS TO IMPROVE YOUR BIM COORDINATION PROCESS
All registred will receive 
 GIFTS
GIFTS
MIND MAPS AND WORK FILES
Link to full-PDF of below graphic is HERE.






Hey there! You might also want to consider using https://blenderbim.org/search-ifc-class.html as a search for IFC classes. The next version of the IFC docs will also have a built-in search tool.
You may also be interested in https://wiki.osarch.org/index.php?title=Revit_and_IFC_classes which breaks it down when this method fails.
Thank you, Dion, for the comment.
Looking forward to part two of this. Good stuff.
Great article! Thanks for help!
Hi I have a question about doing clash detection using exported ifc’s with for example Navisworks / Autodesk Coordination ACC , If you create an issue on the ifc elements, how do you find that element in the Revit model from which the ifc was exported?
Kind regards