Revit IFC export part 3 - en

Exporting IFC from Revit part 3: User-defined properties

Welcome to the third part of the “IFC export from Revit” article series. If you haven’t checked previous posts about this topic, I recommend you to read them.

Part 1 – Mapping
Part 2 – Top-Level IFC entities

Today, I will focus on the topic of user-defined properties, which we can add to exported IFC files.

Often, project information requirements require designers to apply a specific set of properties to their models. Adding such properties in Revit is a piece of cake. We use generally shared parameters, or project parameters, to do it.

How about transferring these parameters to IFC. Hmm… this might be a bit more complicated. There are 3 common ways we can do it. Let me show you each of them.

Link to Revit and IFC files from this article can be found here

DO YOU WANT TO BECOME A BIM COORDINATOR ? CHECK AN ONLINE PROGRAM TO BOOST YOUR CARRER IN BIM

What options do we have ?

When working with BIM models, you will definitely use a lot of various parameters which will be unique for your project.

In most cases, those properties aren’t a part of the IFC schema (more about IFC schema here), so we will need to create our own property sets. Before we will add user-defined property sets and properties to exported IFC, it’s always worth checking what options IFC exporter has to offer regarding property sets.

1. Export Revit property sets option

So basically when we have the set of parameters in Revit, and we want to include them in the IFC, we can use the first option from the picture above – Export Revit property sets.

Using so, we will export all Revit properties according to their internal grouping. This will include a lot of obsolete information in the IFC and will also significantly increase the IFC file size. What’s more, this option also transfer parameters that don’t have any value assigned.

Since, generally, we want our export IFC file to be “clean and tidy”. We don’t need unnecessary data which our Revit model may contain.

That’s why this option is not advisable, and you should use it with caution.

Here in the picture below, (I use BIM Vision to view the IFC) you see how using this option we transfer all Revit properties to IFC. Most of them we are not going to use since they make sense only in Revit and, they make an unnecessary mess in the IFC file.

What we always want to do, is to group and structure the data in IFC in a meaningful way, and this is something that can be done using parameter sets in Revit. IFC exporter gives us two other ways to create these in Revit.

One way is using schedules and the second one is using the parameter mapping file.

2. Export schedules as property sets option

Creating parameter sets through schedules in Revit is very fast and easy. I personally like to use this method quite often to quickly produce an IFC file with a set of properties that I want to include.

In order to use this options first, we need to create a schedule in Revit and add properties which we want to include in the export. For the sake of our example, I have a structural model which comes from Revit sample models.

I will create a structural columns schedule, and I’ll call the schedule Pset BIM Corner.
What’s more, I will add 5 properties to it:

Family and Type, Length, Base Level, Volume and LOD (Level of Development). Here is my schedule:

I want those parameters to be exported to Property set in IFC called Pset BIM Corner.
In order to do it, I go to IFC exporter in Revit, and I modify the setup. Then in the Property Sets tab I choose export schedules as property set. I will also tick the option to export only schedules containing IFC, Pset, or Common in the title.

In my project there is another schedule – Concrete beam schedule. I don’t want parameters from this schedule to be exported. That is why we need to differentiate schedules which are going to be exported. We simply title these schedules using words IFC, Pset, or Common. In my case, I have Pset BIM Corner.

We are ready. Now I can export to IFC.  Here is a link to the exported file.

After the export, you can see that we have a new Pset created for all structural columns. Parameters inside this Pset correspond to 5 parameters which we add into the schedule.

Pros and cons of this method

Using schedules to add Revit property sets is an easy and fast way of working. We create a schedule with all necessary properties, we add title which contains word: IFC, Pset or Common, and we hit Export.

But there are a few drawbacks of this method

1. Such schedules can be easily deleted or changed by a Revit user, even by accident,

2. Sharing schedules between various Revit models isn’t as easy as sharing a mapping table file (which I will present next),

3. Such an approach doesn’t support spaces,

4.We can’t control the mapping of data types to IFC, we need to rely on IFC exporter built-in settings

That is why when adding properties to the IFC I recommend the third option: Export user-defined property sets. Let’s look how we can use it.

3. Export user-defined property sets option

If we go again to the export settings in Revit and look at the Property Sets tab, we have a third option. Notice that to use this option first we require using a mapping file, and we need to specify its path on our disc.

Revit provides us with a template file for the mapping table and as default is already linked in. In my case, the default path for Revit 2020 of this file is:

C:\ProgramData\Autodesk\ApplicationPlugins\IFC 2020.bundle\Contents\2020

The name of the file is DefaultUserDefinedParameterSets.txt and you can download it here.

It’s a good thing to make a copy of it and work on your own file without touching the Revit default file. In this way, when you make a mistake, you can always copy the intact default file again.

In general, this is a simple text file which we open in any text editor, in my case in Notepad. The file has already some guidelines included to help users understand how to use this mapping file.

Everything starting with a # hashtag is commented out, which means the exporter won’t read it. Hence, guidelines start with #.

We can use a hashtag to add our own comments and instructions to this file. I often use comments to give instructions to those who will use this mapping table. I define, what specific property sets we are exporting and why. So they have a better understanding of how to use this file.

For the sake of the presentation, let’s assume that we want to export 3 structural columns’ properties (picture below). I gathered them in Revit in the IFC Parameters group as instance parameters. Those are:

LOD – which is a Text parameter, specifying the Level of Development of a given column.

ReinforcedYes/ No parameter (boolean), specifying if the given column is reinforced or not,

ZoneInteger parameter, defining in which building zone column is located.

So we have our parameters in place and I added a value to each of them (Remember: without a value, the property will not be exported).

Let’s create a mapping file that will export these 3 parameters to a specific property set in IFC. I will call this property set: BC_PropertySet.

Setting up user-defined prop. set text file - Step by Step

Step 1 (number 1 on the picture) –  To create our own property set, we start a new line under the guidelines. (We can also delete the guidelines if we want and start with an empty text file). In our example, I deleted the default COBie example, and I added a my own comment.

We start with the word “Property Set:”. Then we hit TAB. Then I write a Property Set name. In our case, I write BC_PropertySet.

Step 2 (number 2) – Then I hit TAB and specify the Instance or Type Level of the properties.
This is not relevant in newer versions of Revit anymore, because you can combine Instance and Type Parameters as needed, so you can just proceed by entering “I” for Instance.

Step 3 (number 3) – I hit TAB once again, Finally, I need to select which IFC entities this property set belongs to.

Since we want to add properties only for columns, I could write IfcColumn here.  If needed, I can also add several IFC entities separated by a comma, so for example IfcDoor, IfcSlab, and so on.

If I want to add this property set to all elements in the model, then I can use IfcElement entity. (check explanation below)

NOTE : If we have a brief look at the IFC schema you will notice that for each entity you can find the inheritance graph. Here is for IfcColumn entity.

Here you can easily find out which is the next higher entity you can address and by going one level higher. In case of columns, we can use IfcElement .

Step 4 (number 4) – I hit enter. In the next line, first I specify the property name which I want to see in the IFC. In my case, I want our three Revit properties to start with BC_ prefix, so: BC_LOD, BC_Reinforced, and BC_Zone.

Step 5 (number 5) –  Next, I specify the data type of the given parameter in the IFC file. The supported data types are listed in the instructions at the beginning of the file.

In our case:

-> LOD is a Text type parameter,

-> Reinforced is a Yes/No type (in Revit), which in IFC is a Boolean,

-> Zone is an Integer type

Step 6 (number 6)  – The last piece is optional, and we use it to define the property name in Revit

If the Revit parameter is named the same as the intended IFC property, then we don’t need to add it. If we leave this column blank, the exporter will simply assume that the name of the Revit and IFC properties are the same.

In our case, IFC parameters use prefix BC_ and Revit parameters don’t, so we need to specify the last column.

BC_LOD (in IFC)   – > LOD (in Revit)  

I use different naming of these parameters just for a sake of this example. I, personally, prefer to use the same naming for Revit and IFC parameters. Such an approach is more consistent and less confusing for users who export models to IFC.

Remember that we can add as many properties as we need using this method. What’s more, if we require defining further property sets in the same file, you just simply start a new line and follow the Step 1, which I described above.

Step 7. Now our mapping text file is ready, we have to save it. Note that, when saving this file, please double-check that it is saved in the UTF-8 format by your text editor.

Step 8. The last thing is to go to IFC exporter and change the reference mapping file to this, Which we’ve just created. After that, we can simply hit Export.

After the export, our BC_PropertySet should be added to all columns in the IFC file as you see in the picture below (I use BIM Vision to view the IFC).

IFC Revit pset using mapping table

Using a mapping table you can basically export all the properties you need from Revit in a structured and meaningful way. At the first glance, editing a text mapping file might look a bit complicated, but it is really not so hard at all.

The biggest advantage of this method is that we can define the mapping file once, and then use it in many projects, and models. I usually share it with a design team, and tell them to use this file while exporting IFC. They don’t need to think about mapping the properties, because I ‘ve just done the mapping work for them.

LEARN HOW TO EXPORT IFC FROM REVIT. I EXPLAIN IT IN DETAIL IN MY ONLINE COURSE BECOME BIM COORDINATOR

REMEMBER TO REGISTER FOR WEBINAR
24th NOVEMBER at 20:00 CET

10 TIPS TO IMPROVE YOUR BIM COORDINATION PROCESS

All registred will receive 🎁🎁 GIFTS

MIND MAPS AND WORK FILES

To sum up

After reading this post, I hope you know how to export user-defined properties in three various ways.

There are advantages and disadvantages to each method, but I personally prefer using the third one. I encourage you to always test and check the results of your export. Create a few test files. Then using available methods export them and compare them with each other. 

I personally sometimes still struggle with nuances of IFC export, so don’t be in a rush and don’t give up. The overall process is not hard, but it might take some time and preparations to do it properly.

Just as a final word. I explain the topic “IFC Export from Revit” in detail in my online course BBC – Become BIM Coordinator, which will be released soon.

More than 150 lessons, more than 25h of video content full of BIM knowledge. 

If you are interested, feel free to visit becomebimcoordinator.com website and subscribe to the list. I will send you all details about the course in coming weeks.

Remember that if you find this article useful, and you think it might be interesting to one of your friends, please share it. 🙂 Thank you in advance. Take care.

Summary graphic

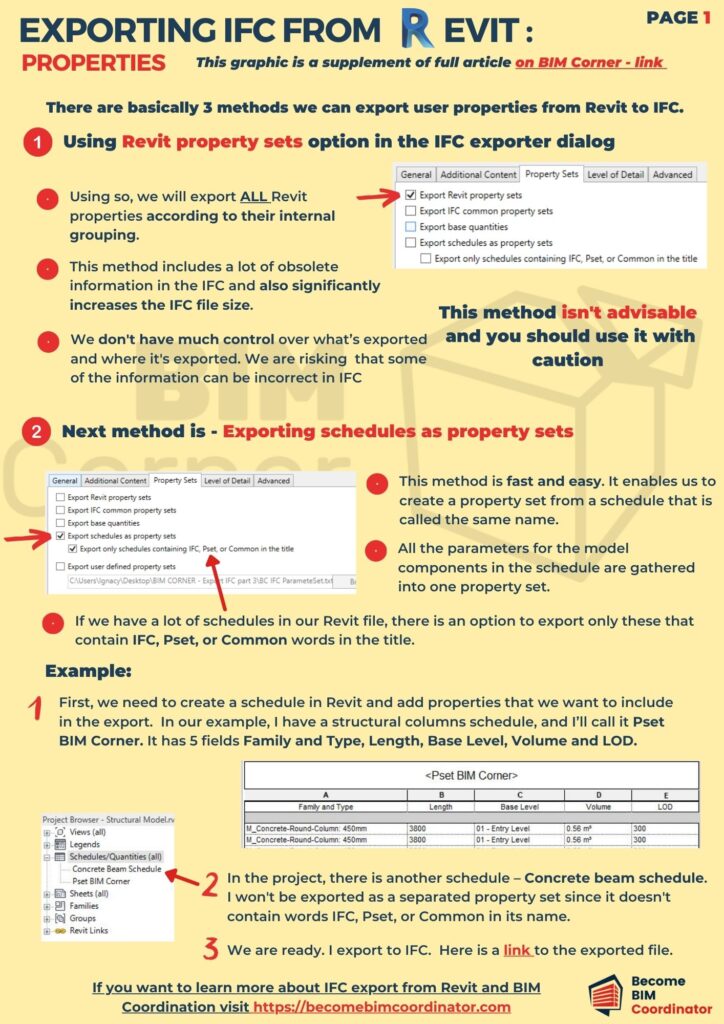
👉👉 Full 4-page PDF summary graphic you can download here. Below is just a first page.

Revit IFC export - propoerties - graphic 1

Did you like that post ? Share it with others !

We spend a lot of time and effort creating all of our articles and guides. It would be great if you could take a moment to share this post !

Share:

Comments:

Subscribe
Notify of
guest
6 Comments
Oldest
Newest
Inline Feedbacks
View all comments
AGupta
AGupta
2 years ago

Hi, i would like to ask if there is a way to export these using IFC

  1. Material Properties from the Revit Database (like, Heat Capacity, Thermal Conductivity, Density, etc),
  2. Loads (point, line, area loads)
  3. Boundary conditions (fixed, pinned, roller)

Thanks!

Patrik Lundqvist
2 years ago

Youre doing a great job, thanx for the effort!

/Patrik Lundqvist, BIM/VDC Specialist at Advanced Engineering and Computation AB in Sweden

Simon
Simon
1 year ago

Hi, i would like to ask if there is a way to export the Workset Area to IFC, by using the Pset txt File.
Thanks !

Last edited 1 year ago by Simon
Marketing Marketing
Admin
1 year ago
Reply to  Simon

Hi Simon.
As far as I am concerned there isn’t a way to do it.

Shridhar Khot
Shridhar Khot
1 year ago

I am trying to export Yes/No type parameter using user defined property sets, but after export it shows Data Type as String and Value also blank. Please help me to sort this issue.

Konrad Fugas
Admin
1 year ago
Reply to  Shridhar Khot

Hello,

could you drop us an e-mail to [email protected]? Please attach screenshots and steps you tried, options you marked, how the parameter looked in schedule in Revit and what was the result in IFC. We’ll try to help, but this one sentence is not enough to give meaningful help – I need more details on what you have already tried.

Author:

Download BIM CASE STUDIES:

After reading this guide you will learn:

  • How BIM is used on the biggest projects in Norway
  • What were the challenges for the design team and how were they solved
  • What were the challenges on the construction site and what was our approach to them

Newest articles: