

Keyboard shortcuts can significantly speed up work in a given program. The sequences of several mouse movements can be easily replaced by pressing several keys. Grashopper is no exception . In the video below you will find 8 most useful shortcuts in Grasshoper. Thanks them your scripts will be created much faster. Enjoy watching the movie – Grasshopper Shortcuts.


MY LIST OF THE BEST GRASSHOPPER SHORTCUTS
- Split your canvas
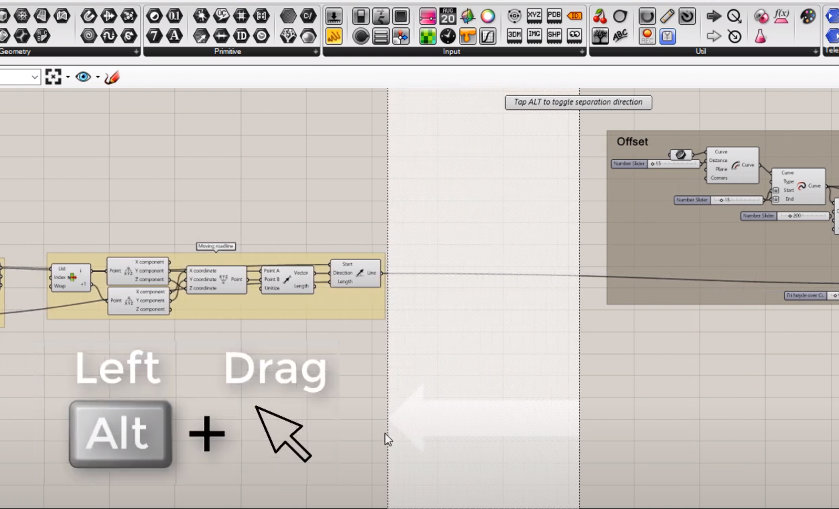
I am pretty sure that you’ve faced the problem of missing space in canvas more than just once. Here is a solution:
Press left Alt and hold it, click on the canvas and drag the mouse to sides. A vertical line with an arrow will appear on the screen, letting you extend your canvas horizontally. You don’t need to worry about existing components because they are going to move along. If you would like to move your components in the vertical direction just press left ALT one more time and you will split canvas with a horizontal line. In that easy way, you will get more space to create your script.
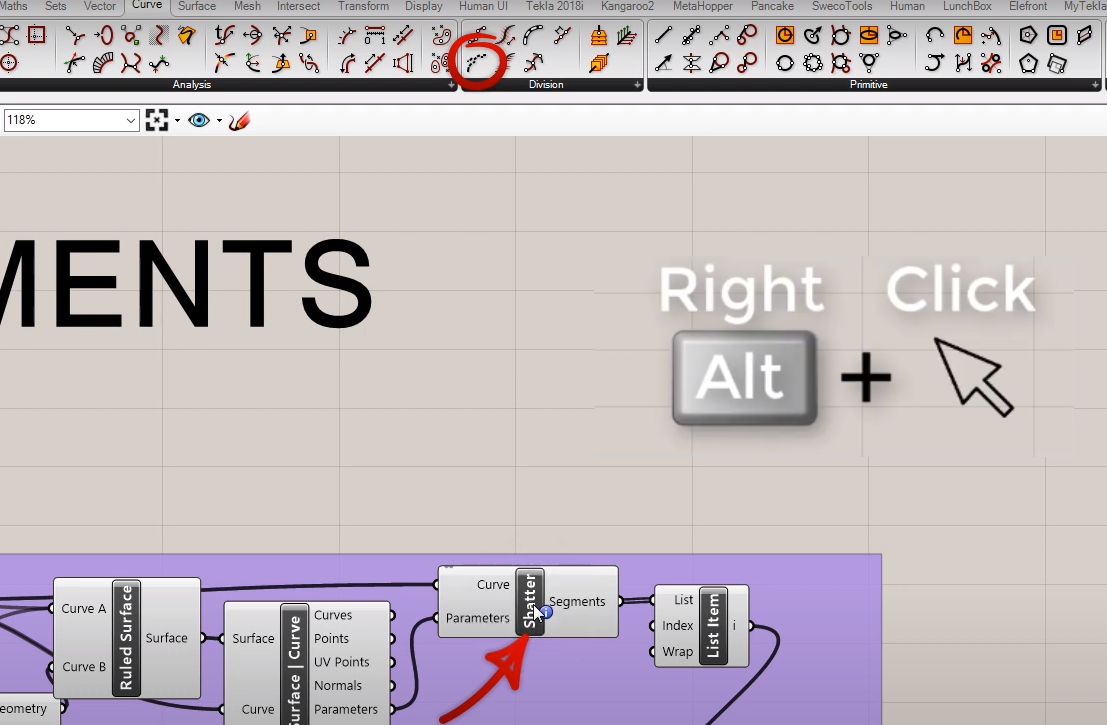
The number of components in Grasshopper can be overwhelming for the beginners. Clicking on component while holding right ALT, you will see the placing on the top toolbar. Red arrows and circle show to which group the component belongs and where exactly it is placed. For example, list item belongs to a group called <Sets>. And move comPOnent belongs to a <Transform> group.
By default in Grasshopper the paste function locates the pasted element right next to the copied element. Afterwards you have to drag it throughout all the script. And for me, this used to be a pain in the ass. While pasting components hold Shift with CTRL and press V. Elements instead of being pasted in the same place will appear in the centre of the current view. That trick helps especially when a script is huge and we want to copy elements from one place to another.
5. Fast copying
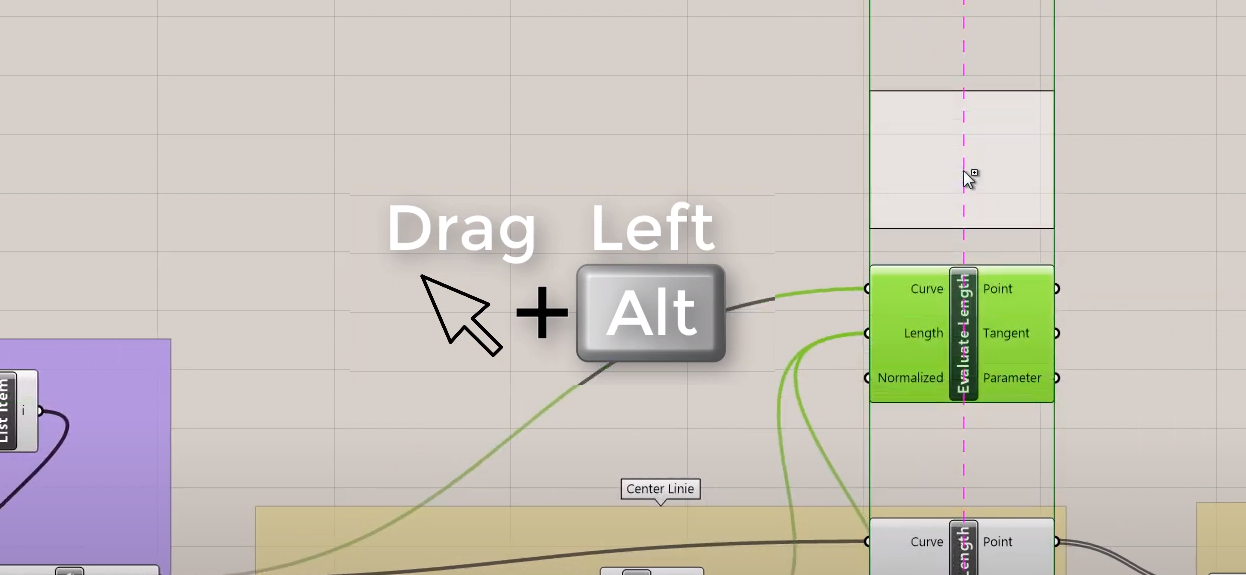
Everybody knows ctrl+C for copying. But actually there is an even faster way for that. In order to copy the selected element, hold left ALT while moving it on the screen. Remember to move your element a little bit before pressing ALT. Otherwise, you will split your canvas instead of copying the element. In this way you can copy all components, panels and sliders.
Sometimes in a huge script among hundreds of lines, it can be hard to spot how components are connected. You have to turn into a detective and segment by segment look for the end of a wire. There is one smart tip that will help you find your track in a fast way. Mark your component and press CTRL first and left arrow afterwards. You will jump automatically to the beginning of the wire and Grasshopper will spot the previous component. By pressing right arrow you will jump to end of the wire.
A bonus tip is holding Shift together with CTRL – in this way you will select all the components connected to the one you’ve just marked.
- Quick image editor
Press together Shift, Ctrl and Q key and the screenshot will be generated in high resolution. In a new dialogue window, you can cut picture or highlight some elements. Moreover, you can automatically place Rhino perspective screen. After all modifications, you can save the image and send it to your colleagues.
Last two Grasshopper shortcuts
A quick way to hide components from Rhino view is pressing Ctrl+Q. Select all your components and press this combination to change visibility. I use this shortcut with another combination which is Invert selection. Mostly to hide or unable unnecessary elements. If you click on elements that you want to keep visible and press Shift, CTRL and <I> key you will select all components besides the ones marked in the previous step. And with Ctrl plas Q key you can hide the rest of components in Rhino view.
1. Wires editing
Definitely my favourite group of shortcuts. I’m not breaking a new ground here but it must be included in this list.
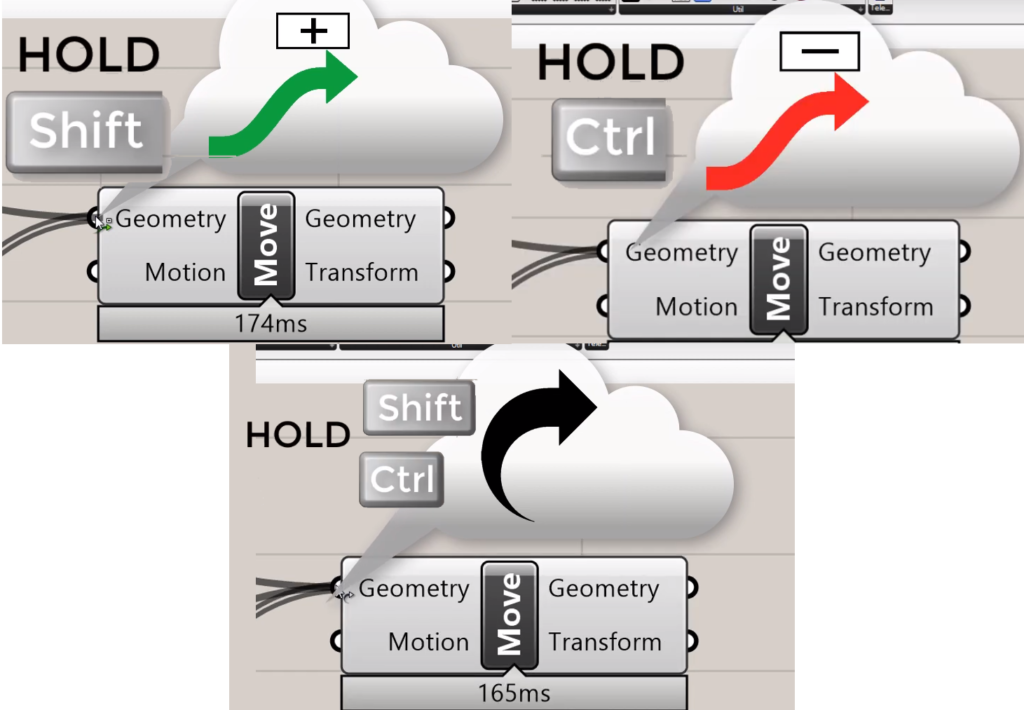
Action one: When you want to add more than one wire to the component, just hold shift. Tiny green arrow with plus will appear. It means that you can add this wire to a component without deleting the previous one.
Action two: When you want to delete just one wire just hold CTRL and a red arrow with minus will appear. Now you can delete selected wire.
Action three: Drag all connected wires to another component with just one move. Hold Shift and Ctrl together, and C shaped black arrow will appear. Now you can just grab all wires into one bunch and move them to another component.
To find more shortcuts just go to File – Interface, scroll down a little bit and there you can find the whole list of shortcuts in Grasshopper. You can edit the existing or add new ones.
Want more? Join the next edition of my training program
Grasshopper Fundamentals Training

What shortcuts in Grasshopper do do you use?
Write in the commentary below what keyboard shortcuts improve your efficiency in Grasshopper.
Which Grasshopper shortcuts In your opinion is missing in this list?
Write an email at [email protected]
We always write back !!
Check out more tricks in Grasshopper and Rhino:
5 GRASSHOPPER TRICKS TO DEFEAT SPAGHETTI MONSTER
5 TIPS TO BETTER COLLABORATIONIN GRASSHOPPER
HOW TO USE MASKS IN GRASSHOPPER FOR DATA TREE?!
15 RHINO TIPS WHILE WORKING WITH GRASSHOPPER
If you want to get more information about Grasshopper and learn parametric modelling, download the free guide – FREE DOWNLOAD
Grasshopper is a plugin to Rhino that you can download HERE


For #7, it’s CTRL-ALT. Not right Alt.
Is it true? Because on my PC in right Alt. Maybe you have specified configuration pre install?
Yes, it’s ctrl + alt https://www.grasshopper3d.com/forum/topics/what-is-this-component-and-where-can-i-find-it
Yes CTRL + ALT is the ONLY sequence mentioned in ANY Grasshopper documentation that I can find, in fact they don’t mention any left-alt or right-alt for anything at all. It’s a fluke or a mistake that it happens to work with Right-ALT only
https://www.grasshopper3d.com/forum/topics/what-hotkeys-and-shortcuts-are-available-in-grasshopper
shows all the hotkeys for Grasshopper and lists it “LMB+Ctrl+Alt = Info mode”
https://vimeopro.com/rhino/grasshopper-getting-started-by-david-rutten/video/79901166
This video authored by the creator of Grasshopper, David Rutten, he should know, and he says it’s CTRL + ALT