It’s true that you don’t have to be the Rhino superuser to create a good script. Most Grasshopper users only need Rhino for visualization and data import. In my opinion, neglecting learning Rhino is a colossal mistake. Knowledge of the program can be useful when working with a script. Moreover, mastering some Rhino tips can save you a lot of time and nerves. Learn Grasshopper Rhino Tricks now!
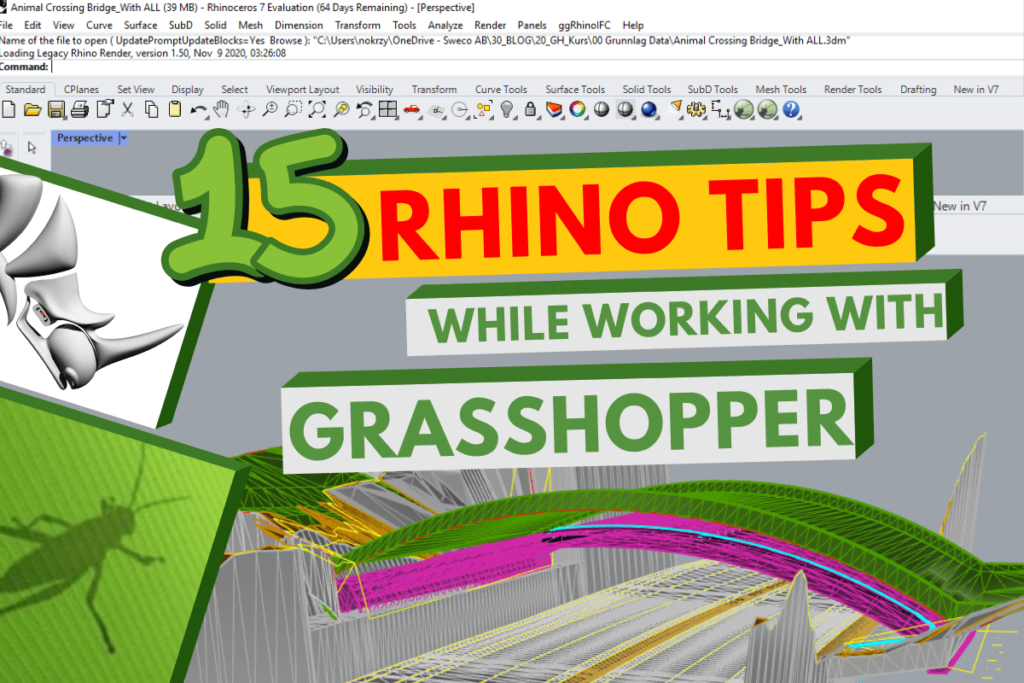
MY LIST OF THE BEST Grasshopper RHINO TIPS
1. Named Views
Let’s start with a small secret: You don’t need to have four standards viewports opened. I know that is set as a default in Rhino, but to be honest, how often do you use the view from the front and the right side? That’s why I recommend closing it and instead of creating your owns. In order to close viewports, Right Click on the view and click <<Close Viewport>>.
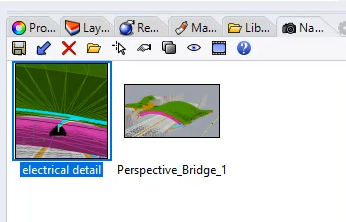
To create extra views, go to View→ Viewport layout → New Viewport. If a new window appeared on your screen, it is time to go in the Named View section. But first, make sure that you have turned on Panel called << Named Views >>. You can do that in options on your toolbox to the right or at the top in Panels. Everything now is prepared to click save and use your view. Every time now, you can just come back to your view with just one click.
The cherry on top. When you work with several screens, you can grab your whole view and move it to another screen. To do that, catch your view and move it outside your view windows. The view will change to transparent, and now you can place it on another screen without any additional toolboxes, just pure view.

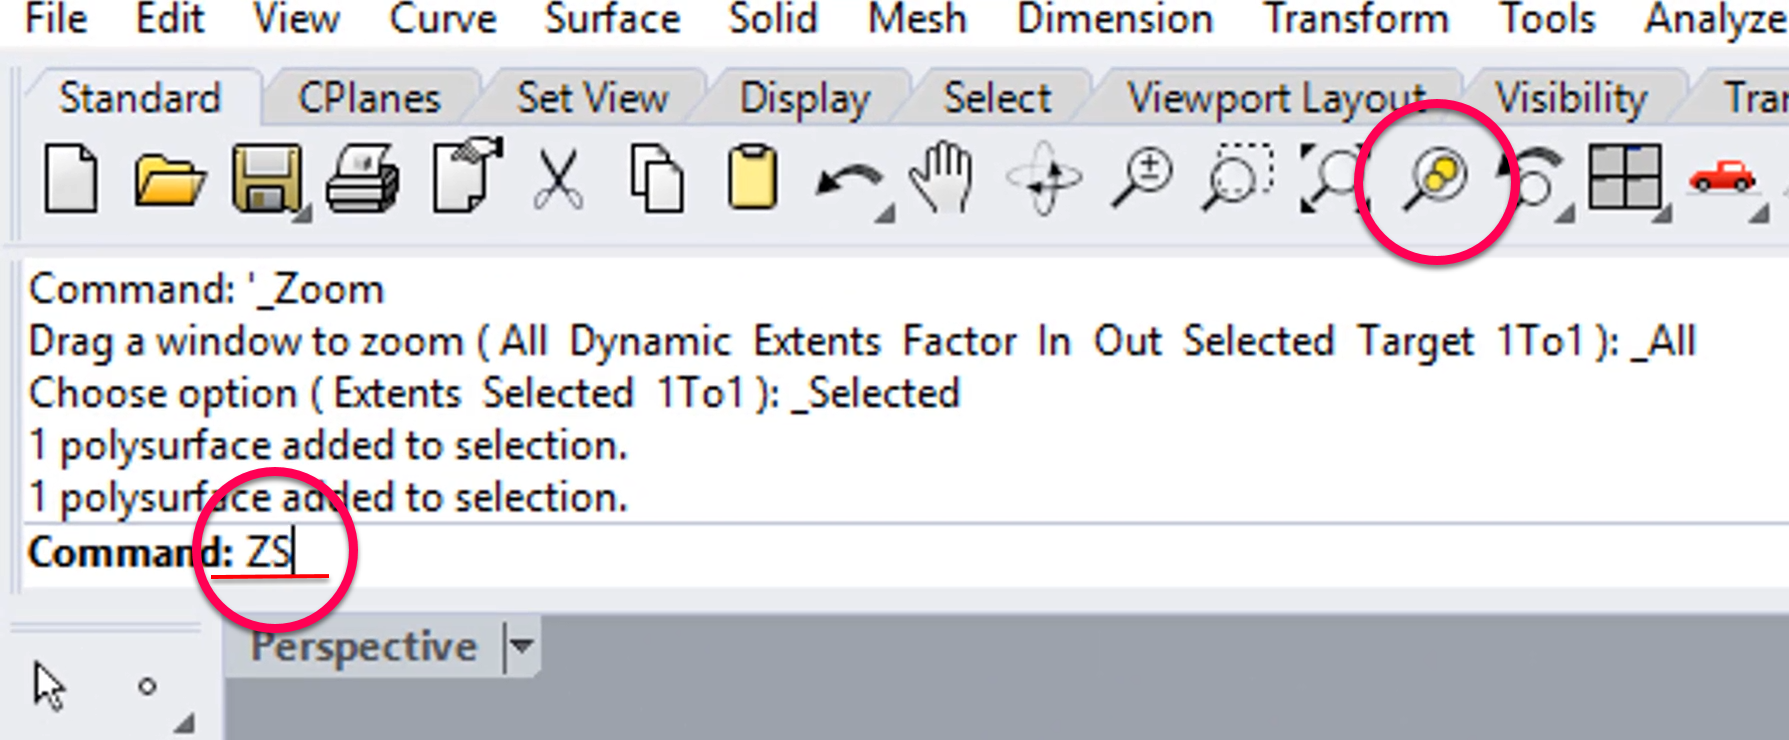
2. Zoom selected - RHINO
In many cases <<Zoom selected >>function saved my ass. How does it work? Select your element in Rhino and write a command Zoom Selected or just two letters – ZS. You can do that also by clicking the icon on the toolbox. OK, but how this function can save your life?
Check this out…
It is easy in Rhino to lose your geometry in view. Too much zoom out or bad rotation can provide an empty view. In this case, Zoom selected works perfectly. Select an object to zoom in another view and go to your empty window while holding Shift or Ctrl. In this way, your object will be still selected while the empty view is active. Now write your comment ZS and geometry will come back.
Alright, but what if it is not possible to select any object on any of your views? Use layers! Go to the layer panel and click selected Objects. You will not realize, but objects in this layer will be selected. To get geometry back on your all screens, write a command ZSA – Zoom selected in all views.
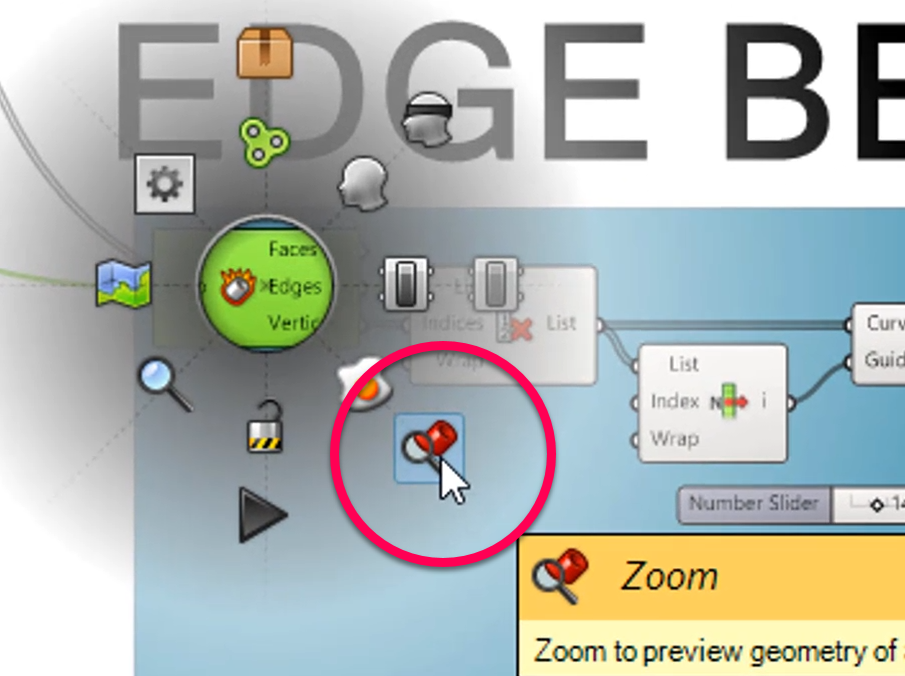
3. Zoom selected - Grasshopper
To be honest, I have discovered this function after one year of using Grasshopper. I still don’t know how I worked without it! It is again zoom selected function, but it will be different from the previous example.
Example…
In this case, objects will be not visible in Rhino because they are not baked, and you cannot select them by layers. Again, we go back to a situation when the viewport is empty. Click the middle mouse button on Grasshopper canvas, and the options wheel will appear. Afterwards, choose magnifying glass to zoom into a grasshopper object in Rhino view.
4. Geometry Pipeline (One of my favorite Rhino tips)
How many times have you lost your referred geometry in Rhino to a Grasshopper? Whenever you would like to update your dwg file, you need to do a referring job manually. For example, when you update the road line in your project after some modifications, every time you have to right-click on the curve primitive component and click <<Set on curve >>. A thankless job, especially with many objects in Rhino.
But I have good news! There is a built-in Grasshopper solution to help you with that. If you haven’t already heard and used the <<Geometry Pipeline>> component, you should start doing it right now! You can find it under param ribbon and geometry.
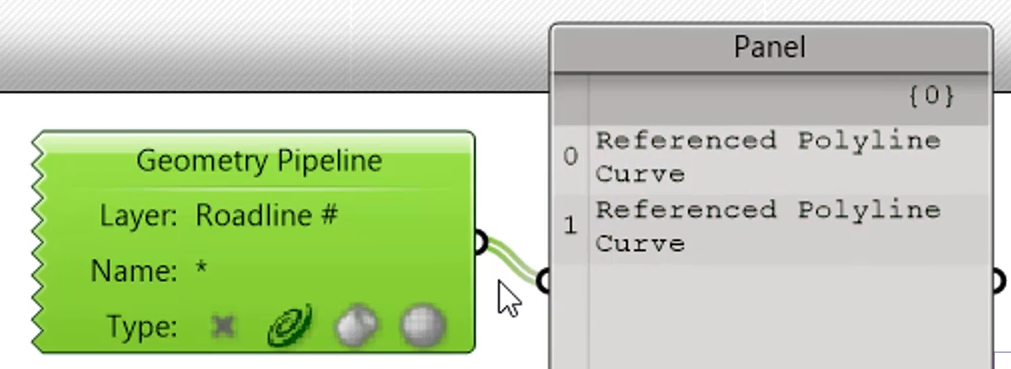
The geometry pipeline is a link to the opened Rhino model, which lets you auto-reference any geometry. It transfers your geometry into Grasshopper, based on type (point, curve, brep and meshes). Moreover, it is possible to filter geometry based on the names of the objects and layers names. And you can do that even with hidden and locked objects.
As a default under layer and name, an asterisk is set up. It means that absolute every object’s Name and Layer will be piped through the component. In other words, you can automatically select and chose all points or curves that exist in the Rhino file.
Let’s go into a practical example…
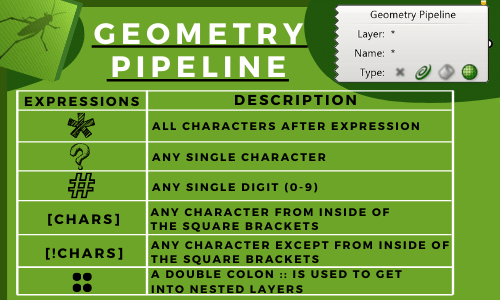
If you would like to filter one specific layer, type the layer’s full name into the component. Note that the filter notations are case sensitive, so it is essential to write precisely characters with small or big letters. OK, but what if you need all layers that start with the ? Nothing hard. Just put an asterisk after your main name part, and the component will filter the rest for you. Furthermore, you can be more precise and use after your main text a question mark to specify any single character in this place or hashtag to grab just digits (0-9). To show you how does it work. Let’s assume that we have four layers called Roadline 1, Roadline 2, Roadline A, Roadline B. Writing in filter a command filters just layers Roadline 1 and Roadline 2.
Whole list with regular expressions how to use them in Geometry Pipeline you can find below.
Geometry Pipeline is my favourite Rhino Tip while working with Grasshopper.
5. Preview Mesh Edges
I don’t know why but as a default in Grasshopper, mesh preview is turned off. Just only baking geometry into Rhino shows how mesh looks and how division is set up. There is one super easy solution for that. Go to the Display at the top toolbar in Grasshopper and click on Preview mesh edges. You can also use the shortcut Ctrl+M. In this way, all your mesh edges will always be visible on your Rhino preview.


Second part of Grasshopper RHINO TIPS
6. Named selection
In Rhino 7 it’s a new option available – Named selections. You can find it under layers and Named selections. I In the Named selection window, you can create a group of elements. After activating the group, all objects will be selected. Super helpful in managing your model. Create your own group and change properties for all selected elements quicker than before.
7. Customize your Popup
It is possible to customize your popup toolbox. As default, It appears after clicking the middle mouse button. While holding CTRL, you can move icons from the main toolbox to the popup toolbox.
8. Right click on selection filter
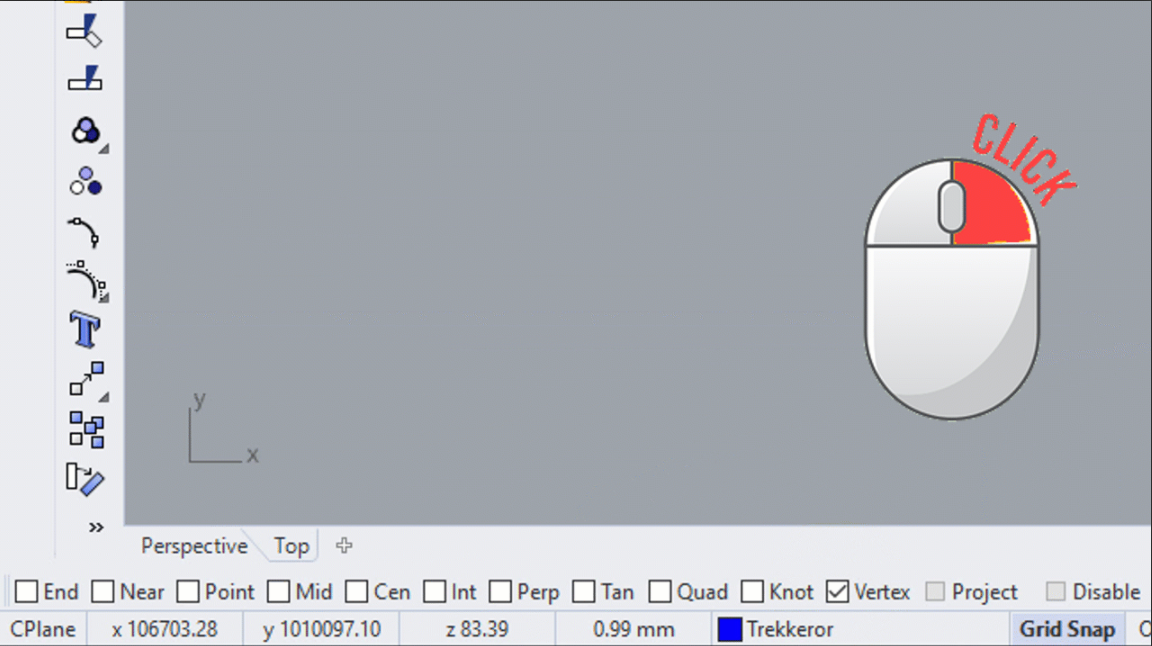
I bet you haven’t known that you can switch off all snaps except the one you would like to choose?
Just right click on snap, and the rest will change to unchecked automatically. To come back to your earlier options, just one more right click, and previous snaps will come back to place again.
9. Selection Filter tool
Go to select in the toolbox and click on the filter button. Window with geometry filters will appear. I recommend docking this window into your panel to have it always visible.
You can easily uncheck which of the geometries in Rhino you don’t want to select in the filter window. For example: If you would like to change attributes for all curves in your project (but they are on a different layer), the easiest way to obtain that will be using filters.
Right-click on a curved box in the filter window and all the rest of the boxes will switch off. Now you can select all objects in your Rhino model, but only curves will be active selected. Often I use a filter to temporarily hide objects in my model – As for example meshes in this example.
10. Gumball
Gumball in Rhino is an absolute must-have for all Rhino users. In order to turn it on, click on the button on the bottom toolbar. Now, if you will select any object in Rhino, a three-dimensional system with extra lines will appear. We call it Gumball, and it will be placed in the gravity centre of an object.
There are three arrows, and every one corresponds to its plane. If you click on the arrow tip, you can write a number, and the object will be moved in the arrow direction. If you click on the sphere in the middle of the arrow, you can extrude the object in an arrow direction. Three arches in the Gumball help you with object rotation according to each plane. You can rotate it manually or type the rotation angle.
With the help of rectangles at ends, you can scale object. If you would like to scale the whole object in every direction, just hold Shift.
By clicking the circle in the middle, you can go to extra options. You can change Aligning or go to extra settings and adjust Gumball to your preferences.
Third part of Grasshopper RHINO TRICKS
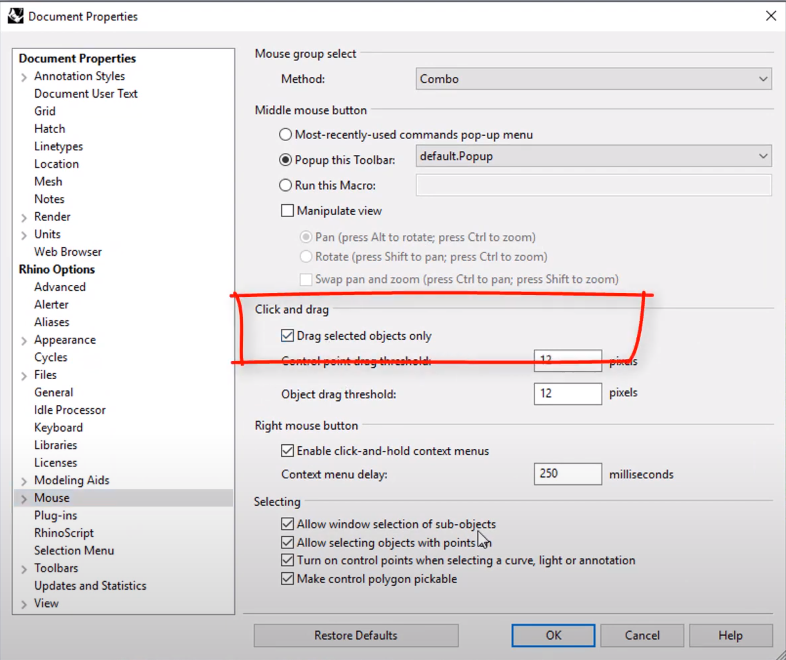
11. Drag objects
I have to admit that several times I moved Rhino geometry without noticing it. It is easy to do so by just selecting the object together with the mouse movement to rotate a view. This small thing can ruin your project, especially if that happened some time ago. It will be impossible to come back.
Finally, I have found a solution for that. Go to Settings — Mouse and check the empty Box for Drag selected objects only. Now To move the object, you have to select it first and then move it. Minor thing but can save your life.
12. Sketch in Grasshopper
Draw function in Grasshopper is not the best one I have ever seen. My created lines are always ugly, and it is impossible to make a straight line.
However, making sketches on your script can be a helpful visual solution thanks to the function called – load from Rhino. Just right click on the sketched line and choose Load from Rhino. If your Rhino geometry is placed near zero points, then imported geometry in Grasshopper will be placed in the top left corner on the canvas. You can import frames, lines or even huge text visible for everyone in a big script.
More than that, you can import whole dwg drawings. In a colossal script, it will be easier to refer to particular parts in your construction. For example, it can be the entire bridge or just a tiny cross-section where you can refer to your script with extra arrows.
You can show which part of the structure refers to which part of the script so that it’s easier for your colleagues to work on your script.
13. Selection Methods
This one may be obvious for many of you, especially for those who know Autocad well.
If you drag select with the mouse from right to left, you will create a crossing box with dashed lines. Now anything you touch will be selected, even if the selection square does not enclose the entire object. If you drag from left to right to choose, creating the window box with solid lines. Then you have to completely enclose the object you are trying to select with the rectangular.
Good to know when you need to select one object among several lines around it.
14. Lock the vector
While freely drawing lines holding some keyboard buttons can be helpful.
First of all, holding shift can block orto directions. While making a line, chose the first point and after hold, Shift to lock orto direction and write the line segment’s length.
Second of all, if you press the TAB key before your second click, it constrains any direction. Unlike holding shift, this combination blocks an axis between the first pick point and the mouse cursor position. You can specify whatever direction you need, and the line will change colour to white while doing it. Once constrained, you can move anywhere along this axis to make your second pick point.
These two combinations work with any command requiring two points for direction input.
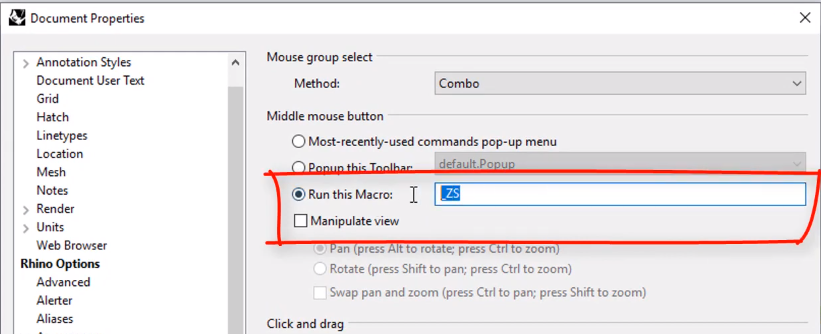
15. Middle mouse button
It is possible to change options for the middle mouse button. Go to Options and Mouse and click: Run this Macro and write ground ZS This Macro stand for zoom selected function. Now quickly, you can zoom to your geometry without typing a shortcut on your keyboard
Which Grasshopper Rhino Tips are your favorite?
Write in the commentary below which you like most.
Do you have any questions?
Write an email at [email protected]
I always write back !!
Check out more tricks in Grasshopper
5 GRASSHOPPER TRICKS TO DEFEAT SPAGHETTI MONSTER
5 TIPS To Better Collaboration In GRASSHOPPER
If you want to get more information about Grasshopper and learn parametric modelling, download the free guide – FREE DOWNLOAD
Grasshopper is a plugin to Rhino that you can download HERE