Grasshopper functions

Grasshopper functions that you didn’t know

After some time I am coming back to the Grasshopper tips and tricks series. Every software has this kind of easter eggs—a surprise or extra feature that is secretly hidden from the user. Coming usually unexpectedly with an extra bonus or a joke. Grasshopper does not contain many spoofs. However, it has some fully hidden functions. In this article and attached video, I want to show you some secrets that you might not have found yet. Check out the list of Grasshopper functions that you didn’t know.

Functions in Grasshopper that you didn't know.

1. Grasshopper elements with different functions.

Did you know that some elements in Grasshopper can have two different functions? 

1A. Let’s start with the first element, which is the point. 

In this exercise, we will create a circle, based on our point. In other words, we will create a circle where the centre is based on our point.

To do that, we are going to use create circle component. This component has a plane as input and radius to build the plane, we need to use the component XY plane, which requires an origin. Origin will be, in our case, the point. In that way, we connect the plane to the component and create our circle. We can skip the step by creating the plane. Connecting automatically point to the plane grasshopper will create the plane XY. So in this way, we can avoid one extra component.

Remember that this works just to XY planes.

point as a plan i Grasshopepr
Point as a plan XY in Grasshopepr

1B. The next element which has two functions is the line. 

In the next exercise, we will move the circle from the previous example from one point to another. To do that, we will use the move component that needs motion. In this case, a motion will be a vector and the vector we can easily define by the point A starting point and point B – ending point. In green colour, it is possible to visualize how this vector looks like (Vector display component). So now we are using the move component. We are connecting our circle to geometry, and motion will be our vector. Standard procedure.

But actually, we can connect the line to the motion because the line is defined in the same way as a vector. We need the starting point and the ending point. In lots of situations, you can use just a straight line instead of creating a new vector.

Note that the order of defending line (direction) will influence the vector. 

Line as a vector in GRasshopper
Line as a vector in Grasshopper

1C. Alright, and the third element is a plane.

 The plane also has another function, and it can be a surface. When we connect the plane to the surface, it will create a brep so this brep can we deconstruct and see all the faces or edges. Let’s see how it looks like; when we zoom it to this surface, it will be like a square element one time.

Plane as a surface in Grasshopper
Sign up for free mailing and you will receive a valuable piece of knowledge about Grasshopper every week.
Already more than 6,000 engineers study with me and take full advantage of the power of Parametric Design.

2. Quick Input

There is a quick way to set up the default number in your component.

Double-click on your canvas and choose your component from the list, put the equal sign and then the default value

For example:

In command box, write Circle=50. Then the circle component will be created with the default value for the radius set to 50.  This method works with also different components like:

  • Divide curve,
  • Divide length,
  • List item,
  • Split list,
  • Shift list
  • Cull index.


In addition, t
his method also works with mathematical components. So if you write addition=50 then the B value will be set to 50.

NOTE! 
Try to not overuse this Grasshopper function. In this way you are hiding your input. Just hovering over input will show you what is connected. Debuging scripts with many embedded values become a nightmare!

NOTE! Try to not overuse this Grasshopper function.

In this way, you are hiding your input. Just hovering over input will show you what is inside. Debugging a script with many embedded values becomes a nightmare!

Just be careful with it! 

Avoid Simplify and Flatten data tree operations

3. Fast calculations

When you double click on your canvas, you can write equations. So, for example, 20 plus 20, you will get the slider with the 40 value. You can write your complicated equation and speedily get your slider. Even you can write more complicated ones with all the brackets and all the mathematical rules, and then in the end, you will get the result of the equation.

Fast calculations in Grasshopper
It is possible to write mathematical rules in slider

4. Multi-wiring

If you need to plug in one wire into multiple components, you can do so by right-clicking instead of releasing the left mouse button when plugging in a wire. Let’s check out the example. So hold your left mouse button and click the right button in that way you can easily and in a really fast way connect your one wire into several inputs hold your left mouse button and click the right one.

You can connect one wire into several inputs without comebacks to the output
Learn Grasshopper

DOWNLOAD 5 STEPS TO LEARN GRASSHOPPER

5 Steps to learn Grasshopper is a guide full of books, exercises, tutorials and videos. Everyone will find something for themselves – regardless of the level of initiation.

Next Grasshopper function worth to know

5. Minus Value

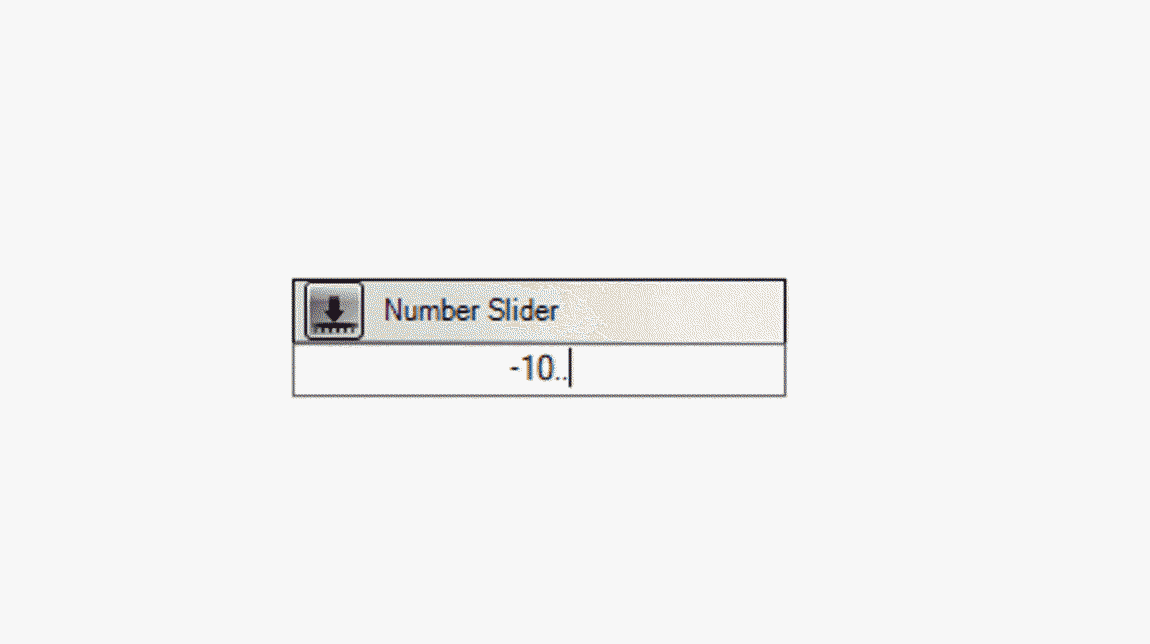
It’s hard to tell how many times I have tried to write minus value in slider automatically from the command box. Always subtraction component comes along. Every time I wanted to get a negative value I needed to use a negative component or go to the properties of the slider and change the value to minus by hand 😔

But actually, it can be done much more accessible. 

When you go to canvas, double click, write your minus value and then write double dot. In this straightforward way, you get minus value pretty cool, huh

minus value Grasshopper
Quick way to insert slider with the negative value

Do you have any questions?

Write an email at [email protected]

I always write back !!

Check out more tricks in Grasshopper

Grasshopper useful components

Grasshopper Data Tree – Path Mapper is a BADASS


If you want to get more information about Grasshopper and learn parametric modelling, download the free guide
 – FREE DOWNLOAD

Grasshopper is a plugin to Rhino that you can download HERE 

Did you like that post ? Share it with others !

We spend a lot of time and effort creating all of our articles and guides. It would be great if you could take a moment to share this post !

Share:

Comments:

Subscribe
Notify of
guest
0 Comments
Inline Feedbacks
View all comments

Author:

Download BIM CASE STUDIES:

After reading this guide you will learn:

  • How BIM is used on the biggest projects in Norway
  • What were the challenges for the design team and how were they solved
  • What were the challenges on the construction site and what was our approach to them

Newest articles: