90% of problems in grasshopper come from the wrong manipulation of the Grasshopper data tree. Every week I get many questions regarding this topic, and most of them can be easily solved with one component from tree ribbon. I know that among 26 components, it’s not that easy to choose the proper one, but today I will show you one really powerful one that can even replace others. I talk about Path Mapper.
Path mapper is a badass
The Path Mapper component you can find in the tab Sets → Tree → Path Mapper. This component allows you to perform lexical operations on data trees.
I have barely started, and already I have used difficult words.
OK so – Lexical operations are logical mappings between data paths and indices defined by textual masks and patterns. Do you remember masks? I wrote about them in my previous post. Read it first and come back to this article:
To simplify: Path mapper helps with reorganizing elements in trees or changing the tree structure.
If you work with complex data structures, you need to rearrange your trees quite often. In Grasshopper, you can find several components for that purpose, such as:
Flatten
Graft
Trim
Simplifie
Flip
1. Grasshopper data tree
All of them might be not sufficient while operating on multiple trees or if custom rearrangement is needed. In many cases, using the Patch mapper component is the only way to find a solution. This component also has disadvantages, but I will tell you about them later in the post.
Okay. Let’s start with something easy.
I’m going to create some data. In this case, it will be just one value put in the data. We select our path mapper component and connect data. The component starts working after writing the source path. The easiest way to obtain the source path is just to go to inbuilt functions and create flatten or graft mapping. The component will change colour to green and will start working. Now we can modify our target path as we wish; for example, we can write just path number {1;5} and element will be placed in this path we can freely add new paths and branches.
Grasshopper data tree simple operation
Let’s go to more advanced examples
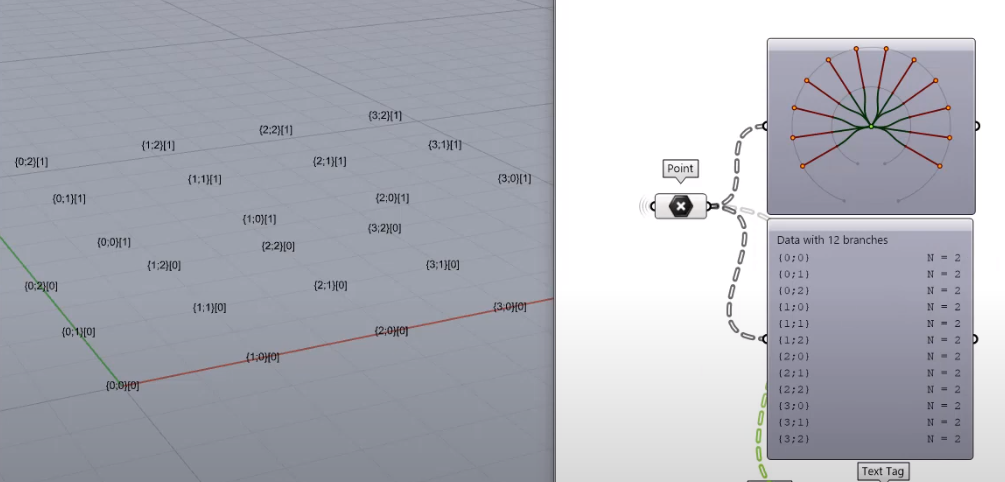
For all operations, we are going to use our base tree. This tree consists of 24 points placed in 12 branches with 2 items each.
Base tree structure
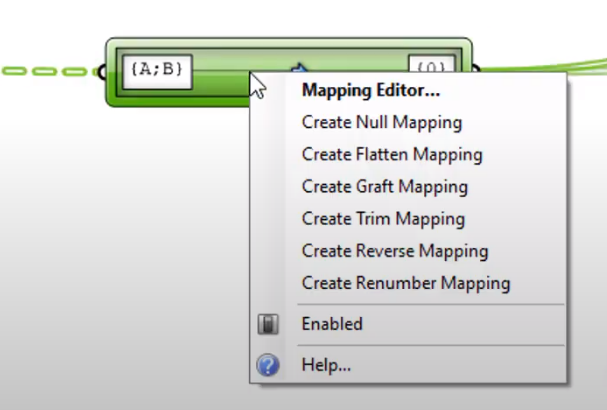
The source path is fixed and is given by the input tree. You can only set the target path. By right clicking on the component you can find built-in mappings inside the Path Mappers. I always use one of them to automatically find my source path.
To make flatten operation, we change our targets branch to 0 so all elements will be placed in just one branch. You can clearly see that on the param viewer below where is just only one branch.
We can compare now these two trees.
Our base tree has two paths in path mapper corresponding to the big letter B and a big letter A. I’ll always describe with a small letter i . Flatten operation means that we are going to break down our structure instead of A and B paths, we are going to have just one, and it will be 0. So all indicates will be put together and the result will be just one branch and 24 items
Flatten mapping
3. Path mapper as a Graft
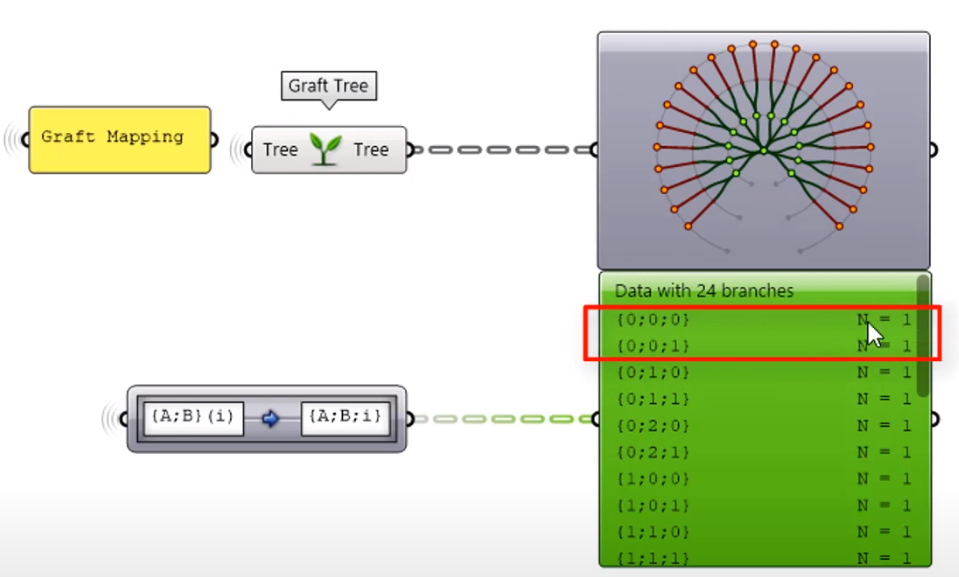
Now we are going to graft function. In this case, we will have more paths so our source will be the same as in the previous example. To graft, we need to add one more path, and in this case, we are going to move indicates from the item level to the path level. To get more branches.
Okay, so let’s look under our first branch from our base tree it was 0;0 and after grafting, we changed this branch into two 0;0;0 and 0;0;1. Below on the data tree param viewer, you can see that we add 2 branches to each last path.
Graft Mapping
4. Trim
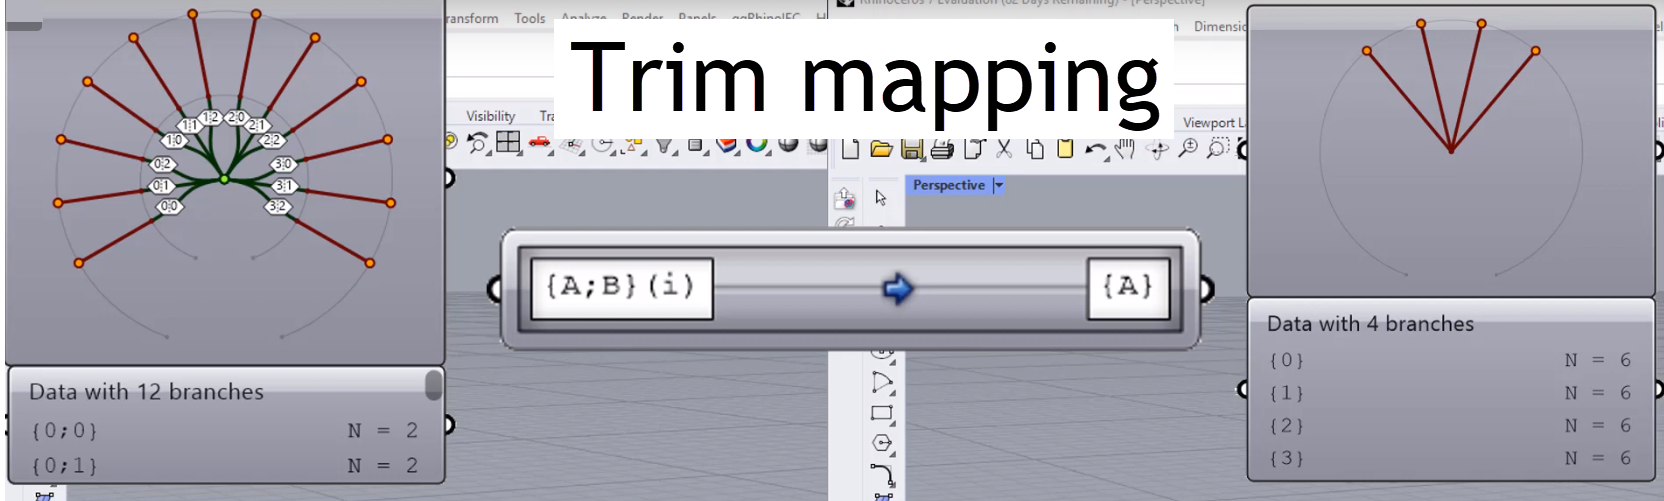
Now we proceed to trim tree operation. As the name suggests, we are going to cut some branches. In this example, we are going to remove path B so the last path in our tree. It doesn’t mean that we are going to delete all elements from the path B. All these elements will be moved to the item level.
In other words…
we are going to merge all branches which has the same number at the beginning in our example 0;0, 0;1 and 0;2 will be merged together. That’s why we’ll get 6 items in this branch. To see it better, let’s check out the picture below. As you can see, we still have 24 points, we haven’t deleted anything, but instead of 12 branches, we have just four.
Graft Mapping
5. Patch index
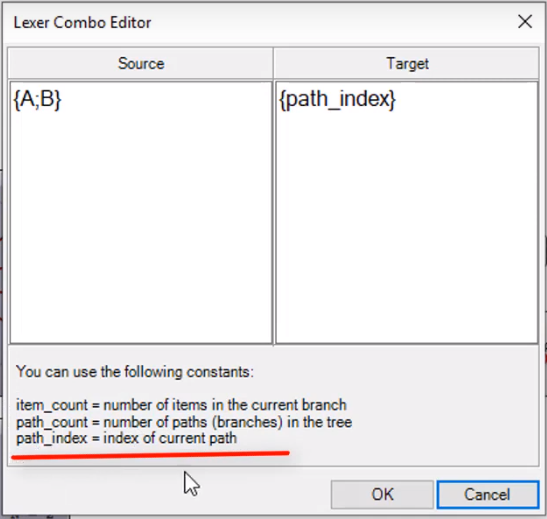
There is a set of constants that help with mapping for example, path index. We can use that constrain if we want only the branch names to be changed and the data items remain on the same branches just will be changed. This will allow us to extract the number of branches from the source and translate the same amount of the target branches. In this case, the whole structure with items and branches are moved to the target branches.
So, as a result we will always get branches in the sequence from 0 to the number of branches -1. Items remain in the same position.
Patch index
6. Patch count
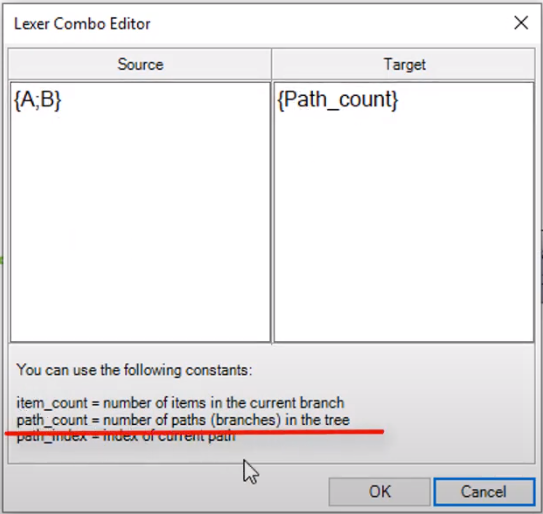
The next one is a path count. There is also an option to make a link between the a number of items or branches and the index number of the target branch. For example, when the source branch is defined as A and B and the target branch as half count, the final branch name will be in our case 12 because there are 12 branches in our example. In other words, path count is a constant value and describes the number of branches in the tree.
Path count
7. Item count
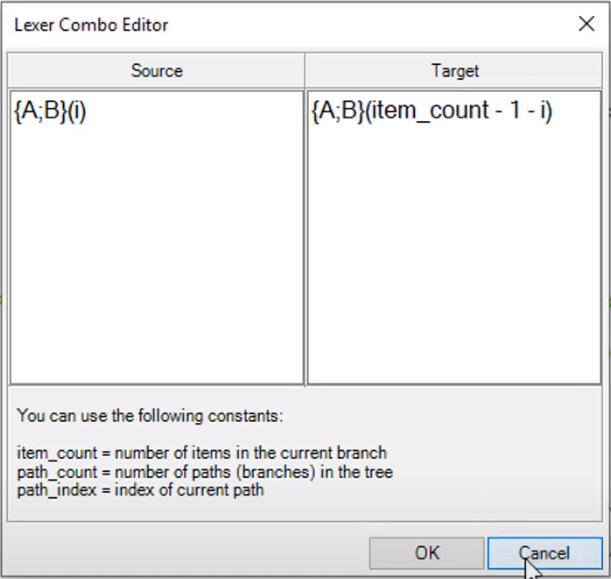
A similar option to path count is item count constant. This will define a number based on the number of items in a branch. You can use that constant to make reverse operations, and you will reverse all items in your tree.
In the target path, just write item_count minus 1 minus i.
Item count
Homework - Grasshopper Data Tree structure
Now I have an exercise for you! I have shown you how to make a reverse operation on the items using the path mapper component. But how you will reverse elements inside branches? Write your solution in comments or send it into my mail [email protected]
8. Path mapper as a Flip matrix
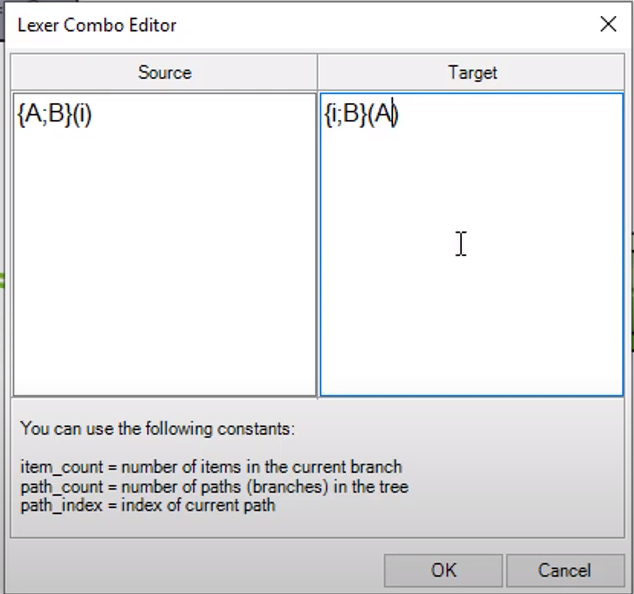
The flip matrix component works fine just with the two-dimensional matrix. In the case of more branches, it will give us an error. However, the path mapper component was created for these exercises! You can have as many paths as you want, and you can easily switch between them.
Flip Matrix
Summary of path mapper in Grasshopper data tree structure
To summarize, the path mapper component lets you reorganize the branch structure by renaming the original path of the branches and index data to a new target path.
However, there is one significant disadvantage of using this component. If any change in the source tree will happen then the component will stop working. Any simplification operation before the path mapper will block this component. That’s why you need to be very precise about all your changes in the script and be aware of how is your data structured.
DOWNLOAD
5 STEPS TO LEARN GRASSHOPPER
5 Steps to learn Grasshopper is a guide full of books, exercises, tutorials and videos. Everyone will find something for themselves – regardless of the level of initiation.
You have successfully joined our subscriber list. Check your inbox. Confirm email in order to get access BIM Case Studies from the biggest Norwegian projects.
Reasons to Subscribe to the BIM Corner List:
BIM CASE STUDIES
After reading this guide, you will learn:
How BIM is used on the biggest projects in Norway
What were the challenges for the design team and how were they solved
What were the challenges on the construction site and what was our approach to them
News From BIM World
Every Thursday you will get a package of news and useful links from the BIM world.
No Hype
Just real content that’s meant to make a difference in your BIM knowledge.
This site uses cookies to offer social functions, analyze traffic and conduct remarketing activities. Details can be found in the privacy policy (info button).


Right On!
Thank you! Stay tuned!
[…] Full articel on BIM Corner BLOG: https://bimcorner.com/grasshopper-data-tree-path-mapper-is-a-badass/ […]