As you could read in the first part of the article http://bimcorner.com/how-to-start-with-bim-in-12-steps, BIM is not only software. First of all, BIM is a set of tools and practices that change working methods. The main idea is to design more efficiently and provide high-quality final documentation with a minimum of design errors. Properly designed processes and the method of monitoring the project work constitute the foundation which enables the achievement of such a goal.
In the following article, I will present another 6 points bringing you closer to BIM!
I encourage you to read the article.
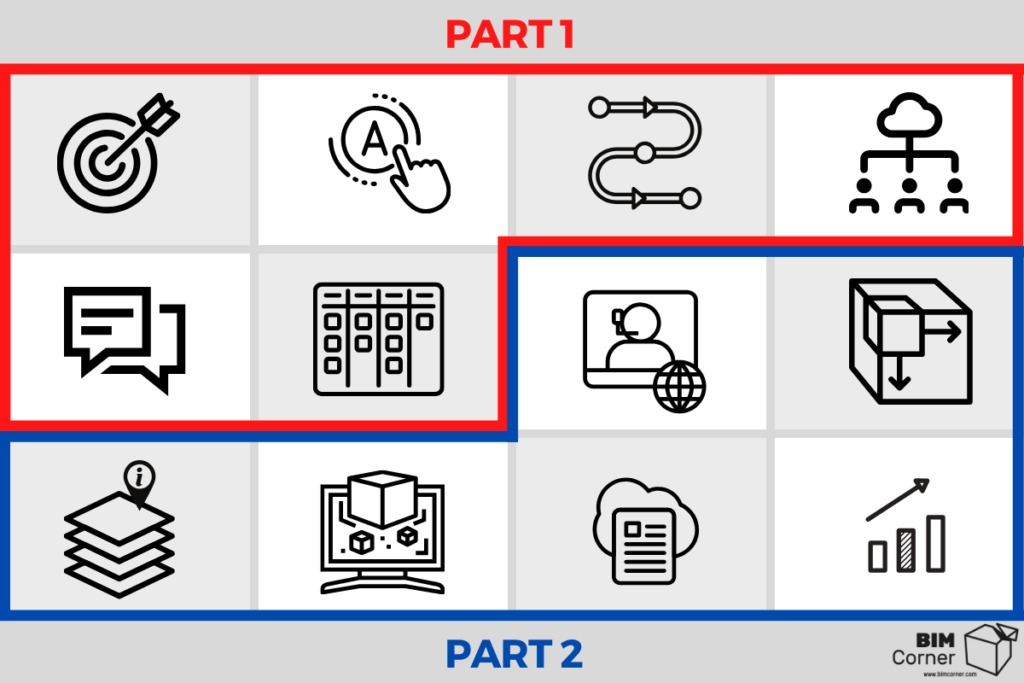
Table of content - PART 2
Formerly, the only way to make key decisions in the project was to conduct a live meeting. At the time of the COVID-19 pandemic, many companies had to transfer the organization of meetings to the Internet overnight. Currently, no one has any doubts that decisions can be made during online meetings. However, just like live meetings, online ones also require appropriate preparation. Therefore, there are fundamental rules for conducting meetings, supporting decision making, and influencing their effectiveness. Let’s examine some of them:
- The purpose of the meeting: It’s important to define the purpose and the main theme of the meeting. It could be a multidisciplinary collisions check in the hospital building on the third floor or an analysis of the design solutions of an intersection.
- The chairperson of the meetings: Any meeting should have a chairperson. In most cases, this person is also responsible for the taking notes during the meeting. Usually, it’s a Project Manager.
- Model presenter: During design meetings, the design issues should be discussed based on the 3D model. The person responsible for its display is usually the BIM Coordinator. In smaller projects, the Project Manager and BIM Coordinator is the same person.
- The exact agenda and time of the meeting: People participating in the meeting should be informed in advance which topics will be discussed and how much time is dedicated to each issue.
- The participants make decisions and prepare themselves: to run the effective meeting, the participants have to understand the issues discussed and, if necessary, make a key decision for the project.
- The reports and the meeting records: To increase the meeting’s quality, it’s essential to continuously improve it. It’s, therefore, necessary to carry out a short evaluation after the meeting. As we know, to improve something, the first thing to do is to measure it. Thus, the meeting’s elements that can be improved must first be identified.
For this purpose, it’s also worth asking the participants closed questions, as their responses can be measured. Such questions could be, for instance:
- Do you think the other participants were well prepared?
- How effective and helpful was the meeting for you?
- To what extent did you contribute to make the meeting as useful and effective as possible?
Furthermore, for evaluation purposes, you can use the following tools, for example, mentimeter.com . The program enables the creation of different questionnaires, their distribution, and subsequent accumulation of answers. Such a practice will make the meetings more effective.
3D modeling significantly facilitates the designer’s work in the infrastructure world. For example, the existing situation reflected by a 3D digital terrain model, combined with an overlapping orthophotomap, allows for a more accurate adjustment of the designed road corridor. Also, the 3D models support the creation of a more accurate bill of quantities, or even a report of earth masses.
If you have designed in two dimensions so far, please remember that you don’t have to create complicated three-dimensional models straight away. The important thing is to create a dynamic and easy to edit model. It’s also necessary that you create horizontal documentation based on the 3D model, not the other way around.
You probably had to make design modifications more than once after the industry meetings. The unconnected horizontal geometry required you to change each element of the route, leading to an increase of the working time, thus decreasing the project profitability. Therefore, even for these basic factors, it’s worth using software supporting dynamic 3D modeling. We have already written about programs that will help you create 3D models in this article: http://bimcorner.com/which-bim-software-to-use/ and this: http://bimcorner.com/ultimate-bim-software-list-for-bim-coordinators/ The most popular ones in the infrastructure world include Civil 3D, Novapoint, OpenRoads, Revit, Tekla. It’s worth noting that the purchase of software supporting BIM modeling is the biggest implementation cost in an organization. However, the money invested in this way provides many benefits for users.
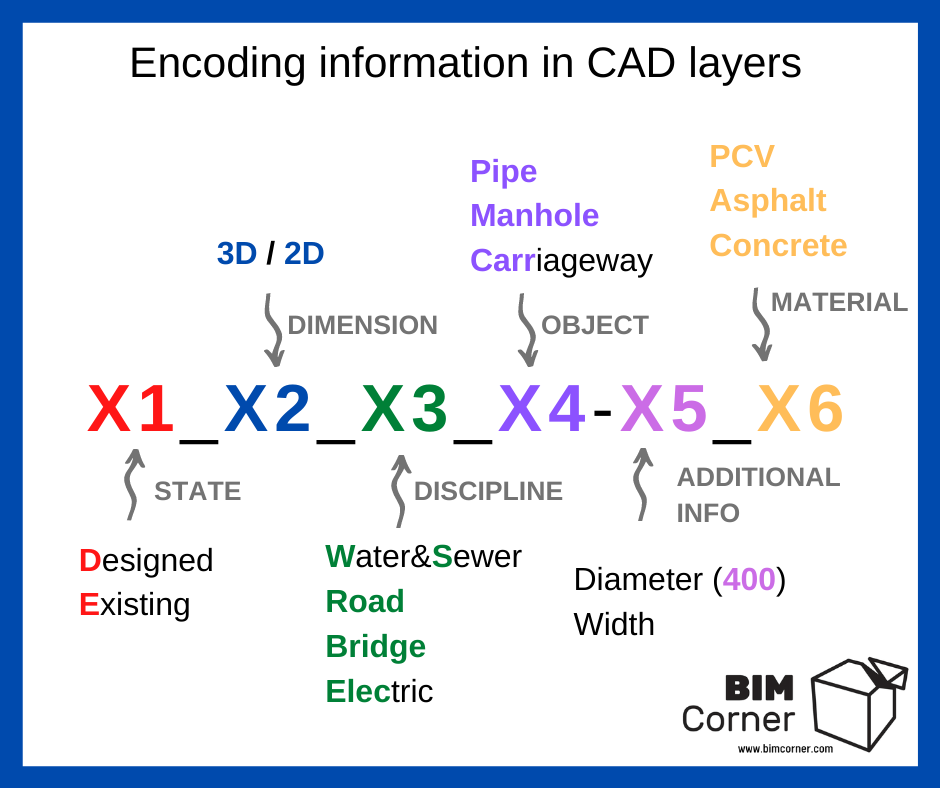
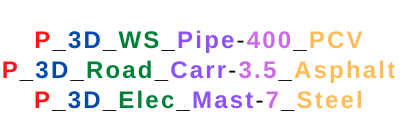
Long story short, the BIM model stands for 3D geometry + non-geometric information. When talking about the BIM model, you should be aware of the fact that properly assigned non-geometric information makes it unique. Depending on the industry, the BIM model can have different properties. Thus, what information is relevant? Consider the example of a designed sewage pipe. The non-geometric information describing the BIM model is, therefore:
- State (e.g. Design)
- Dimensions (e.g. 3D)
- Discipline (e.g. Sewage system)
- Object type (e.g. Pipe)
- Additional info (e.g. Diiameter: 400)
- Material (e.g. PCV)
As you can see, the above information allows you to determine, among other things, if the object is designed, industry, material, and pipe diameter. These basic data give us a lot of value and help us to create a more accurate cost estimate based on the 3D model. Thus, how to assign this information to our BIM model? The easiest way is to encode the information into CAD layers using the following diagram.
Such a method of layer encoding allows you to filter objects and extract the necessary data. At the beginning of your adventure with BIM, encoding information in .dwg files seems to be a very good practice.
So, if you have created a BIM model for your industry, it’s worth displaying it alongside other BIM models. For this purpose, use a tool for viewing multidisciplinary models. Trimble Connect is the program supporting the viewing of BIM models. It’s a paid browser (there is also a desktop, mobile, and Hololens version), with the possibility of creating a free account. The functionality of the free version is sufficient for the beginning. With the help of available tools, you can display 3D geometry and information assigned to objects. The program allows you to save views, cut a model, check for collisions, assign project tasks, and mark collisions. The program supports the most popular formats. We wrote more about the program in this article http://bimcorner.com/which-bim-software-to-use/.
Of course, there is much other software with many useful tools. However, you don’t need expensive software to start working with multidisciplinary models. At the beginning, displaying a multidisciplinary model, with a free tool, at project meetings is sufficient. This will give you a holistic view of the project, allow you to notice the advantages of such work, understand the problem better, and detect a collision in the project.
Industry/multidisciplinary coordination on 3D models directly contributes to the reduction of paper consumption. Instead of a pile of horizontal drawings used for a design revision, we can find collisions directly in the 3D model. However, 3D models aren’t accepted as the only final project product. Paper documentation is still required in the form of drawings.
Thus, your goal should be to limit the paper printout to the necessary minimum, namely, to print the final design documentation. Individual project milestones requiring industry/multidisciplinary control can be carried out digitally.
A tool that allows control of digital drawings is Autodesk Design Review. This software provides free viewing, marking, printing, and tracking changes of 2D and 3D files.
For digital industry/multidisciplinary control, export the file to DWF format from the CAD tool. Using the available tools, Design Review allows us to comment, or select parts of the drawing requiring changes with “clouds”. Once the industry inspection is complete, the comments are visible in the CAD tool after loading the DWF file to the DWG file from which they were exported.
Note that you can always print your drawings to PDF format and then control them with the available tools in PDF Editors. (e.g. Adobe Reader).
Relying on the Kaizen concept, don’t stop evolving. All the above steps bring you closer to a more effective and efficient workflow. Start working with BIM slowly bearing in mind that you are at the beginning of your journey. This is the time to learn and try new working methods.
Focus on reducing the time of your projects. Automate repetitive activities. Create the necessary processes, such as the digital revision of drawings described above. Develop evaluation criteria for meetings. Reduce unnecessary costs, such as printing paper.
Additionally, don’t forget to develop your skills. Test new programs. There are a number of tools, applications that can help you in your daily work. Set new and more ambitious goals.
It’s just the beginning of your journey
I’m glad you got here. I hope these 12 steps have brought a whole new area to your attention. Let me make you remember from this article that what matters most is smarter, more effective, and efficient workflow. BIM technology isn’t the answer to everything, but it certainly is an element that helps to achieve it. Keep in mind the constant improvement. In the following articles, I will attempt to develop in more detail some of the points mentioned above.
