Rhino Inside Tekla – Create your own tools for Tekla Structures
Year after year, you wait for new Tekla Structures updates, hoping for improvements that never quite fit your project’s unique demands. But projects didn’t wait. Designs became more detailed and needed to be finished faster. There were many tools out there, but often, they just didn’t meet your exact needs. Luckily, Parametric Design has become available to every engineer, allowing you to create your own tools without being an IT developer. Rhino Inside Tekla gives Tekla users the freedom to do everything they want… and nothing they don’t.
Table of Contents
1. The big change for the Tekla Users
For a long time, starting with the automation of repetitive and time-consuming tasks in Tekla Structures was difficult. You had to search everywhere for bits of information, and it was very confusing. If you wanted to create a tool, you had to be a C# developer and know the Tekla API by heart. Let’s be real. It is hard to be an awesome structural engineer and an experienced IT developer who knows a text-based programming language perfectly at the same time. Now, everything is changing towards low code, and creating tools becomes easier thanks to the Grasshopper Component.
2. Grasshopper Tekla Live Link vs. Rhino Inside Tekla
You may first wonder if the Grasshopper Tekla Live Link is the same as Rhino Inside Tekla.
They are two completely separate things.
In 2022, Trimble introduced the Grasshopper Component based on the innovative Rhino Inside Technology. This technology lets us integrate Rhino directly into other 64-bit Windows applications.
The Grasshopper Component is different from the Grasshopper Tekla Live Link.
Here are the main differences:
The Live Link creates a real-time connection between Rhino and Tekla viewports. You can build and adjust models on the fly, but you’ll need to know how to script.
The Grasshopper-powered Tekla components, on the other hand, work like standard Tekla plugins. They can run any Grasshopper definition in the background to create objects. Normally, creating custom components in Tekla requires C# programming. Now, you just need to know Grasshopper. However, if you are the end user, you don’t need to see or interact with Grasshopper.
And here’s the best part:
You can control everything directly from Tekla’s interface, meaning you don’t have to work directly with Grasshopper. It’s similar to using a remote control panel to run Grasshopper scripts from Rhino.
Grasshopper component in Tekla applications & components
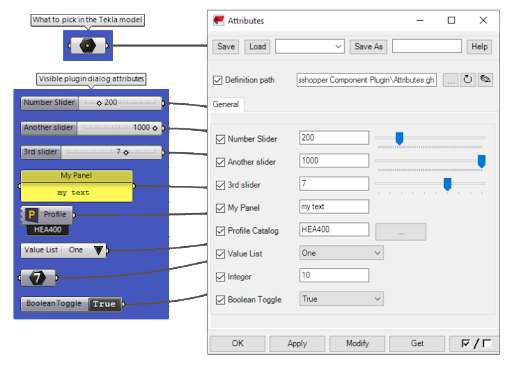
The Grasshopper Component in Tekla Structures lets you use any Grasshopper definition to create objects in Tekla. Just choose a Grasshopper definition, and the component will guide you through selecting the necessary inputs in Tekla. The component dialog automatically shows options based on the parameters in your definition, even including Grasshopper’s sliders for true parametric modeling flexibility.
3. Rhino inside Tekla Workshop
I have invited industry expert Tautvydas Bakas from Doka to a live workshop to demonstrate how easy it is to create your own Tekla components for things like formwork for walls, columns, tunnels, and slabs.
Tautvydas showcases different projects, including buildings and bridges, to illustrate how flexible and powerful Tekla can be. You can view the entire workshop below. To obtain the Grasshopper files with practical exercises, register your email HERE.
More practical example showing the power of Rhino inside Tekla:
This video showcases the power of the direct modification plugin and Grasshopper component. By simply dragging handles to trigger the Grasshopper definition, it becomes easy to create placing tools for any system and adapt them to any specific project.
5. Rhino inside Tekla for non-Grasshopper Users
The truth is, not everyone will become a computational designer to create scripts, but everyone should have the possibility to use them freely! I was super excited when Tekla released the Rhino.Inside.Tekla Grasshopper Component, giving users the ability to embed scripts.
This allows users to utilize parametric modeling without needing to navigate through the Grasshopper scripts. Not everyone is skilled at creating well-structured scripts. With the Grasshopper Component, you can control everything directly from Tekla’s interface, meaning you don’t have to work directly with Grasshopper. It’s similar to using a remote control panel to run Grasshopper scripts from Rhino or a Grasshopper player.
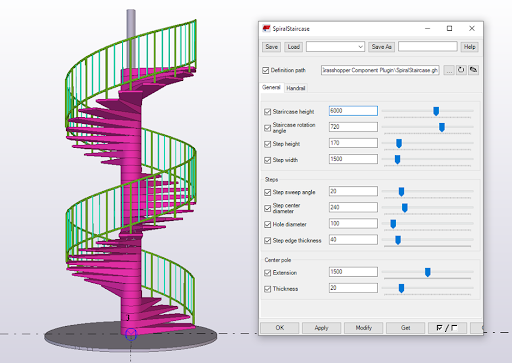
Example of Grasshopper Component User interface
6. Rhino Inside Tekla Installation Guide
Here’s a checklist of essentials you need to use the Grasshopper Component based on Rhino Inside technology:
Tekla Structures License: You’ll need Tekla Structures version 2019i or newer.
Rhino Requirement: The component is compatible with Rhino 7 or newer (excluding WIP versions).
Grasshopper-Tekla Link: Make sure you have the 1.10 installer pre-release, dated 2021-11-17 or later.
Grasshopper Component Plugin for Tekla Structures: Download the latest version, 1.0, released on 2021-11-18.
Rhino 8 Important Note! The Grasshopper Component will automatically switch to Rhino 8 upon its final release, but you will need to update the component to version 1.4 for optimal performance. You can download it FROM HERE for the time being.
Regarding the Rhino License:
Rhino License Requirement: Using Rhino.Inside requires a Rhino license. If you’re on a floating license system, ensure a Rhino license is available before launching the Grasshopper component. If a license isn’t available, the component could cause Tekla Structures to freeze due to its inability to secure a license.
License Release: The Rhino license is released when Tekla is either closed or restarted. Due to the nature of Rhino.Inside, manually releasing the license without fully closing the Tekla process is not possible.
Tekla tool created in Grasshopper looks exactly the same as with C#
6. Summary of Grasshopper Component
Rhino Inside Tekla lets engineers make their own design tools easily, without needing to know a lot of coding. For a long time, starting with the automation of the repetitive and time-consuming tasks in Tekla Structures was difficult. You had to search everywhere for bits of information, and it was very confusing. You didn’t have one place to learn it all, step by step, until now.
My new training, Grasshopper in Tekla, is based on more than ten years of expertise in Tekla Structures and uses proven methods from the world’s biggest projects. I’ve included tools and resources that you can freely use for drawing creation and 3D modelling in Tekla that give you the freedom to do everything you want… and nothing you don’t.
You have successfully joined our subscriber list. Check your inbox. Confirm email in order to get access BIM Case Studies from the biggest Norwegian projects.
Reasons to Subscribe to the BIM Corner List:
BIM CASE STUDIES
After reading this guide, you will learn:
How BIM is used on the biggest projects in Norway
What were the challenges for the design team and how were they solved
What were the challenges on the construction site and what was our approach to them
News From BIM World
Every Thursday you will get a package of news and useful links from the BIM world.
No Hype
Just real content that’s meant to make a difference in your BIM knowledge.
This site uses cookies to offer social functions, analyze traffic and conduct remarketing activities. Details can be found in the privacy policy (info button).