Exporting IFC from Archicad

Once, during the work on apartment information sheets on one of the housing projects we’ve been working on at the time, the contractor of the investment contacted us and asked for an IFC model that he wanted to use for cost estimation. It was my (and my colleagues) first experience with such an export so with no pre-established standards, no BEP or even a template in ARCHICAD it was a challenge for us. We tried to make the model operational but unfortunately without success… It required too much work with a short deadline. In this guest article I would like to introduce you to the subject of exporting the IFC model from ARCHICAD. You will learn step by step how to do such an export and thanks to this knowledge you will avoid situations that may cause the project to a standstill.

This post is a continuation of the series on IFC export. You can find previous articles on this subject written by Konrad here. In other blog posts, you will find articles about exporting to IFC from other popular programs. If you would like to learn more about the IFC format itself I encourage you to read Janusz’s articles. The first one in his series of posts can be found here.

Preparing a model for exporting

IN ARCHICAD exporting to IFC is literally a matter of a few clicks. However, from Konrad’s previous posts, you know that it is not enough to just press the magic button – save as IFC. For the IFC model to be useful, you need to know what purposes it will be used for and to remember a few general rules that will help us to export the model properly.

In the presented example I will be using the international version of ARCHICAD and default ARCHICAD classification system. You can also load a different classification system from the GRAPHISOFT website that you can easily import into your project.

1. Setting the correct classification for elements in the model

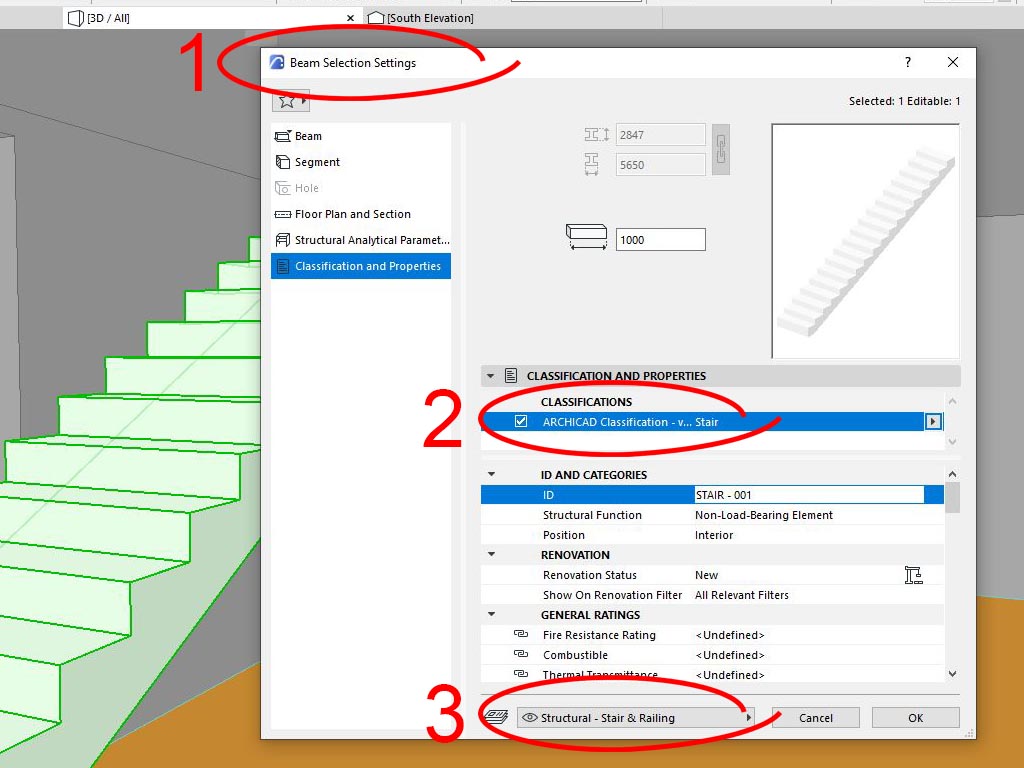
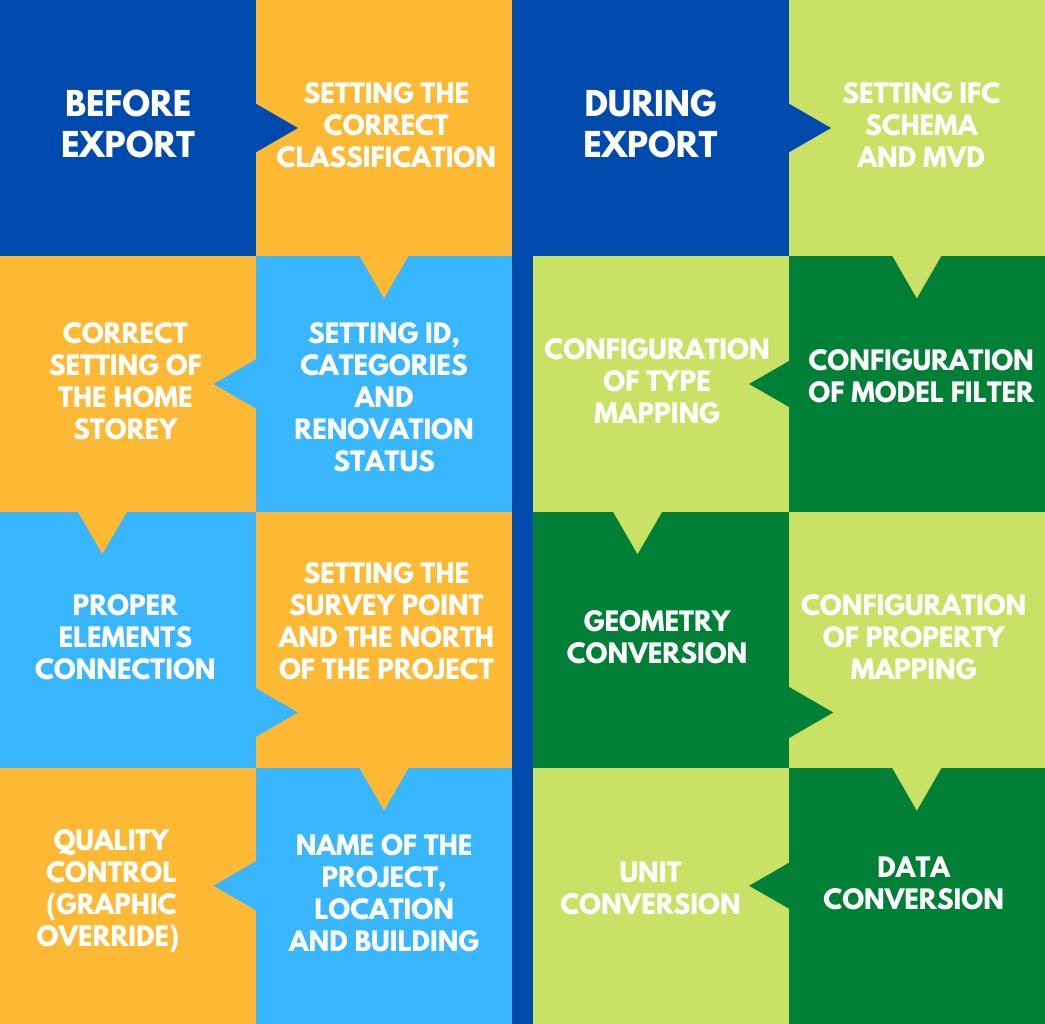
By default ARCHICAD assigns appropriate classification to particular objects depending on the tool they were created with. For example, if you create stairs in a project with the predefined Stairs tool, they will automatically be classified in the ARCHICAD classification as Stairs. Therefore, they will be exported as IfcStairs. If for some reason in the project we created stairs, e.g. with the Beam tool, we should assign them an appropriate classification so that they will be properly exported as IfcStairs. This is crucial because the correct classification of the model elements make the model useful for the people who only use the IFC model.
stairs - classification
To change the classification of a given element go to its settings (Ctrl + t). In the example above, the stairs were created with the Beam tool (1). In the ARCHICAD classification window, change the classification from Beam to Stairs (2). We should also remember to choose the appropriate layer (3).

2. Setting the id, category and renovation status

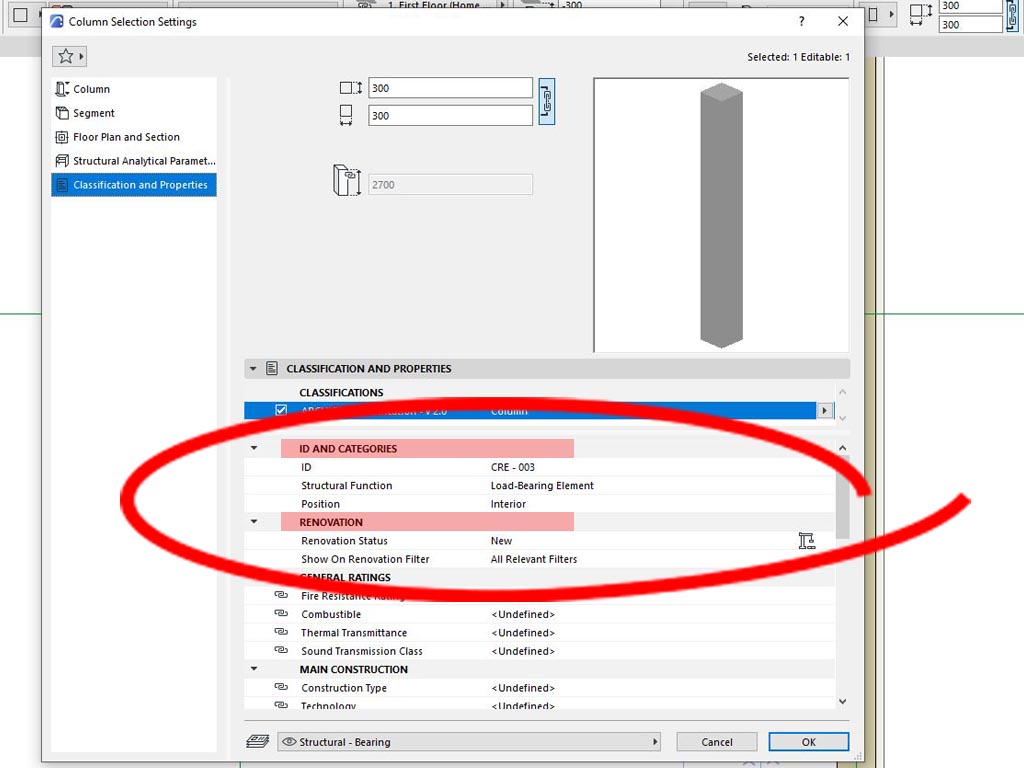
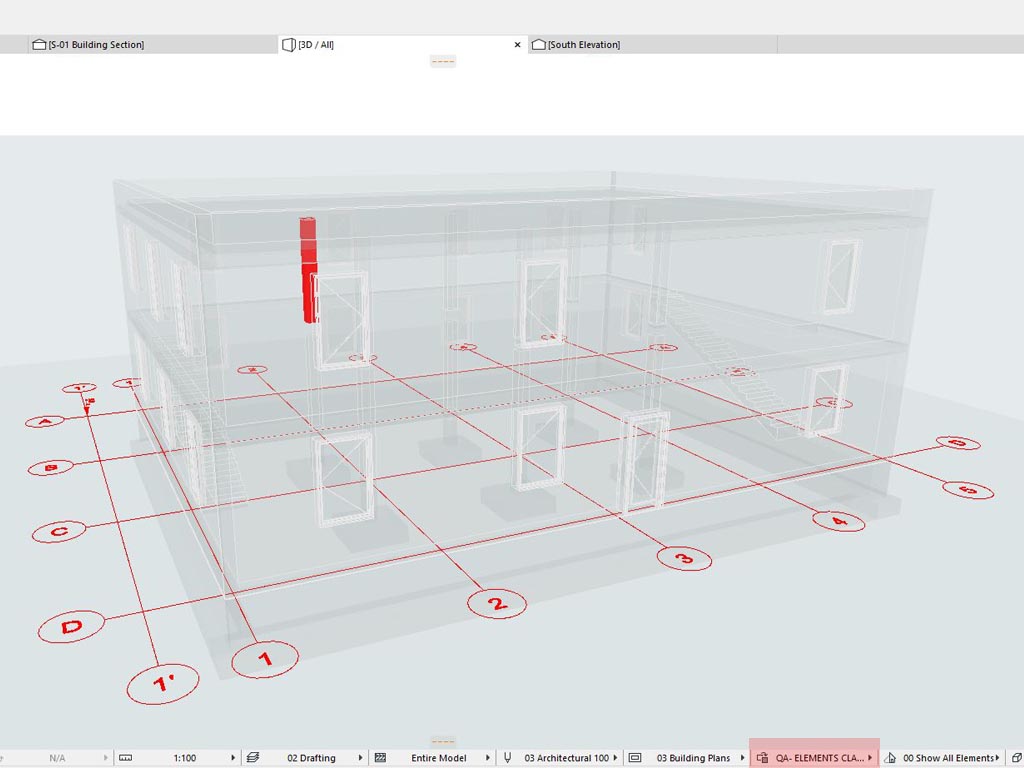
Set correctly the ID, structural function, position and renovation status for the elements in the project.This is an important point not only in the context of exporting to IFC. It is a basic information about each element in ARCHICAD thanks to which we can for example filter the display of individual model elements. Note that the ID parameter after exporting to IFC is mapped by default in ARCHICAD as the Name attribute.
ID and category
The ID AND CATEGORIES options as well as the RENOVATION status can be found in the Classification and properties tab of a given element.

3. Proper determination of the home storey

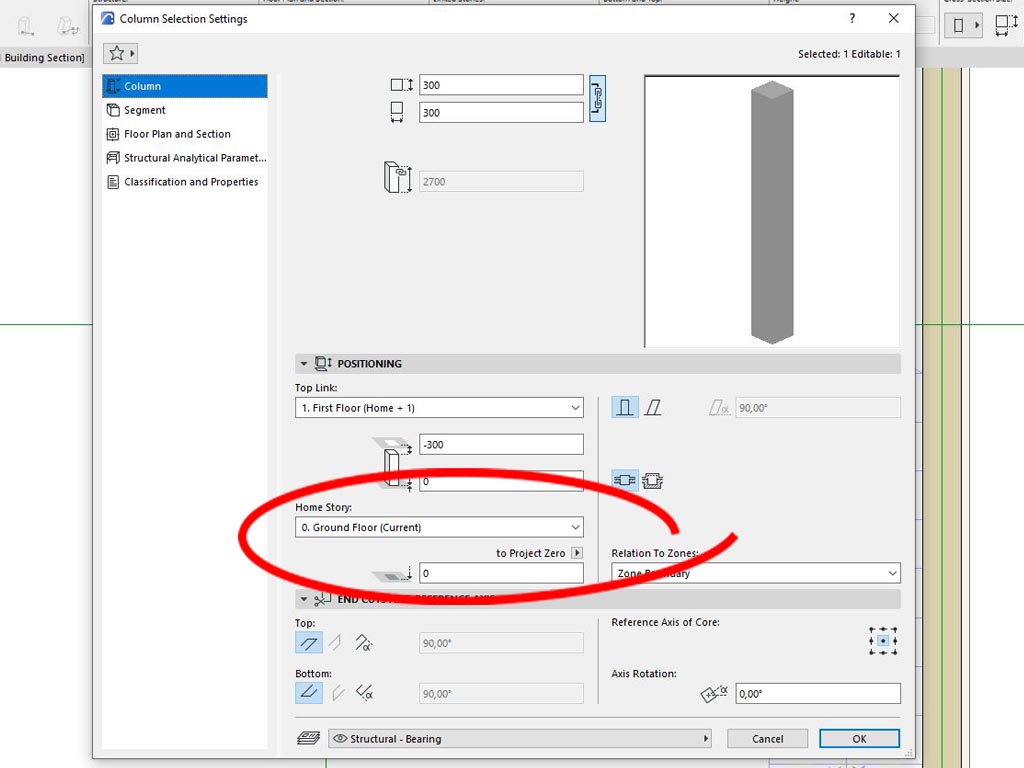
It is equally important to correctly define the home storey of individual objects in the model. In the IFC schema the individual elements are related to each other. Relations relate i.a. to the storey and that’s why it is important that the elements are properly related to the storeys after export.
Home story
Sometimes by copying an element to the higher floors we will not change its home storey, make sure that the elements are related to the correct storeys.

4. Correct connection of elements

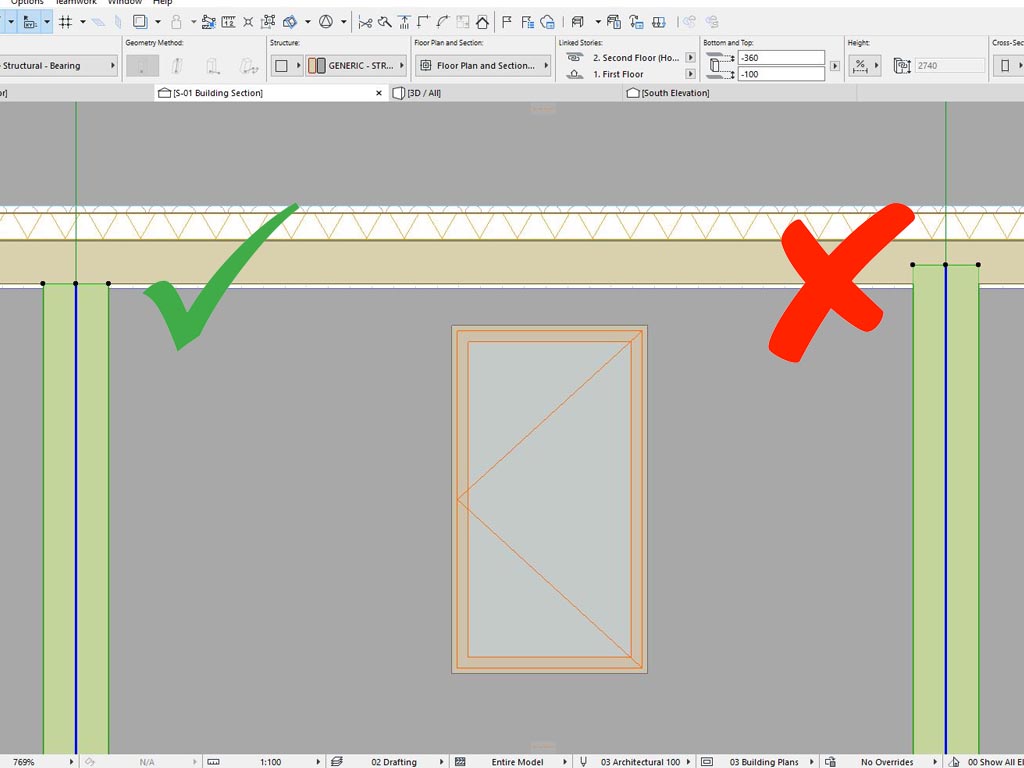
Correct connections between elements are crucial for the IFC model to be useful. When exporting a model to e.g the cost estimator, it will be important that the dimensions of the model match. For example, it is worth making sure that the columns do not penetrate the floor slab.
Joining elements
Make sure that the elements in the model connect correctly with each other.

5. Setting a survey point and a project north

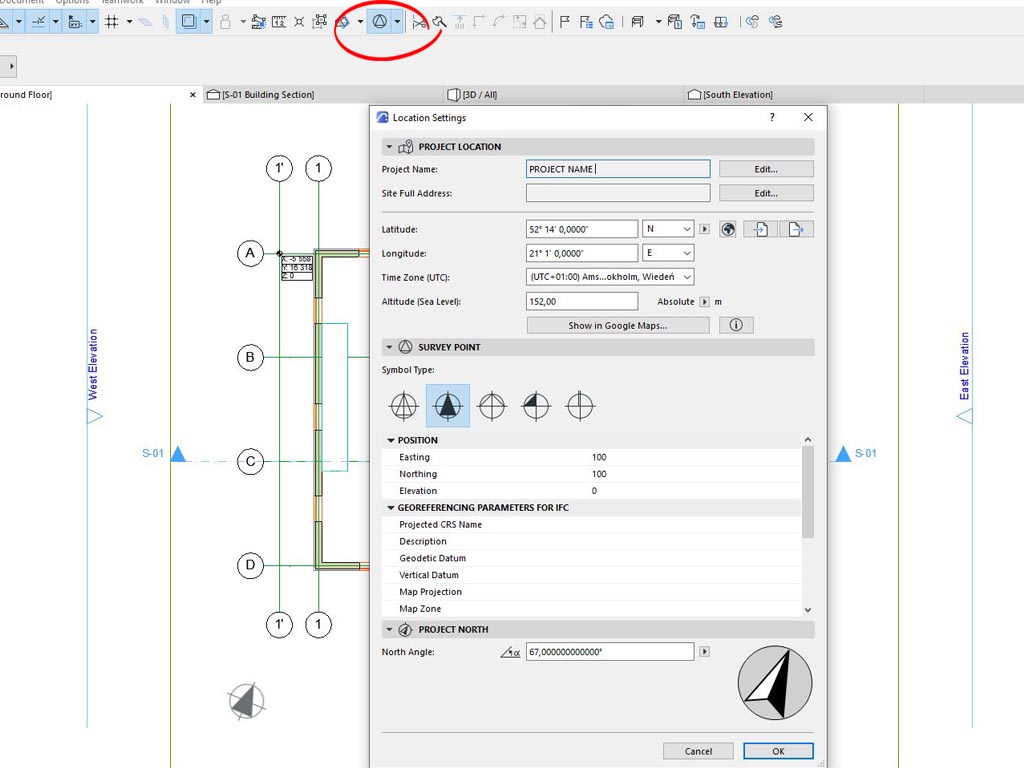
If the IFC model will be used for coordination it is especially important to establish a geodetic point and true north of the project. Setting the location of the model in relation to the global coordinate system and cardinal directions allows the correct coordination of several IFC models of different disciplines in one file. In ARCHICAD 25 in the top bar you will find the Show Survey Point icon. From the level of this tool we are able to determine the location and north of the project.
Survey point
On the top ribbon you will find the Geodetic Point settings.
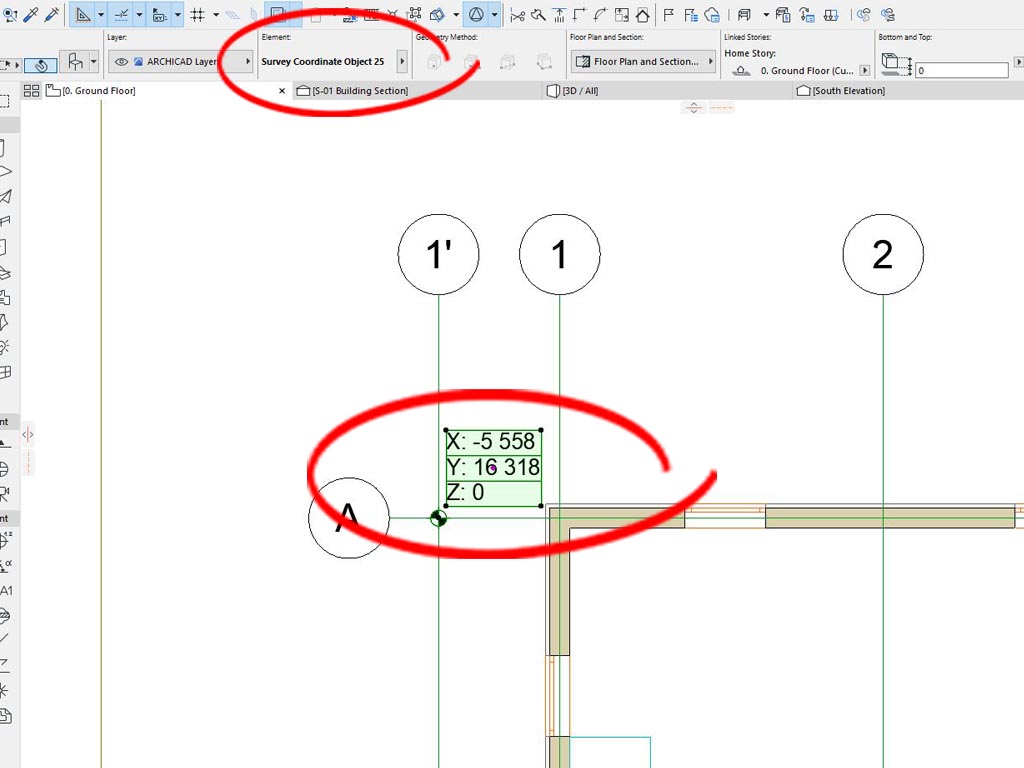
After establishing a Survey Point using the Survey Coordinate Object we can check the coordinates of any point in the project.
Coordination object
Coordinates of the point at the intersection of the two axes read with the Survey Coordinate Object.

6. Specify the name of the project, location and building in the IFC schema

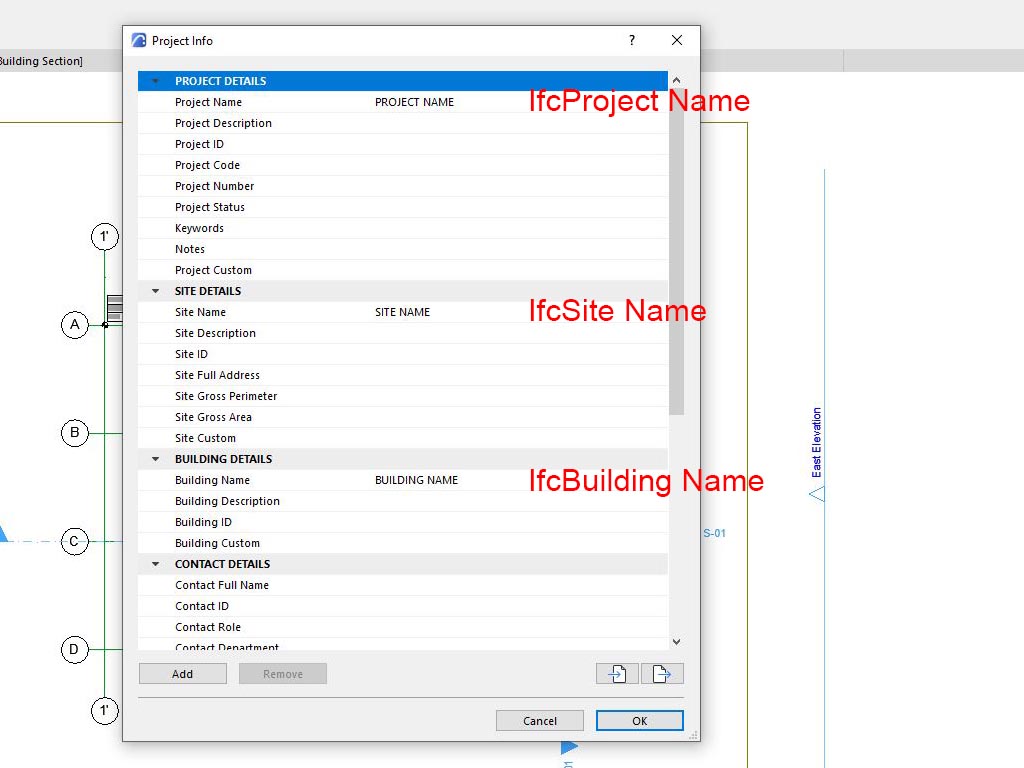
It is also worth specifying the basic information such as the name of the project, location or building name. All of the data will be visible for other users after export to IFC. If we do not give them specific names they will be generated automatically. For example, a site in our project IfcSite will be named Location. To give unique names to IfcProject.Name, IfcBuilding.Name or IfcSite.Name, go to the Project Info tab.(Project> Info> Project Info).
Projet information
In the Project Info tab we can define the names of the basic elements.

7. Using quality control in the form of graphic override

To be sure that the model has been prepared for export properly do the quality control using Graphic Override. Thanks to this tool we can for example visually check whether all elements have an assigned classification or if they are assigned to the appropriate storeys.
QA
Using the Graphic Override (circled at the bottom) in ARCHICAD we can perform a model check. In the presented variant the unclassified elements are highlighted in red. Elements with an assigned class are transparent.

IFC project manager

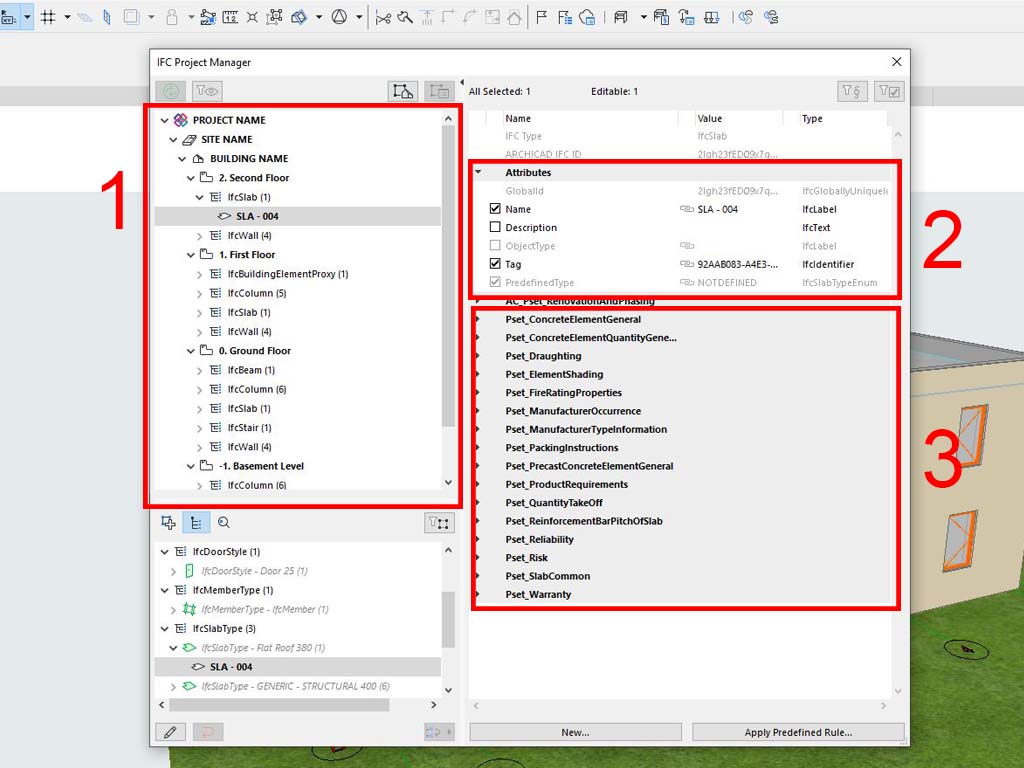
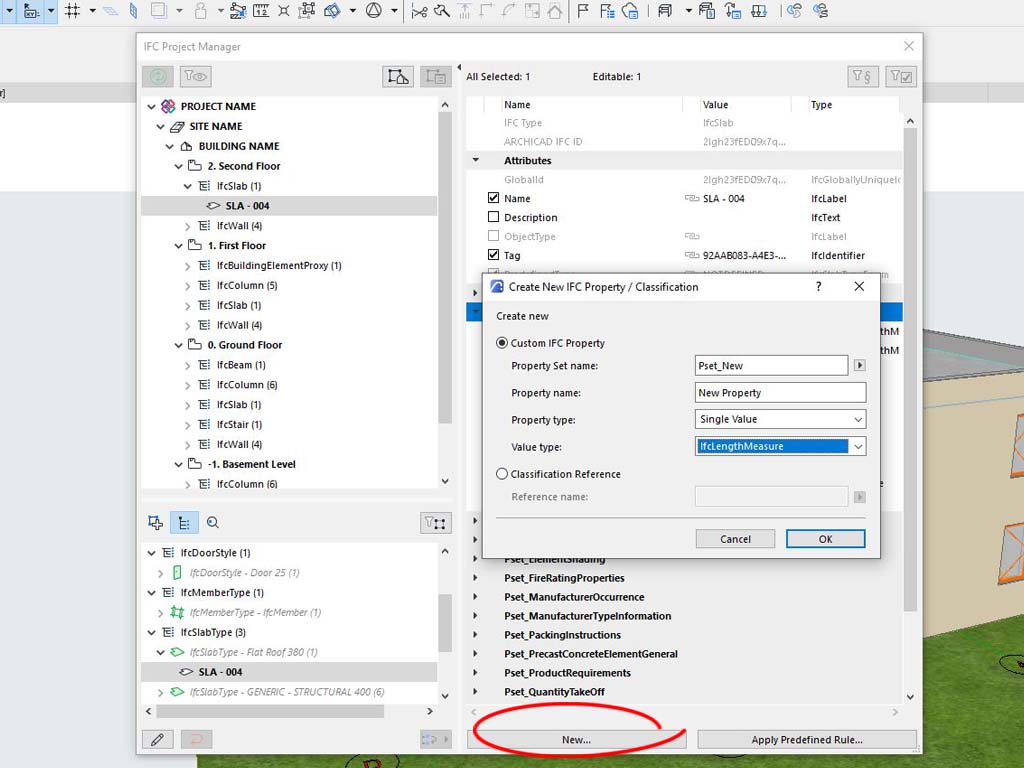
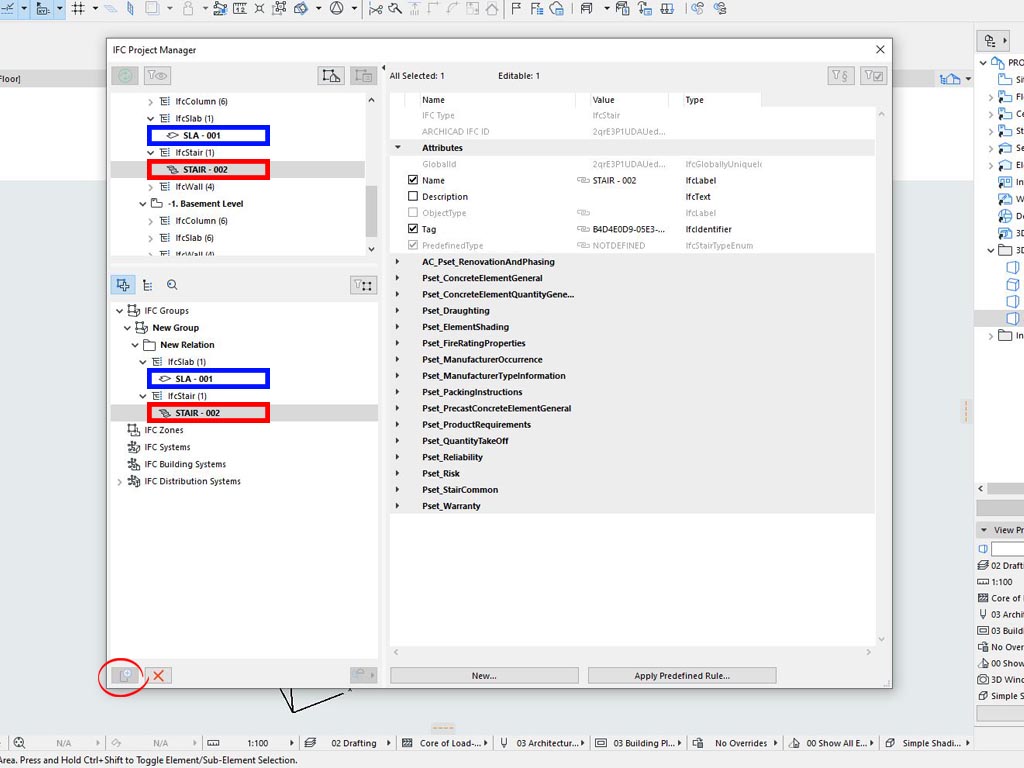
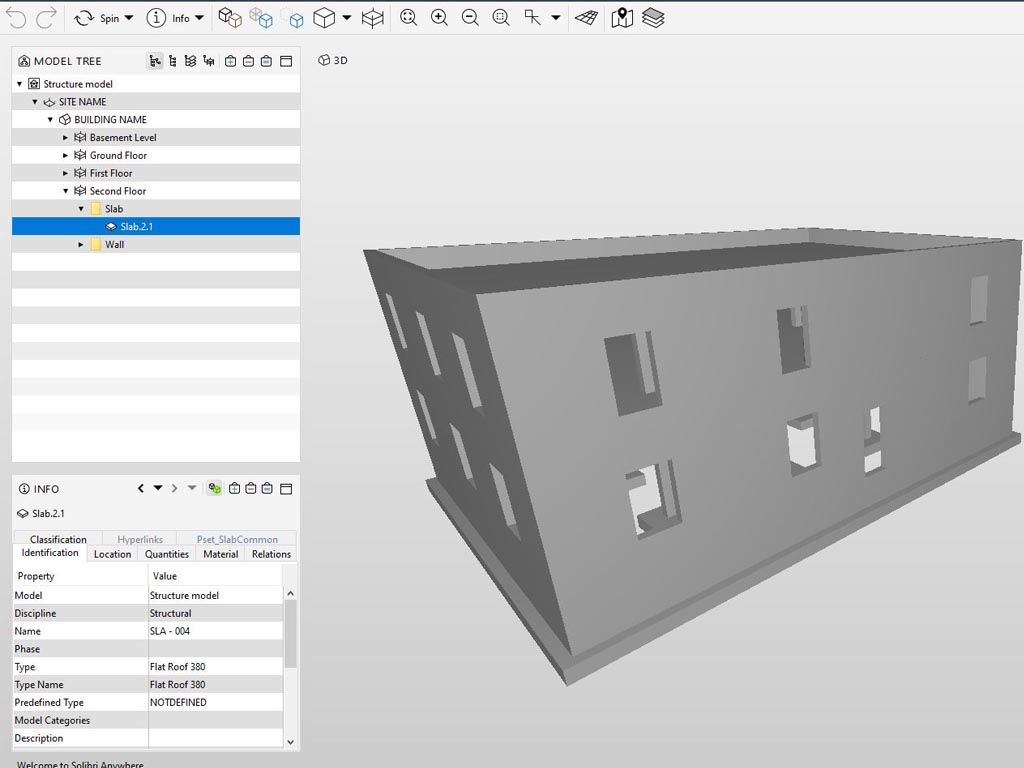
Before we go into the export settings take a look at the IFC Project Manager tab. (File> Interoperability> IFC> IFC Project Manager) In the manager dialog, at the top left, we can see the hierarchical structure of the IFC model (this is how the model tree will look after the export). At this point we can find, for example, a slab on the +2 level (SLA-004) and see the attributes and IFC properties assigned to it.
IFC project manager
(1) - Hierarchical structure of the IFC model; (2) - Attributes; (3) - Property sets

The manager enables us to create new properties and IFC property sets for individual elements in the project.

New property set
To create a new property or a set of properties click the New icon. It is important to choose the Property type and Value type accordingly. In case we would like to create a property - Price, we would choose Single Value as the Property Type and IfcInteger as the Value Type.
Below the hierarchical structure we see three icons. The first two are used to group items And the third one, the magnifier, is used to search for elements based on the IFC ID. 
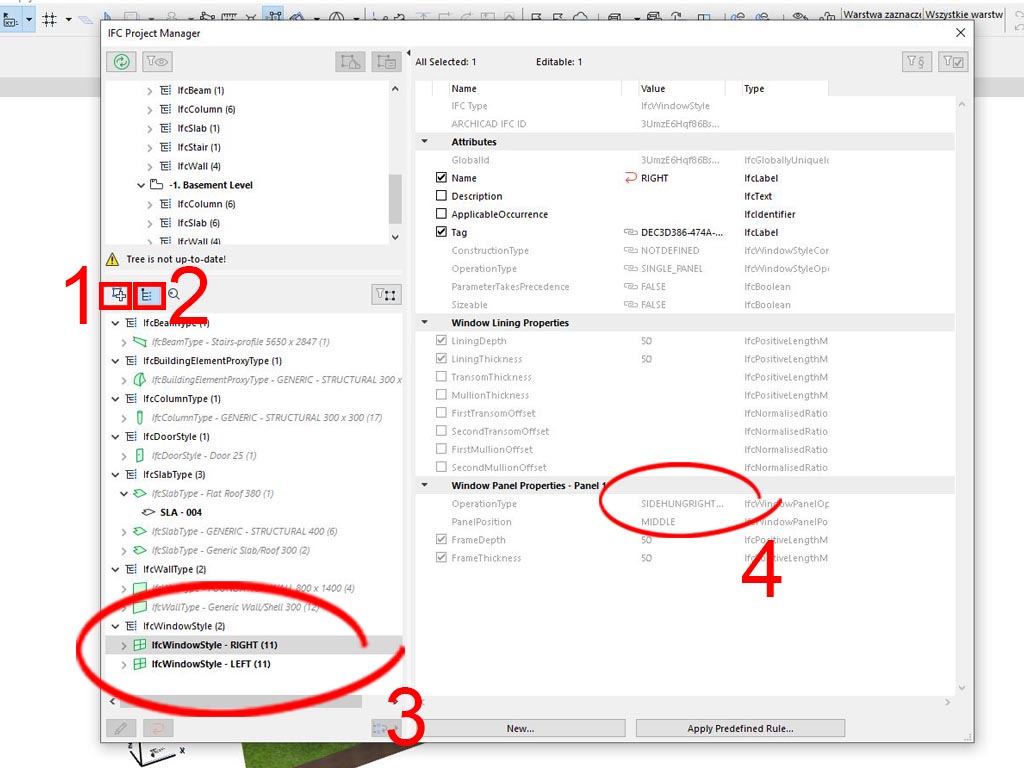
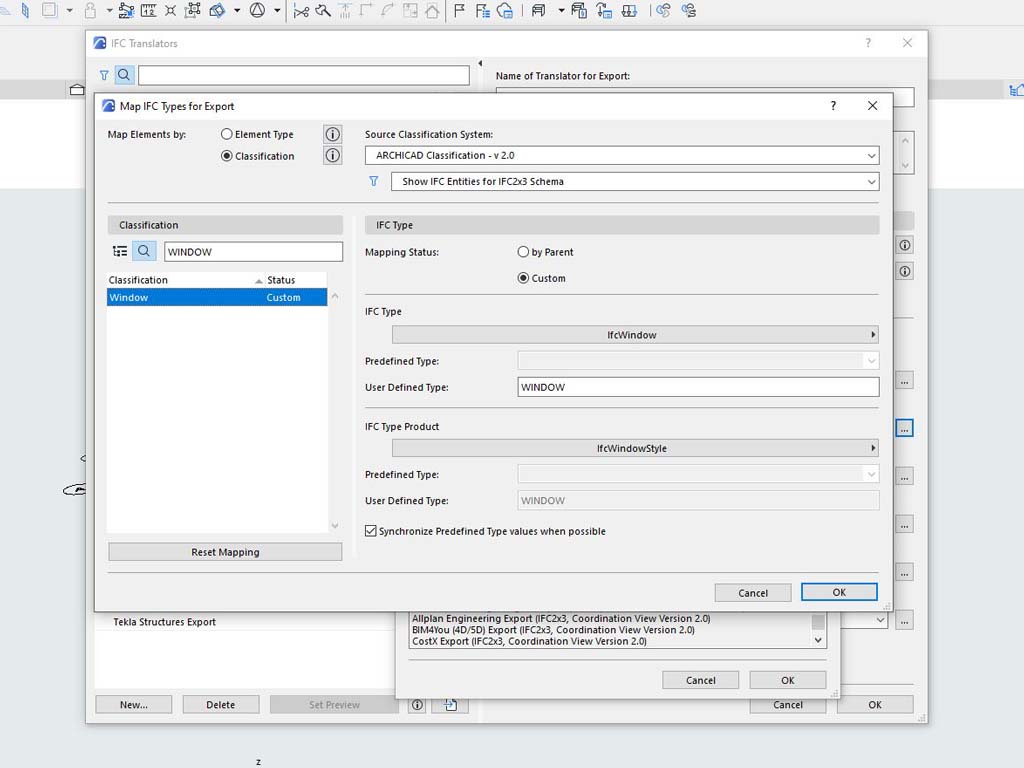
In the Product Type tab we see individual elements in the project grouped by product types (IFC Product Type). In our example we have 2 types of windows (IfcWindowStyle) differing in the direction of opening. From the Assignments window we can create new groups from project elements. After exporting the created groups will be visible in the IFC file.
Grouping
(1) - Assignments tab; (2) - Active tab, Product Types; (3) - all types of windows used in project (two in our case) (4) - The distinguishing feature of the marked elements (in this case window sash opening direction)
Assignments
In the Assignments tab we choose the assignment type. In the example I chose IFC Group. Then click the Create button at the bottom of the window. In this way we create a New Relation, in practice a folder to which we can drag elements from the hierarchical structure. In this way we can group all modelled elements by the categories such as structure, MEP etc. in the project.

Export settings to IFC

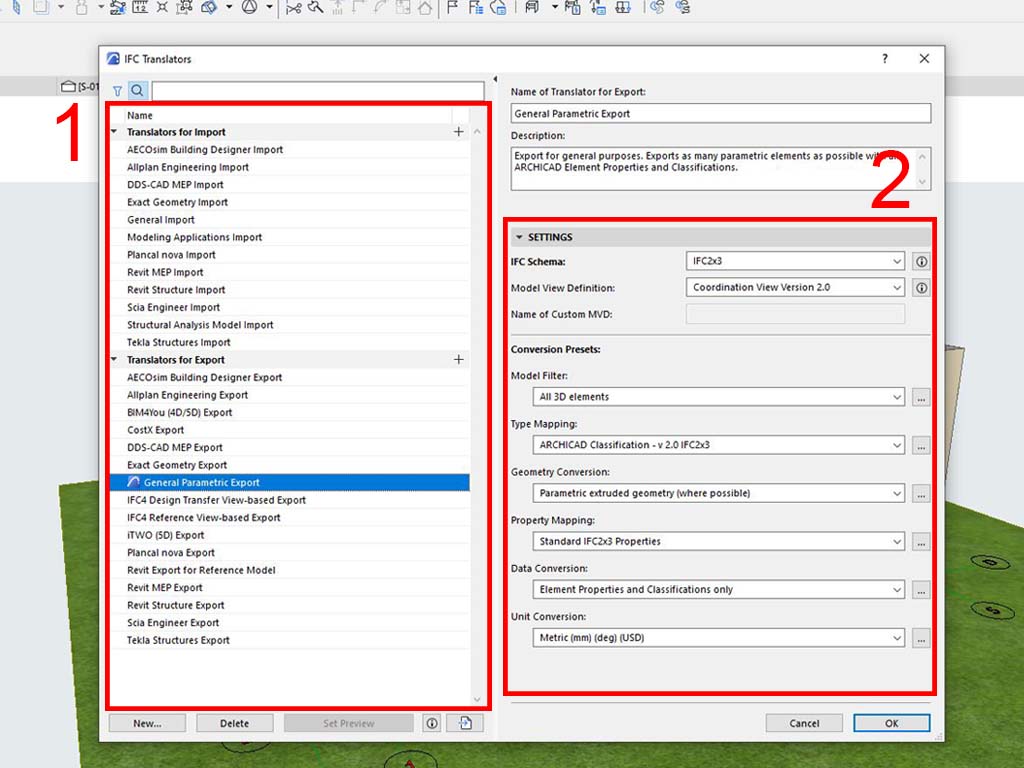
Now let’s move to the export itself. In ARCHICAD exporting to IFC is carried out using the export translator. The only thing that’s left to do is to configure a translator according to your needs or to use a predefined translator. Let’s start with the correct translation settings. (File> Interoperability> IFC> Translators)

1. Export translators

On the left we see built-in import and export translators that are optimized for specific programs for example Tekla. The Create button at the bottom allows us to create a new translator. On the right side we see Translator settings. Here we can modify the settings of existing translators or adjust the settings of our own translators.
Translators
(1) - Built-in translators; (2) - Translator settings

2. Settings of export translators

Let us assume that we want to export a model of load-bearing structural elements as a reference model for the structure engineer. I will briefly present the settings that I will be using.
Model view
Model view to export

Ifc schema settings and model view definition

First: select the IFC schema. The ARCHICAD selection includes the IFC2x3 schema and the latest version of IFC4.0. 
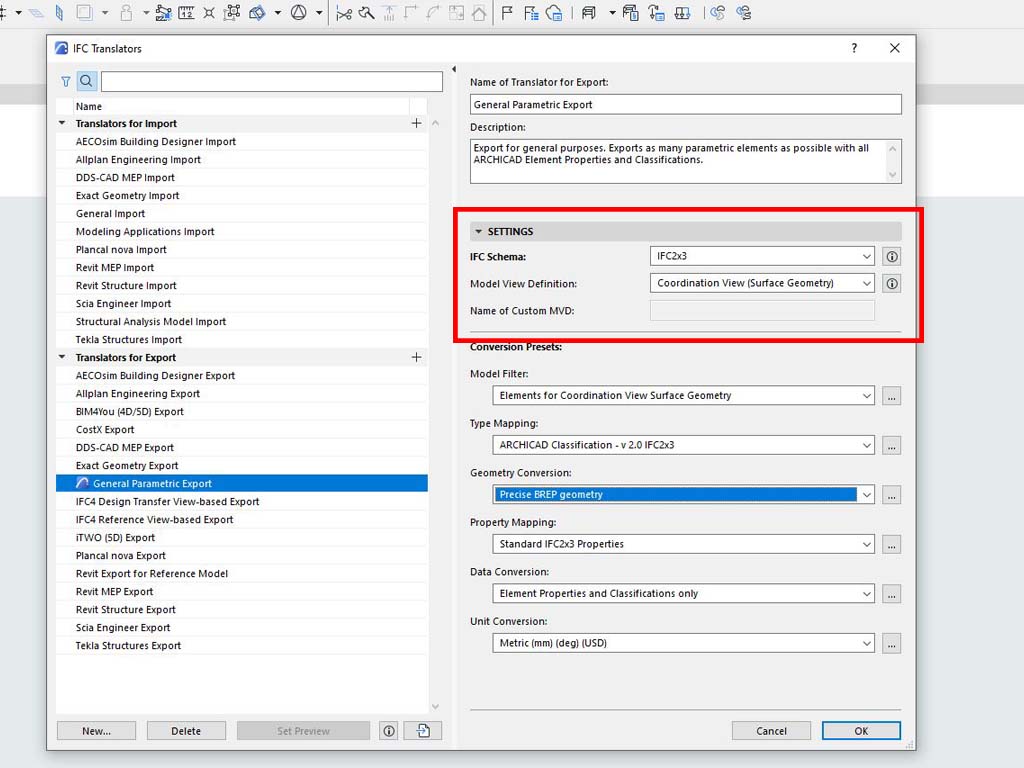
Then: determinate which Model View Definition (MVD) we will use. Depending on the purpose for which the model will be used, we select the appropriate MVD to export the appropriate data and elements. In our case we choose Coordination View (Surface Geometry), because the model will be used as a reference model for the structural engineer
IFC and MVD schema
First: choose the IFC and MVD schema.

Configuration of the conversion

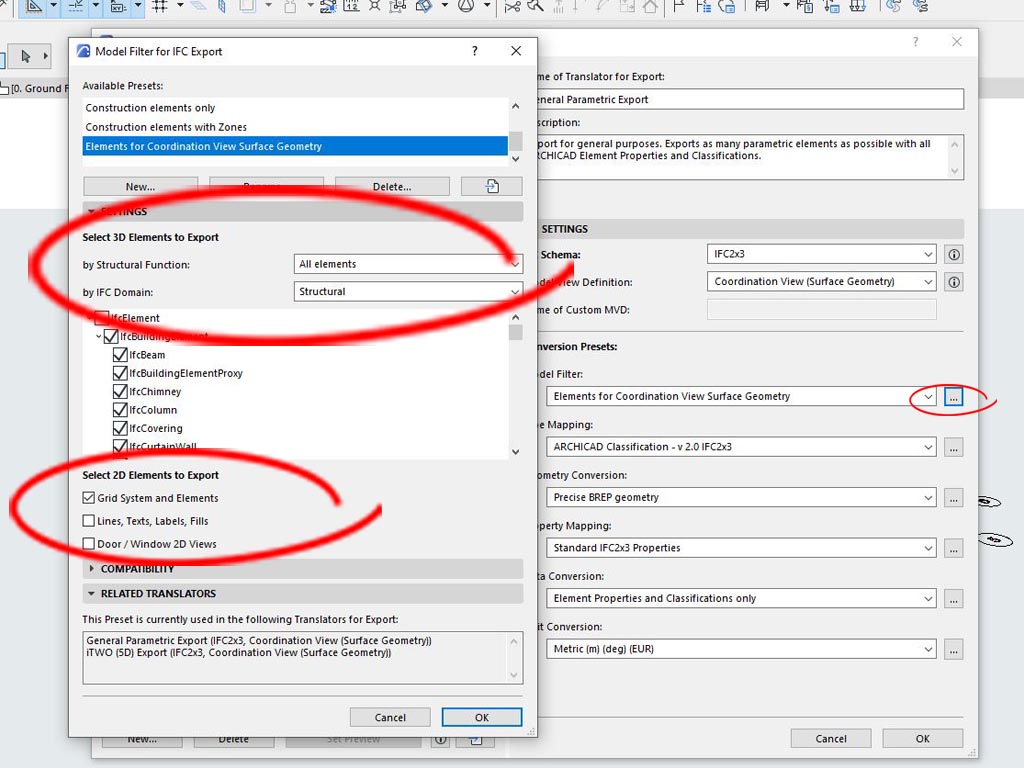
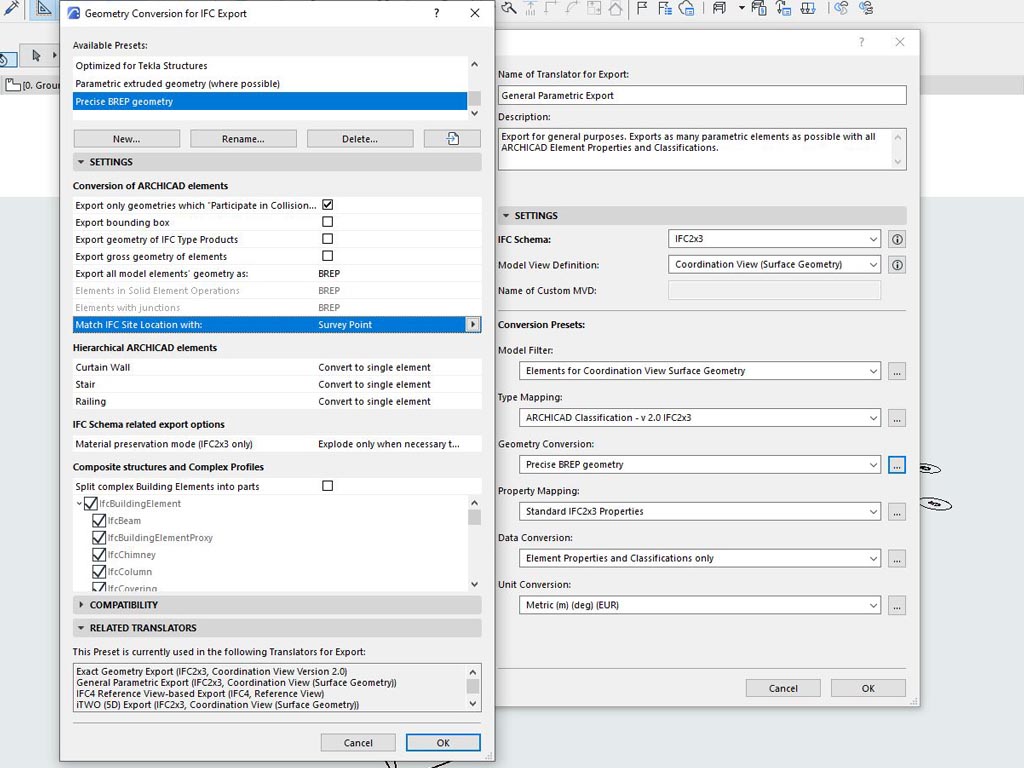
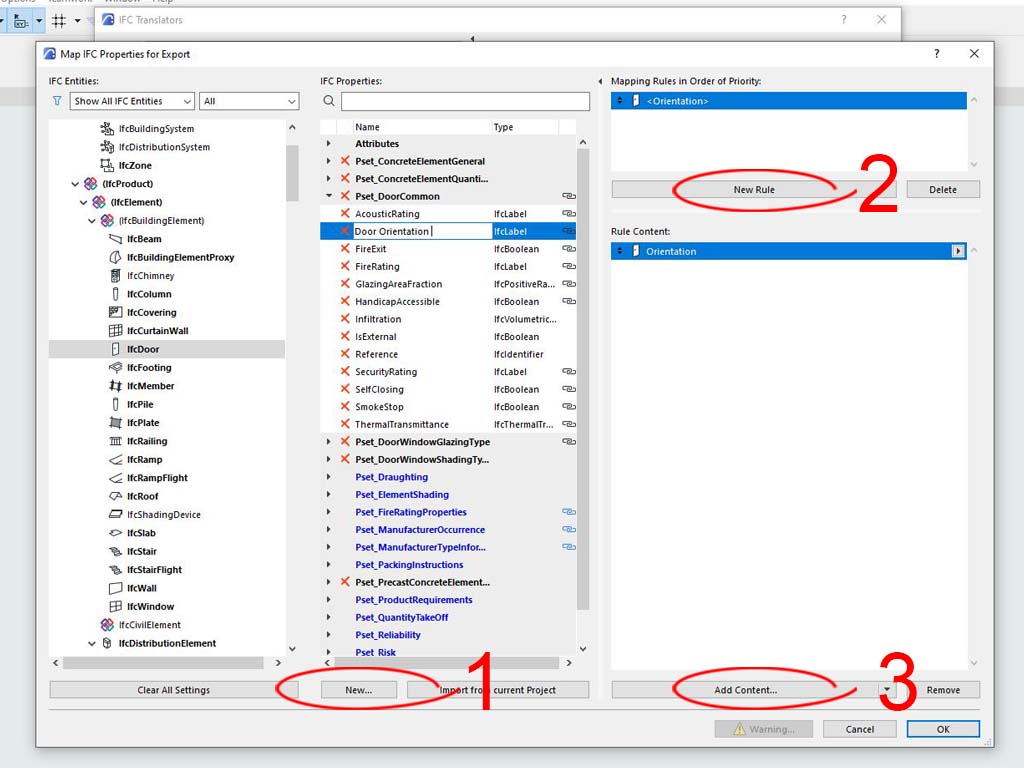
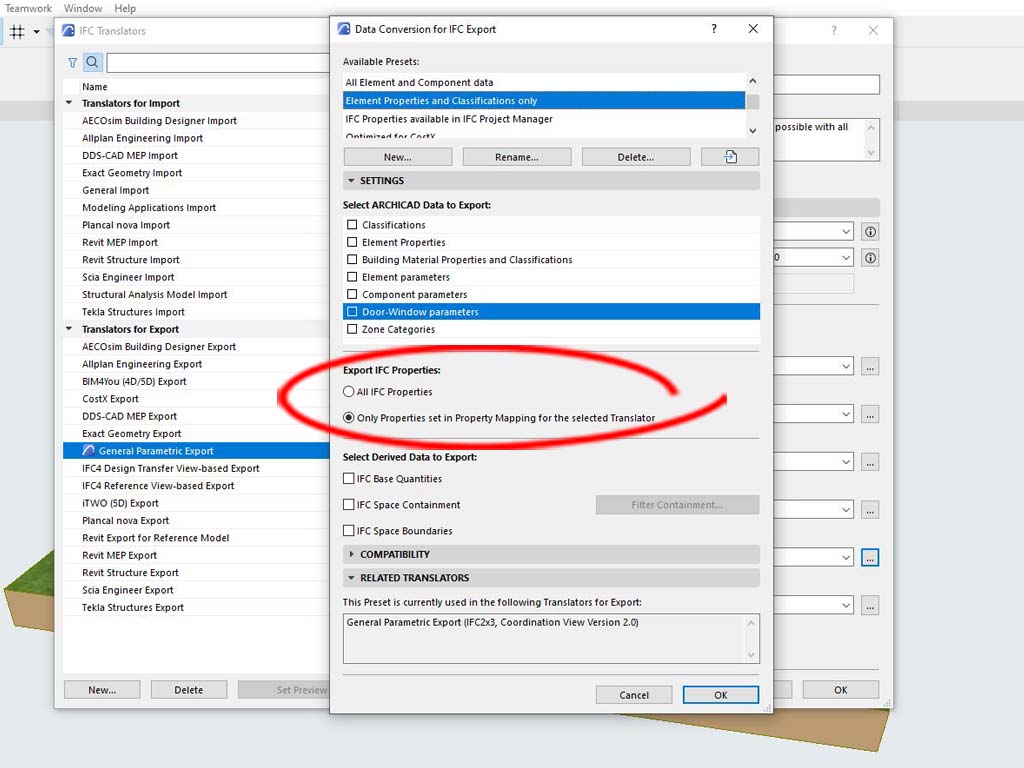
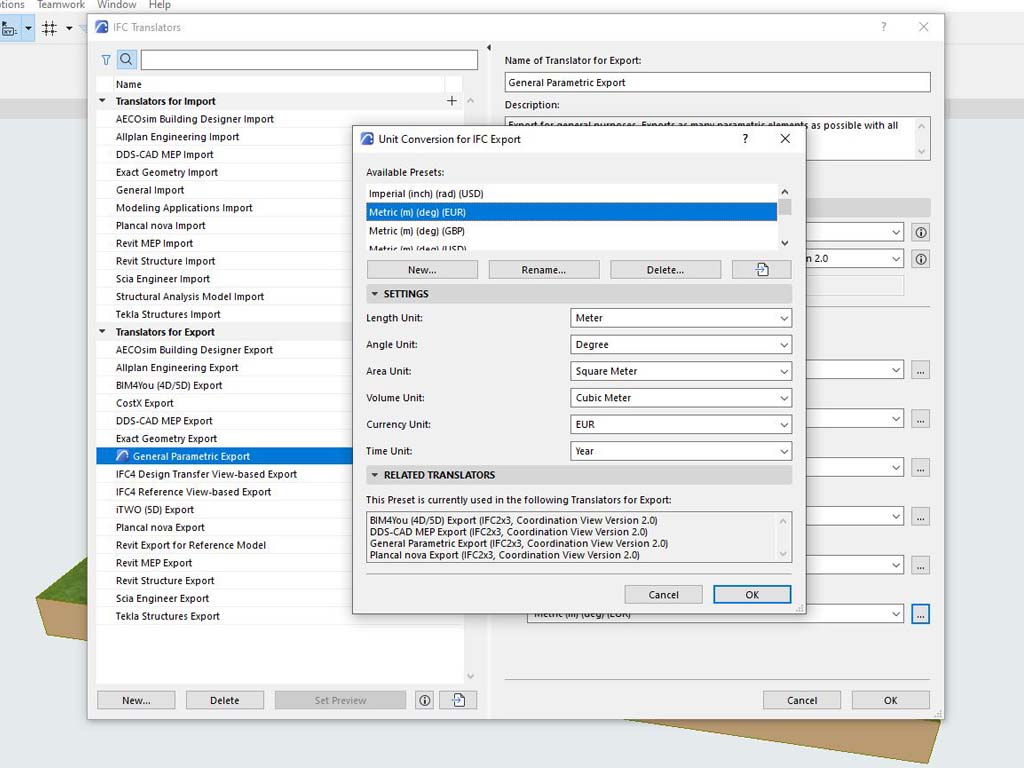
Next, move on to the options of the conversion configuration. Here we have six configurations and each of them is a drop-down bar. We can choose a ready configuration, or by pressing the square icon next to them, edit information according to your needs.
  • Model filtering
Here we can define the scope of the exported elements. It is possible to export all 3D elements, as well as only selected items from preferred categories such as structural or installation elements etc. After entering the configuration edition we can see which IFC elements will be exported. We can also decide if and what 2D elements we want to export.
Model filtering
We choose what 3D and 2D elements we want to export.
  • Type mapping
In this configuration we can check on how all classifications are assigned to the appropriate IFC Type (based on the default ARCHICAD classification). For example, an item classified as Window is mapped as IfcWindow. Here we also have the option to change the mapping method (I was talking about its importance in the beginning of the article.)
Type mapping
We can see that in the default ARCHICAD Classification window is mapped as IfcWindow.
  • Geometry conversion
These options allow us to decide how the geometry of the elements in the project will be exported. As our model will be used for reference purposes, we choose the Precise BREP Geometry option. At this point we also determine the location of the IFC model. Since we have previously established a Survey point we choose the option to match the IFC location with respect to the Survey point. We can also decide whether the complex ARCHICAD elements should be exploded into individual parts or exported as one element.
Geometriy Convertion
We can see that in the default ARCHICAD classification, a widows is mapped as IfcWindow.
  • Properties mapping
This window shows us how IFC attributes and properties are mapped with the corresponding parameters in ARCHICAD. When creating your own Property, you need to create a new mapping rule. For example, we would like to create a new property called Door Orientation for all items exported as ifcDoor. For this purpose, we create a new rule and select the appropriate parameter from ARCHICAD that defines the direction of door opening. Of course the property sets for given elements should comply with the project requirements and BEP. We can delete unnecessary properties and / or create new ones here. If we would like to add a new property for all building elements and not just ifcDoor, we don’t have to do it separately for each element. It is enough to create a new property from the ifcBuildingElement level, thanks to which the given property will be inherited by all subordinate elements.
Properties mapping
(1) - We create a new property Door Orientation; (2) - We create a new mapping rule; (3) - We select the appropriate parameter to be mapped with the new property.
  • Data conversion
From this window we decide what data we want to equip individual elements of the model with. For example, we are able to export all ARCHICAD properties as IFC Properties. To make the IFC file clean we can select the Only Properties set in Property Mapping for the selected Translator option, so that the program does not export properties that have no parameters assigned to them.
Unit conversion
We only export mapped properties.
  • Unit conversion
The last configuration we choose is the Unit Conversion. From this window we can set important project parameters such as project units.

Model export to IFC

Once we have the translator settings configured, all we need to do is press the magic export button. You can simply export an IFC file from a floor plan or a 3D view by going to File> Save As. Then choose the IFC Schema and translator. However, it is better to prepare a new Publisher set. This way we can prepare different views for export (e.g. only structural and load-bearing elements) and have defined translators for these views. Thanks to this, after making changes to the model, all you need to do is click the Publish button and the model/ models will export correctly, automatically saving to the previously selected location.
After exporting we can open the model in one of the many free IFC file viewers.
SOLIBRI
The IFC model opens in the free Solibri Anywhere software.

Summary

Exporting a model from ARCHICAD to IFC is relatively simple.It comes down to selecting the appropriate translator and configuring its settings. However, in order for the model to be useful for the purposes for which it was created, it requires preparation and reflection. It is also important to follow a few rules already at the modeling stage to avoid unnecessary clutter and facilitate the export process. As a summary, I have prepared the graphic below, in which I have included the most important issues that are worth remembering.

Dear Reader, if you have your thoughts or experiences on the subject of exporting to IFC from ARCHICAD, be sure to leave a comment 🙂

Bibliography

  1. https://helpcenter.graphisoft.com/user-guide/77302/
  2. https://helpcenter.graphisoft.com/user-guide-chapter/86920/
Kacper Kłos
Kacper KłosArticle Author
Read More
Licensed architect, graduate of the Gdańsk University of Technology and the BIM Manager Program course organized by GRAPHISOFT. He gained his professional experience working in several Tri-City studios. Currently he runs his own design office, Kłos Studio. BIM technology enthusiast, in particular ARCHICAD software. Founder of the blog akademiaarchicada.pl.

Did you like that post ? Share it with others !

We spend a lot of time and effort creating all of our articles and guides. It would be great if you could take a moment to share this post !

Share:

Comments:

Subscribe
Notify of
guest
0 Comments
Inline Feedbacks
View all comments

Author:

BIM Corner Guest

BIM Corner Guest

Download BIM CASE STUDIES:

After reading this guide you will learn:

  • How BIM is used on the biggest projects in Norway
  • What were the challenges for the design team and how were they solved
  • What were the challenges on the construction site and what was our approach to them

Newest articles: