
Not so long ago, during a discussion about connection database to model, I asked my colleague:
“How do architects manage their data without a database? You’ve worked in an architectural office before, do tell me!”
“That’s the whole point – they don’t manage the data.”
“What? Please explain.”
“You see, the problem is complex. Architects often receive bad quality data. As an early-stage of design is prone to constant changes, so it usually results in lack of time to learn new workflows.”
I cannot help much with data quality and stage characteristics, but I want to help with learning this new workflow. The goal of this article is to help you with reusing the data you already have and automating its flow and exchange.
In the previous articles from the series, we learned How to Present Project Requirements and How to create a Building Program in a database. Now, I will show you how to model using the information provided. I want to present here how to connect departments and rooms since the deviation briefed vs designed is oftentimes the first requirement checked by the building owner.
In the course of this article I will first present both the background and rules, where I answer these questions:
- What data can I retrieve from the database?
- How to set up a connection between a model and the database?
- How to exchange the data between a database and my model?
Afterwards, I will present in practice two workflows using two different tools:
- dRofus software with Revit or ArchiCAD
- Excel spreadsheets with Dynamo and Revit
Database software is free of choice – there are plenty of solutions in the market whose aim to help with BIM processes. The same applies to any pair of modelling + visual programming software. The other workflow is possible for those, who rely only on spreadsheets. What is also usually true for free, self-developed solutions – the set up requires more effort and the automation is not perfect.
Table of Contents
What data can I use? Why?
At this stage, the building project has gone through the requirement specification as well as the planning phase. As a quick reminder, the Building Owner and Planner has specified:
- Aims and needs the building has to meet,
- Functions and departments in the building,
- Room schedule with their requirements,
- Required equipment and its specifications.
This is all the data you can use while modelling your project.
Unfortunately, in many architectural offices nowadays architects begin to draw manually and rewrite all the information from Excel to the model. Why don’t use that spreadsheet as the basis? Isn’t it easier to just pull the rooms out of the “rooms pool”?
When changes come, designers change information manually. Add, remove, resize, change according to new requirements. And then again. And again. Of course, changes are unavoidable at such an early phase. What if you can get a one-click update on how you are doing with the designed vs required area? Or have automatically updated all data that has been changed?
Many architects felt it would be awesome. That’s why they began to use databases connected to models. I am going to show you here, how to set it up in the easiest possible way.
How to set up a database connection to my model?
In order to start designing using a database you need to perform a correct set-up. Before we dive there, just a remark – yes, it is an additional work. But we do it in order to achieve results mentioned in the article: Data-Driven Design Explained In One Guide (scroll to chapter 4).
Here are some of the core concepts.
Creating and maintaining one-to-one relations
To find what relationships within the database are and what kind of relationships there exist, you can read for instance here: What are the different types of relationships in DBMS?
To achieve successes from using the Data-Driven Design process it is crucial to create and maintain one-to-one relationships for all objects in both the database and in the model. What does this mean in practice?
You create a relationship while you establish a Key Attribute to link those two sources together. This implies that one room in a database corresponds to only one specific room in a model. The connection allows you to modify and exchange any other parameter between the model and the database. Or you can combine information from both of the sources into one report or schedule.
Maintaining this connection throughout the whole lifecycle of the project is a harder task. In theory, an object receives an Attribute that is always constant and unique. But objects and rooms are being renamed, copied, deleted, etc. Without maintaining the control you may happen to end up with:
- Objects being connected one-to-many,
- New objects were created either in a database or in a model without a corresponding object in the other source,
- The same object exists in both the model and database but with a different key attribute.
In all the cases you lose the synchronization possibility.
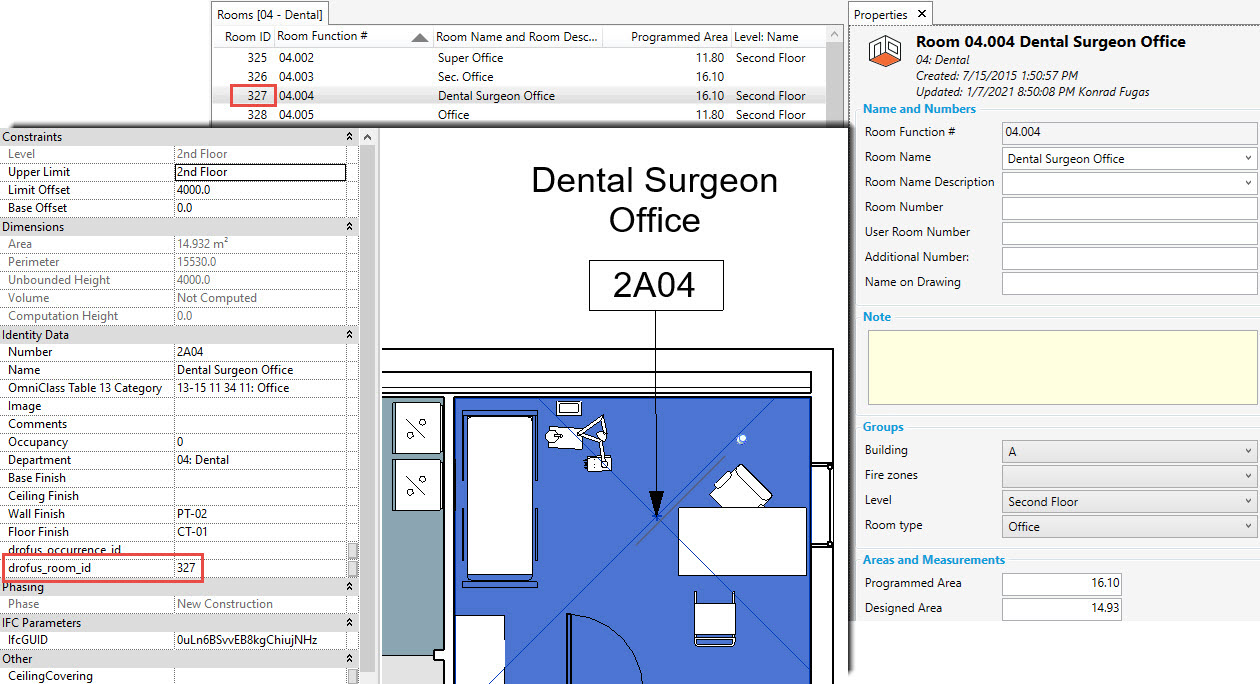
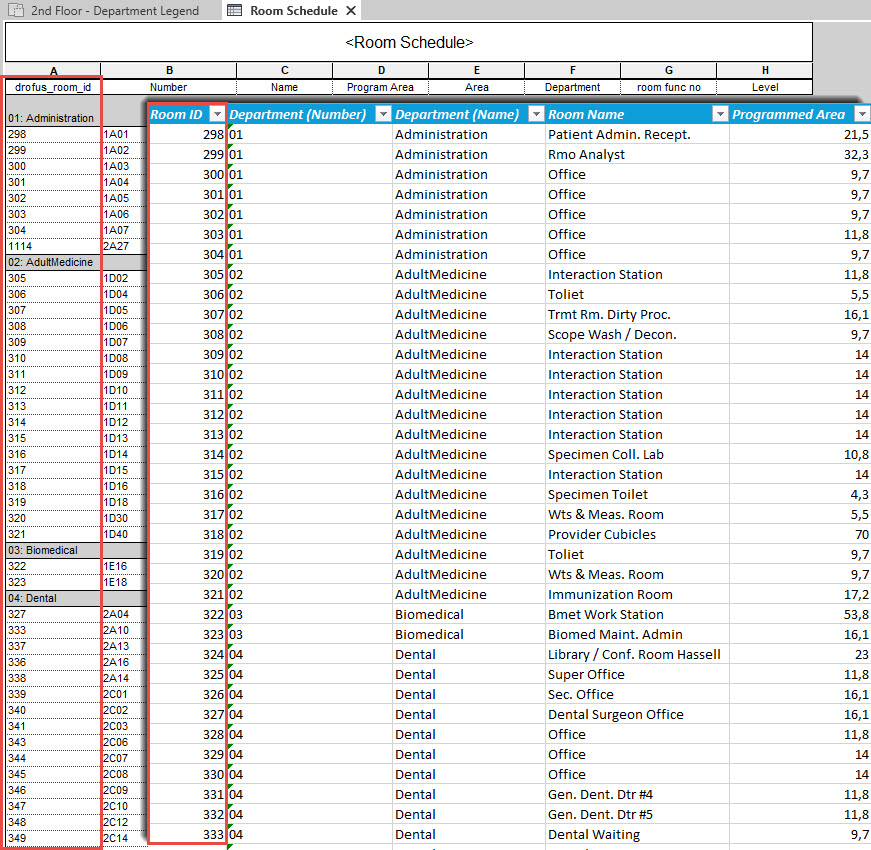
Key Attribute
So what could serve as a Key Attribute used for comparing database and model?
In my opinion, it is best to create an additional parameter called for example Room ID. Since the only task for this parameter is to link objects between a model and a database there is a high possibility that it remains constant and unique throughout the whole project. (That is why I don’t prefer relying on existing parameters such as Room Numbers since they are being changed way too often).
“Wait a moment” – I can hear you say now – “shouldn’t we aim in general to have only necessary parameters? Adding a whole bunch of ID parameters only augments the model!”. And you are right…But only partially 😉
Indeed, I add a few more ID parameters (for rooms, object types and instances) but at the same time, I cut out a lot more parameters connected with object properties. More about this below.
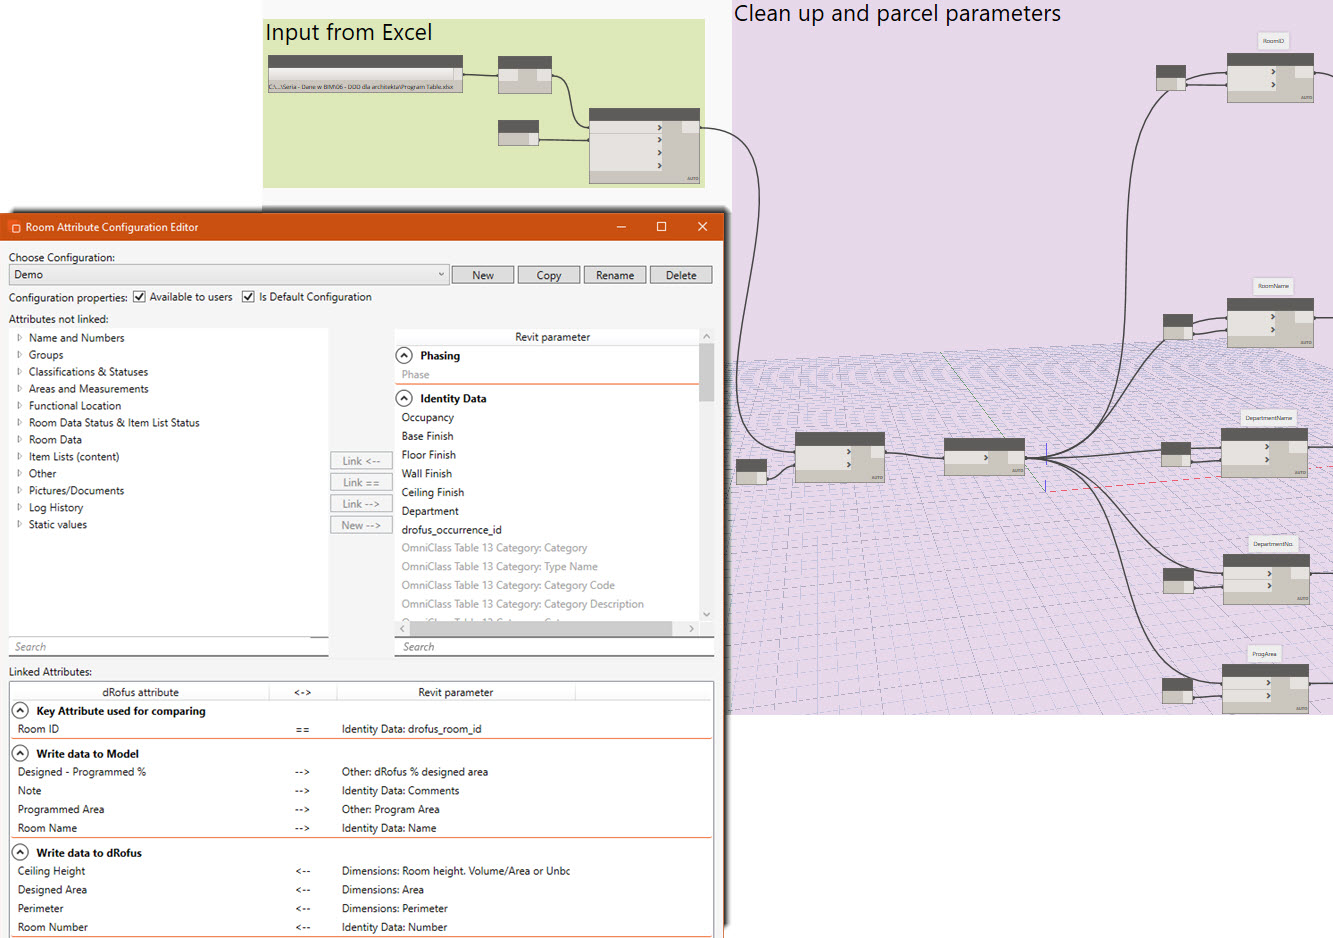
Data mapping
I have discussed that subject in the first entry of that series.
Your main task here is to choose a set of parameters that you would like to exchange between the model and the database. Then you set up a mapping table that serves to transfer parameters during data synchronization. Such a table can be set either inside a software, in Dynamo/Grasshopper or any other Excel import add-on.
By setting up the data flow, you choose parameters that are going to be present both in the database and the model. What type of data should it be? For instance:
- Information that comes from a 3D model: designed area, height, volume, level
- Room names, numbers, object types
- IDs, IFC GUIDs
“Master of data” mapping
Now you are about to choose whether the model or database should hold given data.
In general, you should follow the rule: Graphical data is driven by the model, non-graphical data is driven by the database.
Those are some types of Data-Driven parameters (i.e. we don’t necessarily need them in the model):
- Functional requirements,
- Parameters and statuses for objects (Control Areas, Project Closeout etc.),
- Room Data Sheet and Equipment Lists parameters,
- Object data and requirements (e.g. door hardware).
Here are some parameters that are Model-Driven (come from the model and can be put in the database):
- Graphical parameters: areas, perimeters, height, volume, location,
- Objects, their shape, location, quantities and interdependencies,
- System types (ventilation, electricity, etc.).
Connecting the database to a model - showcase
Now that you have learned the most important rules on how to apply a database to your modelling workflow, let me showcase how this can be set up as a real example in the software.
Using a database solution
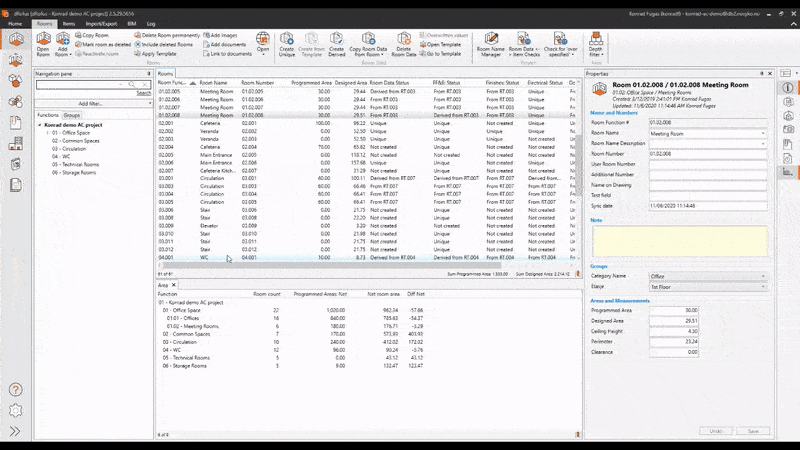
I am beginning with connecting to the existing dRofus database. My rooms are listed and specified there. I begin to draw spaces in ArchiCAD or place rooms in Revit. While doing that I can connect them to the database thanks to the direct add-on. Two-ways data exchange happens after clicking on the synchronise button. I can then check reports for the areas designed vs required and rearrange and redraw specific areas.
Revit
ArchiCAD
Using Excel and visual programming
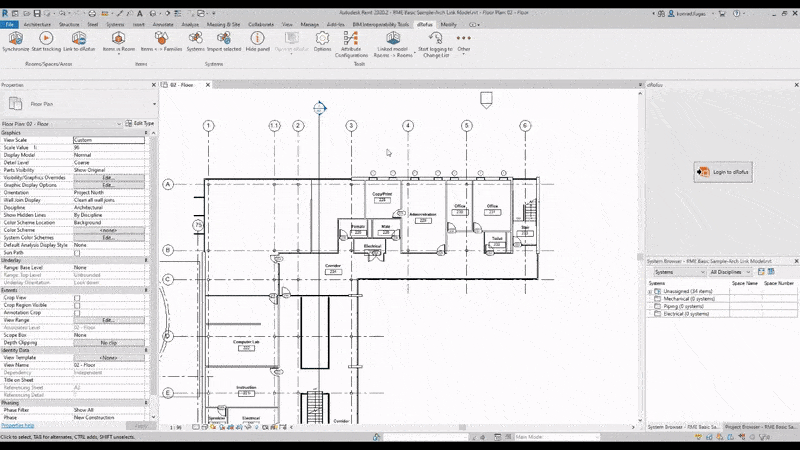
Dynamo and Revit
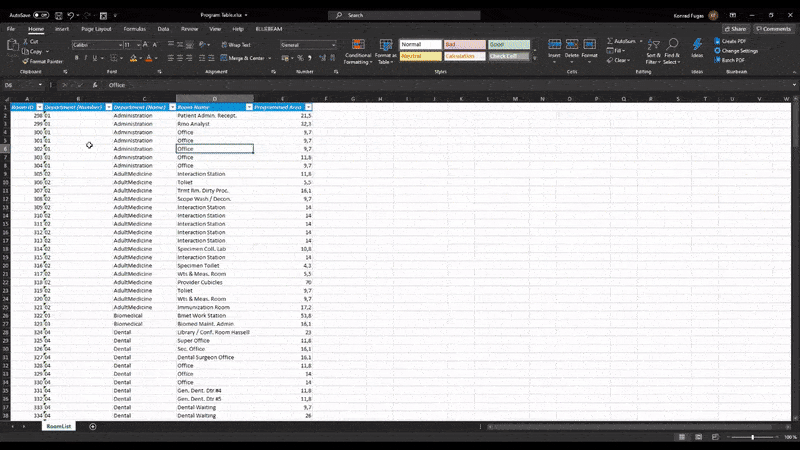
Firstly you need to clean up and order our Program Table that you got from the Building Owner.
By this, I mean to structure each room by row and fill columns with detailed characteristics.
Secondly, set all in Office 365 with version history and share the link between involved stakeholders. And never, ever share a file. Nothing kills collaboration more than multiple versions of the same file. Thanks to version history you can track both changes and who made them.
Then you have to import rooms to Revit as Unplaced Rooms. To perform this I use a Dynamo Script to populate Revit with the data from Program Table (RoomID, Department Name, Department Number, Room Name and Number, Programmed Area, etc.). Then you can place rooms by choosing from the unplaced room list. By adding a Programmed Area parameter to the room tag you can compare the designed area with the requirements on the fly.
With another Dynamo script, you can export data back to Excel.
Summary: How to establish database connection to model?
In this entry, I showed you the advantages of using the database connection to a model. Thanks to that workflow it both provides quality data and automates its exchange. That leads straight to enhanced design and better control over the work.
I hope that this article can make a crack in the wall and help you improve the traditional workflow 🙂
Infographics

The following article is included in the Data-Driven Design series. In case it’s the first post you came across, I encourage you to read the introduction "Data-Driven Design Explained in One Guide". I describe there the series and describe the concept of Data-Driven Design. Have a good read.
Check out the series about Data-Driven Design:
1. PART – Data-Driven Design Explained In One Guide
2. PART – How to present building information in a database?
3. PART – Building Planning – How to Present Project Requirements
4. PART – How to create a Building Program in a database
5. PART – Structured Building Data and It’s Frictionless Flow