

5 steps to learn grasshopper

Five Steps to Learn Grasshopper in Revit

Want to learn Grasshopper in Revit, but not sure where to start? Pick one small task you already understand in Revit. It might be creating a floor, updating model data, or setting up the same drawings again. Then learn the components you need to automate that task.

In this article, I’ll walk you through five practical workflows from our workshop with Junghwo Park. We start with geometry and finish with drawing documentation. Each step gives you something concrete to try in your own test model.

Table of Contents

Before we start, register for the free five-step Revit automation workshop. Registered participants receive the workshop recordings, Grasshopper files, and presentation, so you can follow the examples and practise afterwards.

5 step grasshopper in revit

First get Rhino Inside Revit running

Rhino is the modelling environment. Grasshopper is its visual programming tool, where you connect components instead of writing every instruction as code. Rhino.Inside.Revit brings both into Revit and adds components that can read, create, and modify Revit content.

You need Revit, a working Rhino installation, and Rhino.Inside.Revit. Check the official installation guide for compatible versions. Open a small Revit model, start Rhino.Inside from the ribbon, and open Grasshopper.

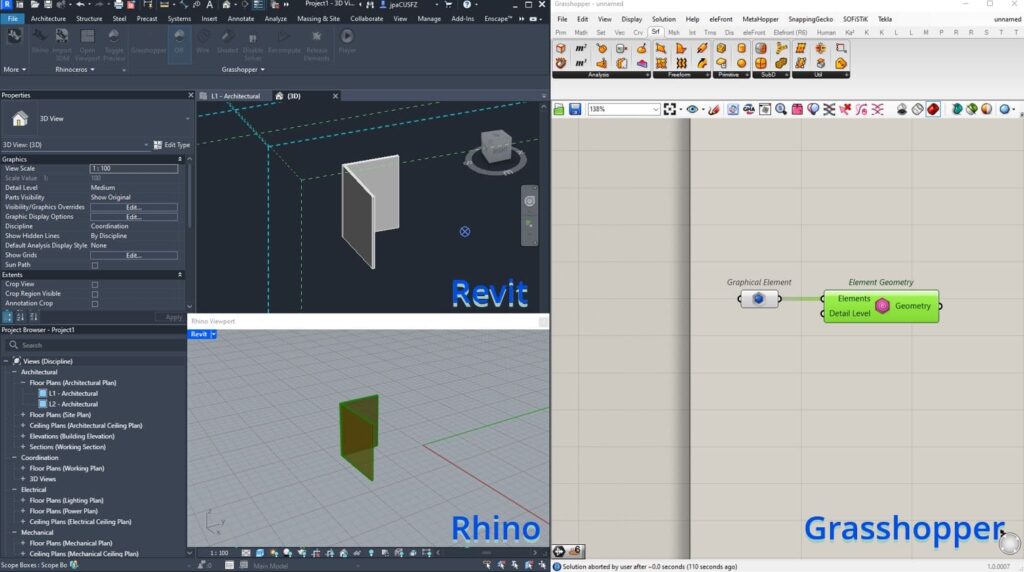
Before creating anything, try reading one wall. Reference it with Graphical Element and connect it to Element Geometry. You can inspect that wall’s geometry in Grasshopper. This is a simple way to check that the connection works.

Revit walls referenced through Graphical Element and Element Geometry in Grasshopper
Revit walls referenced through Graphical Element and Element Geometry in Grasshopper. Source: Notion guide, What is Rhino Inside Revit.

New to components, wires, or sliders? Keep our Grasshopper basics guide nearby. You can learn those ideas while working through the examples below.

Step 1 Bring geometry into Revit with DirectShapes

Let’s get something visible into Revit first.

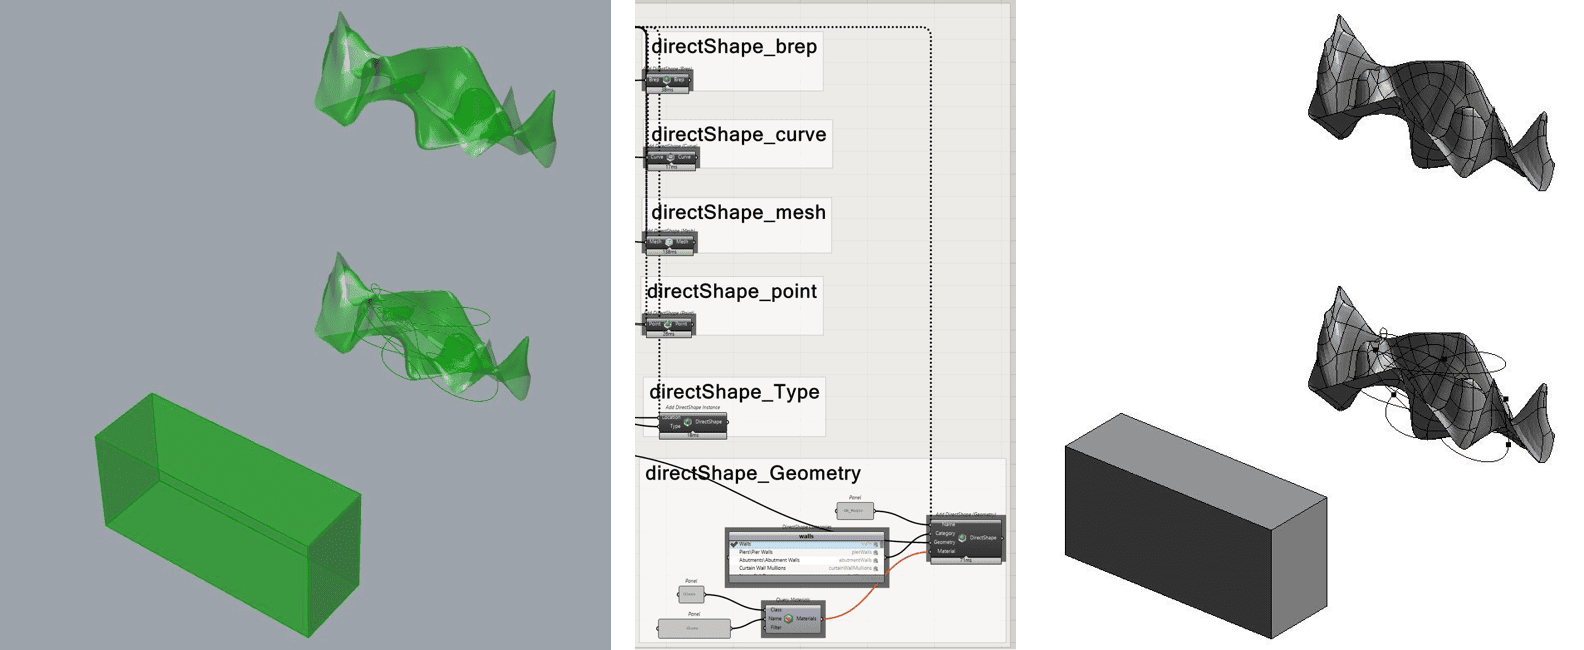
The first example in the presentation takes geometry from Grasshopper and creates Revit DirectShape elements. This is useful when you want to explore a form without building a detailed Revit family straight away.

The example includes converting mesh geometry into Breps before creating the DirectShapes. A Brep describes a shape through its boundary surfaces. That conversion belongs to this example, though. DirectShape also supports meshes, so you do not need to convert every mesh into a Brep.

Start with a simple shape, connect it to the appropriate DirectShape component, and check the result in Revit. Then change one input in Grasshopper and see what happens. Check its size and position too. A familiar dimension is a better check than guessing from the viewport.

Freeform geometry and Rhino Inside Revit DirectShape components
Freeform geometry and Rhino Inside Revit DirectShape components from the workshop. Source: Workshop presentation.

A DirectShape is a real Revit element, but it does not behave like a fully parametric loadable family. You cannot edit its geometry with the same family controls. McNeel’s DirectShape guide explains the differences.

For this first step, focus on understanding the connection between your Grasshopper inputs and the result in Revit. Once that makes sense, move to elements with more familiar BIM behaviour.

Step 2 Create native Revit elements with the Maison Dom Ino example

Getting a shape into the model is useful. Now let’s create floors, columns, and other elements that Revit recognises by their actual role.

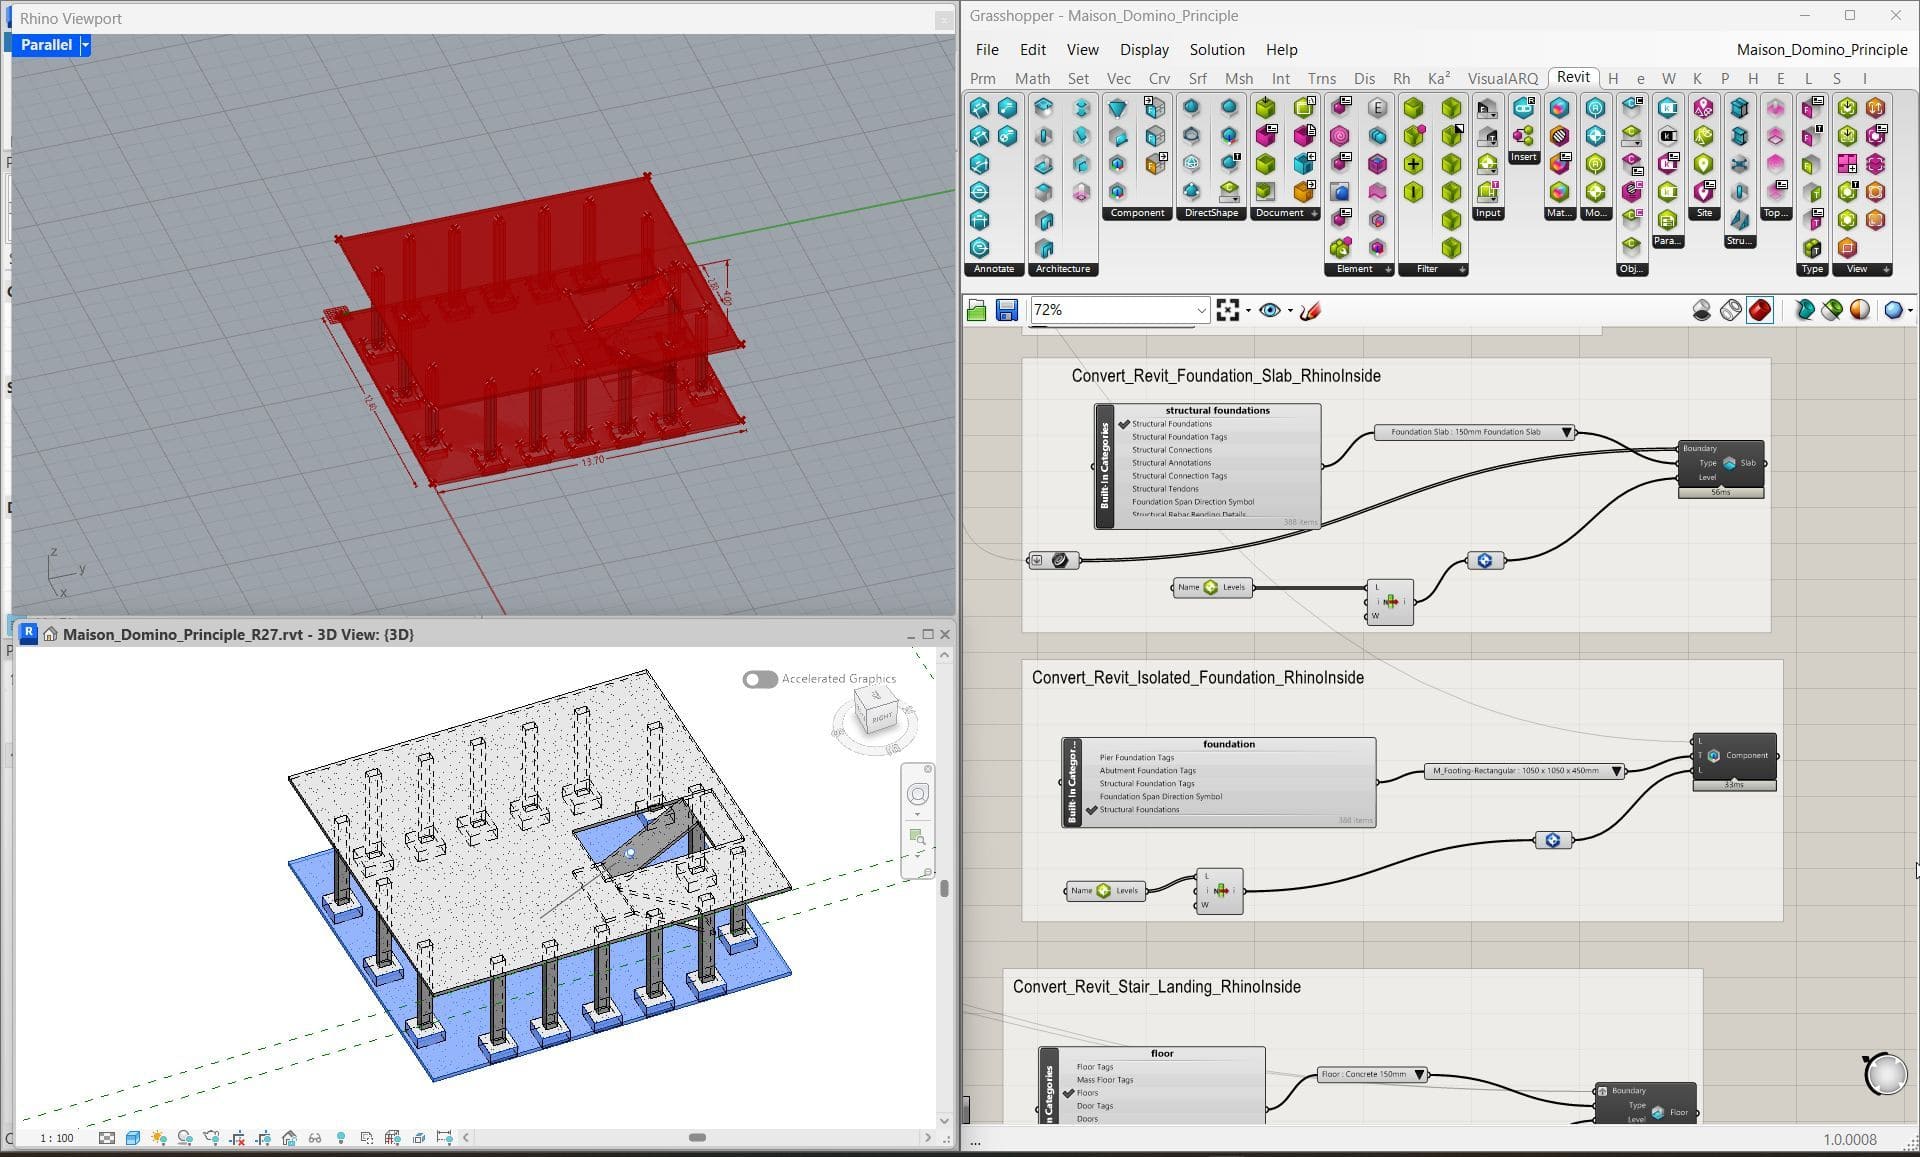
The presentation uses Le Corbusier’s Maison Dom-Ino principle as a parametric exercise. Grasshopper defines the geometry and repetition, while Rhino.Inside.Revit creates native Revit elements such as levels, columns, floors, and stairs.

You do not need to rebuild the complete example on your first attempt. Start with one level and one floor. Identify the inputs that define its boundary, floor type, and level. Then inspect the created floor in Revit before adding more elements.

Maison Dom Ino model in Rhino and Revit beside Grasshopper element creation components. Source: Workshop presentation.

Another useful exercise is creating a shaped floor. Extract a mesh boundary, join the boundary curves, project them to the XY plane, and use Add Floor to create the floor. Then use Host Shape with the original mesh vertices to shape it.

This teaches an important habit: separate the geometry from the Revit information needed to create the element. A boundary alone does not tell Revit which floor type or level you want.

Try changing one spacing or height input in the Maison Dom-Ino definition. Check the resulting elements in Revit and inspect their properties. The goal is to understand how the model was built, so you can adapt the logic to your own work.

Step 3 Bulk edit Revit parameters from structured data

Grasshopper in Revit is useful for much more than geometry. Updating model data is a practical place to use it, especially when you keep entering similar values by hand.

The third example connects Revit parameters to structured external data, such as an Excel spreadsheet, and updates multiple elements through the definition.

Before writing values, make sure you have selected the right elements. You can reference a small set manually or use a category and a query. A category picker defines a category; the query actually collects the matching elements.

Then inspect the existing parameter values and compare them with the proposed updates. Check that the data type fits. A text value, a length, and a number are different things, even when they look similar in a spreadsheet.

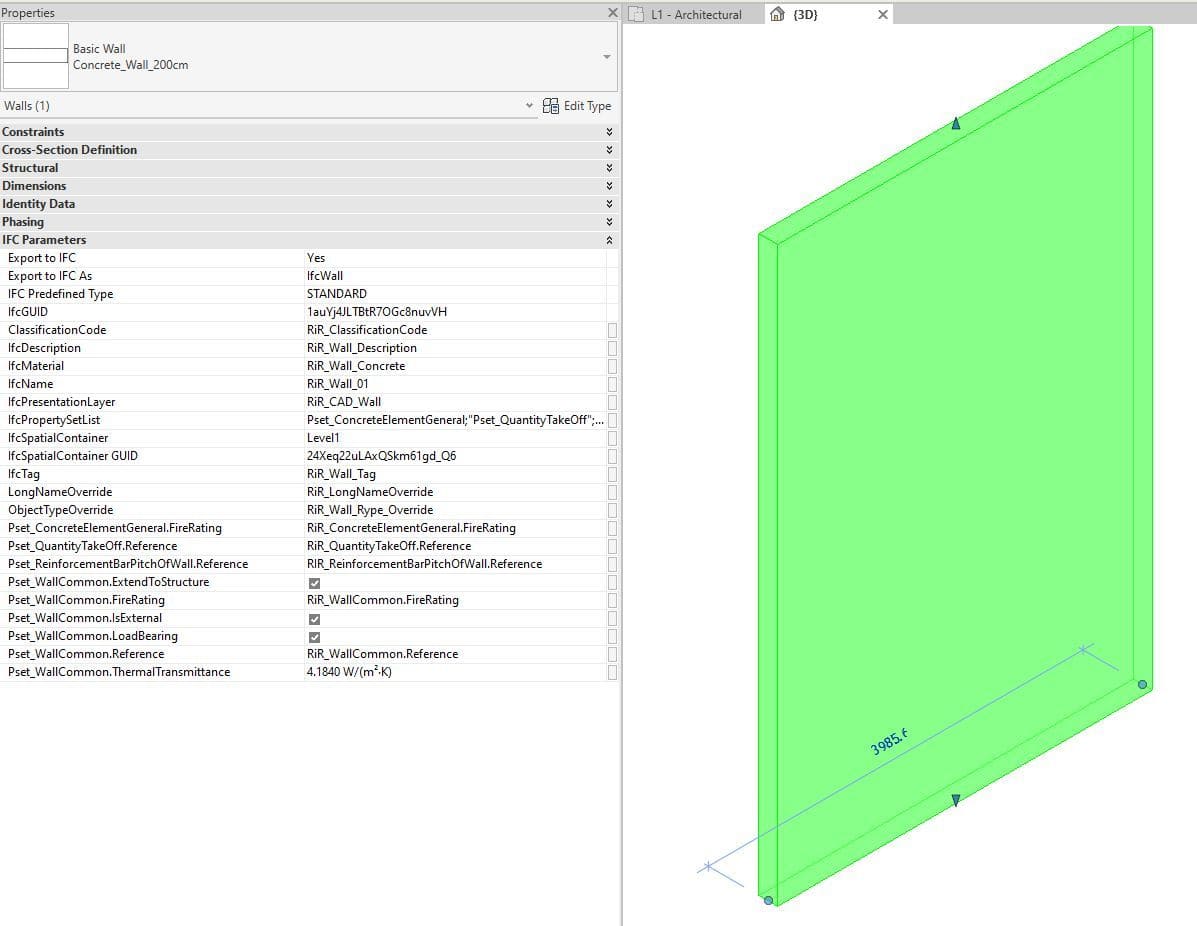
Selected Revit element and its Properties palette in the parameter editing example.
Selected Revit element and its Properties palette in the parameter editing example. Source: Workshop presentation.

My suggestion is to test a handful of elements first. Use an explicit identifier to match each spreadsheet row to its intended element, rather than assuming that two lists happen to have the same order. Check for missing matches and empty values before increasing the selection.

After the update, read the values back and check them in a Revit schedule. Automation repeats your mapping very efficiently, so it is worth checking that mapping carefully!

Step 4 Inspect family parameters before changing them

Bulk updates answer the question, “How can I change many values?” This step answers another one: “Which value should I actually change?”

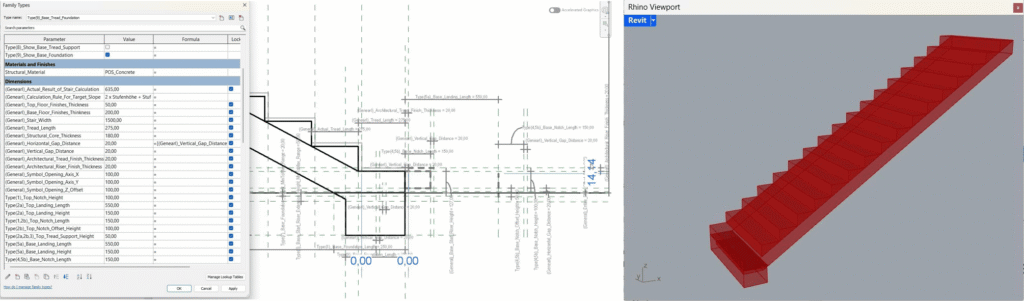
The presentation uses a custom precast concrete stair family. The definition inspects its parameters and targets the ones that control the details we want to modify.

Start by selecting one stair and reading its available parameters. Find the parameter you need, check its current value, and understand what it controls before connecting a new input.

Precast stair family parameters and section beside its three dimensional geometry
Precast stair family parameters and section beside its three dimensional geometry. Source: Workshop presentation.

Pay attention to the difference between instance and type parameters. An instance parameter belongs to an individual placement. A type parameter is shared by instances of that type, so editing it can affect other stairs too. Built-in versus custom is a separate distinction from type versus instance.

Also check whether the value is writable. Some parameters are calculated or controlled by the family’s formulas. Grasshopper still has to work within those Revit rules.

Change one intended parameter and inspect the stair in both a model view and a section. Did the expected detail change? Did the family remain valid? Once you understand that behaviour, you can think about applying the same logic to a larger selection.

Step 5 Automate Revit views and sheets

Once you can create elements and manage their data, the next step is documentation.

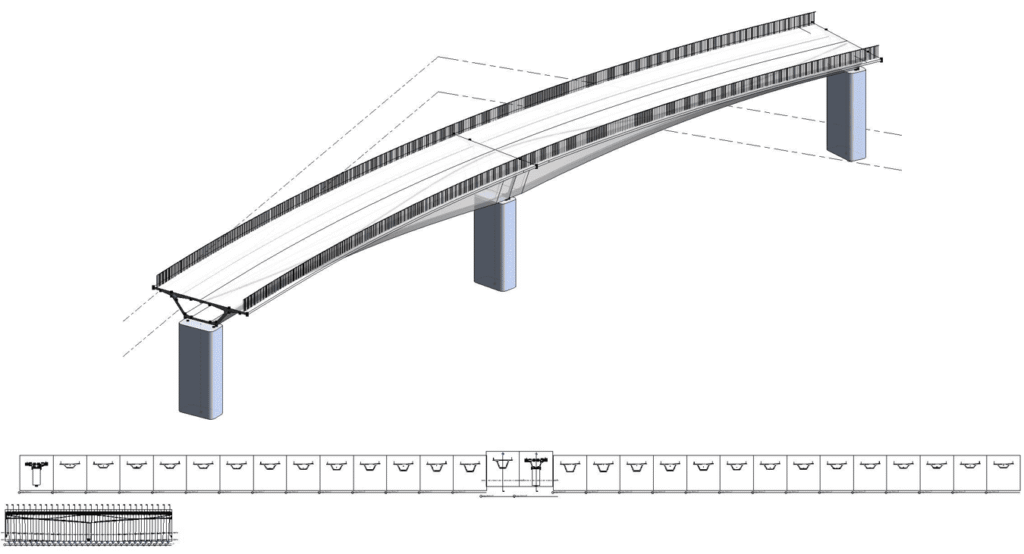
The final workflow in the presentation automates views and sheets. It covers tasks such as creating views, applying view templates, naming sheets, and placing views. The bridge example shows how repeated documentation can be organised through Grasshopper.

Bridge model with a strip of repeated cross section drawing views from the workshop.
Bridge model with a strip of repeated cross section drawing views from the workshop. Source: Workshop presentation.

Begin with one view and one sheet. Decide which view you need, which template it should use, which title block belongs on the sheet, and where the viewport should go. Make those choices explicit in the definition.

Check the result in Revit before generating a whole set. Is the crop correct? Is the scale useful? Does the view fit within the title block? Are the sheet number and name right?

You can then expand the workflow using a consistent list of names, numbers, and positions. McNeel’s views guide and sheets guide are useful references while building this part.

Keep the first version easy to read. Group the components, label the inputs, and explain the naming rules. That makes the definition much easier to reuse when you return to it, or when a colleague needs to run it.

Keep learning with one useful Revit task

You do not have to master all five workflows at once. Choose the one closest to something you do every week. Open the example, follow the data through the components, and change one input at a time.

If you want to follow Junghwo’s examples, register for the free workshop and its learning materials. You can also explore our five resources for learning Grasshopper in Revit when you are ready for more practice.

Want a structured path beyond these first examples? Have a look at our full Grasshopper in Revit Training and join the waitlist for updates about the next opportunity to join.

Join the Grasshopper in Revit Training waitlist.

Did you like that post ? Share it with others !

We spend a lot of time and effort creating all of our articles and guides. It would be great if you could take a moment to share this post !

Share:

Comments:

Subscribe
Notify of
guest
0 Comments
Oldest
Newest

Author:

Download BIM CASE STUDIES:

After reading this guide you will learn:

  • How BIM is used on the biggest projects in Norway
  • What were the challenges for the design team and how were they solved
  • What were the challenges on the construction site and what was our approach to them

Newest articles: